Have you ever had the need to add a notice in the WordPress dashboard? Admin notices are an integral part of plugins/themes. They are needed to inform users of errors that may have occurred or simply send out a notification for an action performed.
In this article we’ll take a look at how to add admin notices along with how to make the notices dismissible.
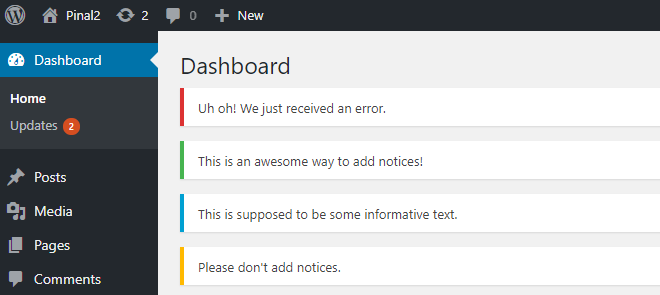
An admin notice is basically a div tag with a white background, some text and different colored left border containing some kind of information for the users. The four different types are red, green, orange and blue. Given the class names, the red ones are used to display errors, green for success messages, orange for warnings and blue for informative notices.

Each notice is essentially a div with a notice class along with one other class indicating the type of notice. The <div> content is usually simple text echoed in <p> tags.
The HTML for the notices in the above screenshot is as below:
As mentioned above, each of these notices uses a different class.
- Error notice:
notice-errorclass - Success notice:
notice-successclass - Informative notice:
notice-infoclass - Warning notice:
notice-warningclass
Adding notices on a page
Adding notices on the WordPress admin pages can simply be achieved by using the admin_notices hook. Assume you wish to display an error notice on the admin pages.

The function my_error_notice is attached to the admin_notices hook.
In a scenario where you wish to show more than one notice, it is advisable to write separate functions for each notice.

Not only does the code become more manageable, but it also becomes easier to hook in & modify/add/remove the notice as needed.
Adding conditional notices
Generally, we would like to add a notice as an outcome of some specific action. For e.g. an error message if things went wrong or a success message for an update completed successfully and so on.
As you can see here, the add_action hook is inside an IF condition. So, the notice will be displayed only if the condition is met.
Adding dismissible notices
WordPress has the ability to add dismissible notices. These can be added by using the is-dismissible class.

However, WordPress doesn’t remember that a notice has been dismissed, so it is up to us to remember that and make sure it doesn’t reappear after having been dismissed. This can be achieved by following the below:
- Add a conditional dismissible notice. When the notice is dismissed we will update an option record
my_dismiss_noticeand set it totrue. - Run an AJAX call when the dismissal button is clicked.
- The AJAX call will update the option record to
true, thereby ensuring the notice does not reappear.
Step 1: Add the conditional notice
Check the data in the my_dismiss_notice record. If it’s not true, then we can display the notice.
Notice the my-dismiss-notice class in the notice div. This has been added to ensure that we latch onto the dismissal button of only our notice and not some other dismissible notice being displayed.
Step 2: Detect the click
Before we start with the JS code, we need to include the JS file. I’m assuming a simple plugin folder structure where the /js folder houses the JS files.
Each of the functions used in the code do the below:
wp_register_script(): This function is used to register a script which can be enqueued on a page later.wp_localize_script(): This function helps you localize strings and pass strings and variables as needed to the script registered above. A script should be localized before being enqueued.wp_enqueue_script(): This function enqueues the scriptnotice-updatewhich has been registered above.
In the JS file, we need to write a click event bound to the my-dismiss-notice class.
Step 3: Update the option record
Update the my_dismiss_notice option record and set it to true. This will ensure that the notice is not displayed after being dismissed once.
That’s it. Once the notice has been dismissed, it will not be displayed. In case if you wish to display the notice every time the plugin is deactivated & then activated again, please make sure you set the option record in the database to false when the plugin is deactivated.
Admin notices are a great way of keeping the site administrator in loop of the happenings of the plugin/theme. Dismissible notices do need a bit of work to make sure they stay dismissed and do not keep reappearing. However, eventually it is a great way to keep the end user informed.
In case if you have a great custom way to create notices or have used the default methods to your benefit, please do let me know in the comments below!


We want plugin to quickbook