Table of Contents
Orders are created in WooCommerce when a customer completes their checkout process. WooCommerce orders have different statuses which lets you know the current position of the order, whether it is complete or its payment is pending, etc.
WooCommerce has a few pre-defined order statuses which help us to set order status (move the order from one stage to another in the processing cycle). Let’s have a look at them.
Pre-Defined Order Statuses in WooCommerce
1. Pending Payment:
The WooCommerce order status is set to “pending payment” when the order is placed but the payment is not made. This normally occurs when ‘Cash on Delivery’ is selected as the payment option.
2. Processing:
The WooCommerce order status is set to “processing” when the order is placed and payment has been made and the stock is also reduced. All orders go through processing except ‘Downloadable’. The downloadable items are made available once the payment has been made by the customer.
3. Completed:
Once the order is placed, payment has been made and the order is delivered to the customer, the WooCommerce order status will be marked as completed. The order requires no further action.
4. On-Hold:
Here, the WooCommerce order status is set to “on-hold” when the order is placed and payment is awaited. The stock is reduced once the order is set on on-hold. The admin needs to confirm the payment. Generally, if the order is of digital & downloadable products, the status is set to on-hold. Once the payment is made, the digital products are sent to the customer and the order is marked as completed.
5. Cancelled:
The order status is set to cancelled if the customer or admin cancels the order. The stock is not reduced here.
6. Refunded:
The payment has been refunded to the customer by the admin if the order was cancelled.
7. Failed:
The order status is set to “failed” if the payment process failed during the checkout or the payment was declined.
Creating a Custom Order Status in WooCommerce
Now that we have looked at the available order statuses, let’s create a new custom order status. It’s possible that you want to create a new order status that doesn’t belong to any of the current order statuses. That’s a very common business requirement of WooCommerce store owners.
Order statuses are stored in the post_status column in wp_posts table. So, we first need to register a post status using register_post_status method available in WordPress.
For example, our Deposits for WooCommerce plugin has a custom order status of Scheduled. The scheduled orders are created when the user selects a payment plan and the remaining deposit amount is to be paid through subsequent orders. These orders have the order status of Scheduled.
Let’s create an order status called ‘Scheduled‘, which will be stored in the databases as ‘wc-scheduled‘ post status.
In the above example, we register a new post status using register_post_status(). The function takes two parameters – $post_status and $args. $post_status is the name of the new status that should be stored in database whereas $args parameter is an array which has following properties –
- label: A name for the post status
- public: Whether posts of this status should be shown in the front end of the site
- exclude_from_search: Whether to exclude posts of this status from the search results.
- show_in_admin_all_list: To include posts in the edit listing of their post type
- show_in_admin_status_list: Show in the list of statutes with their post counts.

Need a flexible way to manage your order status?
Custom Order Status Pro for WooCommerce helps you create & manage custom order statuses within the WooCommerce order status dashboard and organize the order better using the custom icons and labels to efficiently increase the workflow.
Apart from organizing the orders, you can send notifications to customers and admins when the order status changes.
Now we need to add this post status in the array of the order statuses. We can do this by using the WooCommerce filter – wc_order_statuses. This function takes one parameter – $order_statuses. We add our new post status in the array and return the new array.
function ts_register_scheduled_order_status() {
   register_post_status( 'wc-scheduled', array(
       'label'                     => 'Scheduled',
       'public'                    => true,
       'show_in_admin_status_list' => true,
       'show_in_admin_all_list'    => true,
       'exclude_from_search'       => false,
       'label_count'               => _n_noop( 'Scheduled <span class="count">(%s)</span>', 'Scheduled <span class="count">(%s)</span>' )
   ) );
}
add_action( 'init', 'ts_register_scheduled_order_status' );

function ts_add_scheduled_order_statuses( $order_statuses ) {
   $new_order_statuses = array();
   foreach ( $order_statuses as $key => $status ) {
       $new_order_statuses[ $key ] = $status;
       if ( 'wc-processing' === $key ) {
           $new_order_statuses['wc-scheduled'] = 'Scheduled';
       }
   }
   return $new_order_statuses;
}
add_filter( 'wc_order_statuses', 'ts_add_scheduled_order_statuses' );
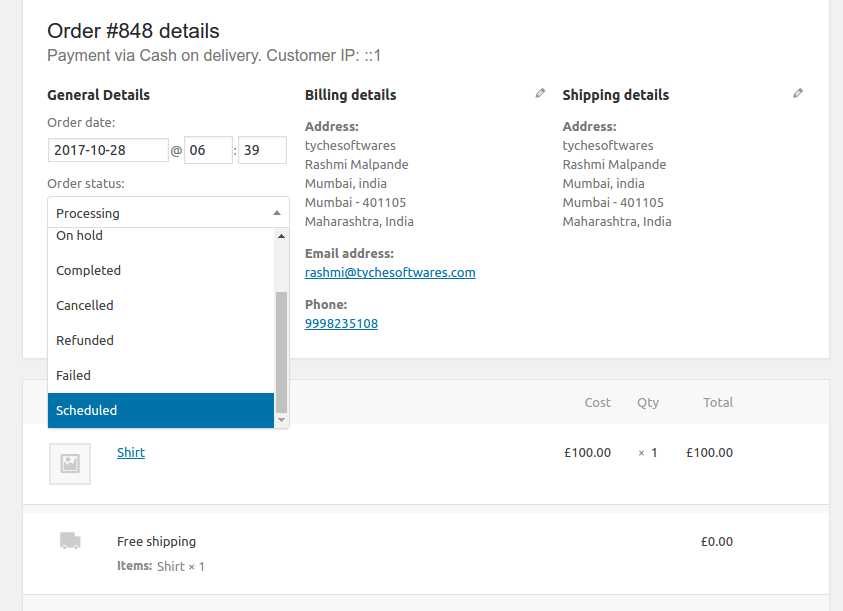
The order status will now show up on the edit order page –

As we have set the show_in_admin_status_list property to true, it will also show up in the list of filters on the WooCommerce Orders page if you have any order with order status of wc-scheduled.

And if you look in the wp_posts table, you can see the post status of the order is saved as ‘wc-scheduled‘.

As you can see, it is quite easy to create a custom order status in WooCommerce. Common examples of custom order status will be – scheduled, shipped, awaiting shipment, etc. whatever you set, you can easily use the WooCommerce order status manager to rename it. I hope you find this useful and always eager to hear back from you.


The code works great, thank you. But under the new created order status (for us it’s “proforma”) the order is ” This order is no longer editable.”
Would you know how to keep the order editable under the new custom status? Thanks