Offering free shipping on selected products is one strategy to increase sales for those products & grab customer attention. The good part is, that you don’t need to be a coding wizard or invest in pricey plugins to make it happen. With the set up of WooCommerce shipping classes, you can effortlessly set up free shipping for your chosen products.
This post helps you to assign free shipping to a single product in WooCommerce.
Preliminary Steps
1. Create a shipping class for a product.
2. Set shipping costs for the shipping class.
3. Assign the shipping class to the selected product.
Solution: Assign Free Shipping to a Single Product in WooCommerce
Let’s walk through the process of assigning free shipping to a single product with example use cases.
Step 1 – Create a Shipping Class for a Product
In your WordPress dashboard, navigate to WooCommerce → Settings → Shipping → Shipping Classes, and then click on “Add Shipping Class”. You can name it “Free Shipping” or choose any other name that suits your preference.
Use Case: Imagine you have a Kitchen Product such as “Hamilton Beach 1 Liter Compact Glass Kettle” in your online store, and you want to offer free shipping exclusively for this item. You can create a shipping class called ‘Free Kitchen Shipping’ to achieve this.
Step 2 – Set Shipping Costs for the Shipping Class
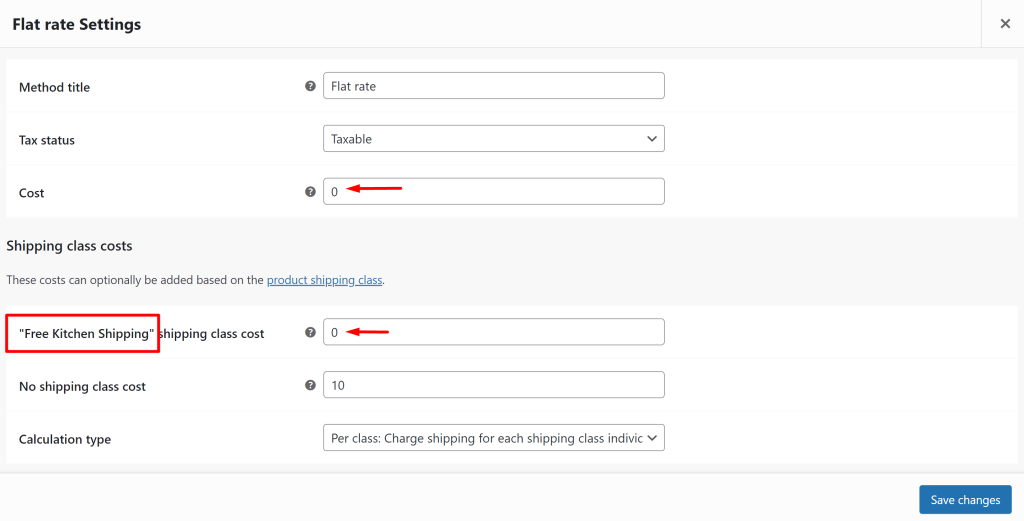
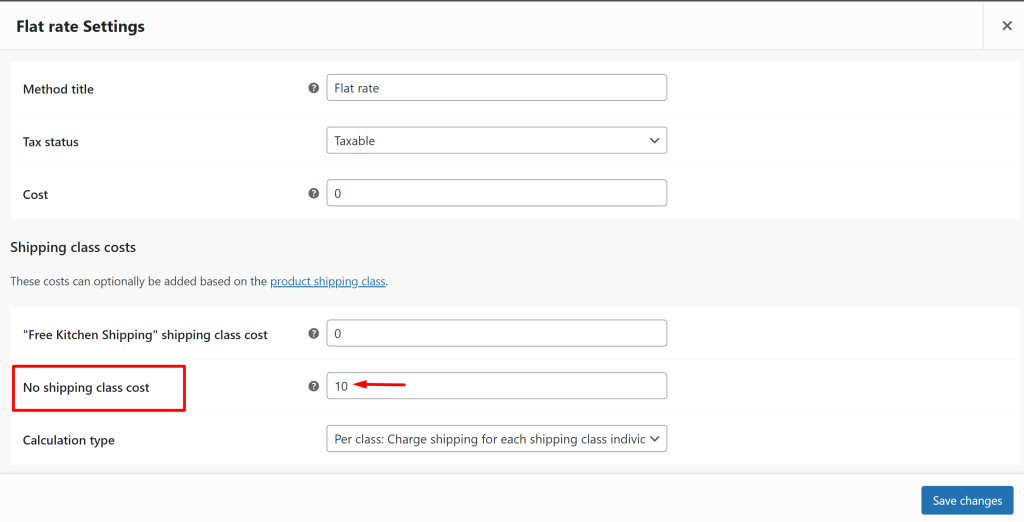
Navigate to WooCommerce→ Settings→ Shipping → Shipping Zones. Ensure that within each shipping zone, you have at least one Flat Rate configured. When editing each Flat Rate, make sure to:
- Set the cost to $0.
- For your custom shipping class, ensure the cost is $0.
- For products without a shipping class (“No shipping class”), set the cost to its appropriate value for other products. I have set it to $10
- Choose the “Charge per class” option.
Use Case: Set the cost of the created shipping class “Free Kitchen Shipping” to $0 (free shipping).

Step 3 – Assign the Shipping Class to Relevant Products
To enable free shipping for a specific product, choose & edit the product from the Edit Product page -> Product Data → Shipping → Shipping Class. Assign the custom shipping class to the product, and then update the product. Afterward, if you return to the WooCommerce admin page at WooCommerce→ Settings → Shipping → Shipping Classes, you should notice a “1” displayed under the “Product Count” column.

Use Case: Assigning the “Hamilton Beach 1 Liter Compact Glass Kettle” product to the ‘Free Kitchen Shipping’ class ensures that this product receives free shipping.

Output 1
What happens at checkout? When a customer adds the “Hamilton Beach 1 Liter Compact Glass Kettle” product to their cart, they see that no shipping fee is assigned to this product.
Output 2
However, if they add any other product (e.g. ‘Electronic Product’) to the cart, they are charged the ‘No shipping class cost’ of $10, as per the configuration.

| Recommended Reading: How to change the WooCommerce Shipping “Via” text for a Specific Shipping method? |
Conclusion
By following the above steps, you can strategically offer free shipping on selected products. You can assign the weight and dimensions of products too to calculate shipping costs dynamically. For example, you can offer different shipping rates for small, lightweight items versus large, heavy ones.
Let us know your feedback or any other queries in the comment section.


