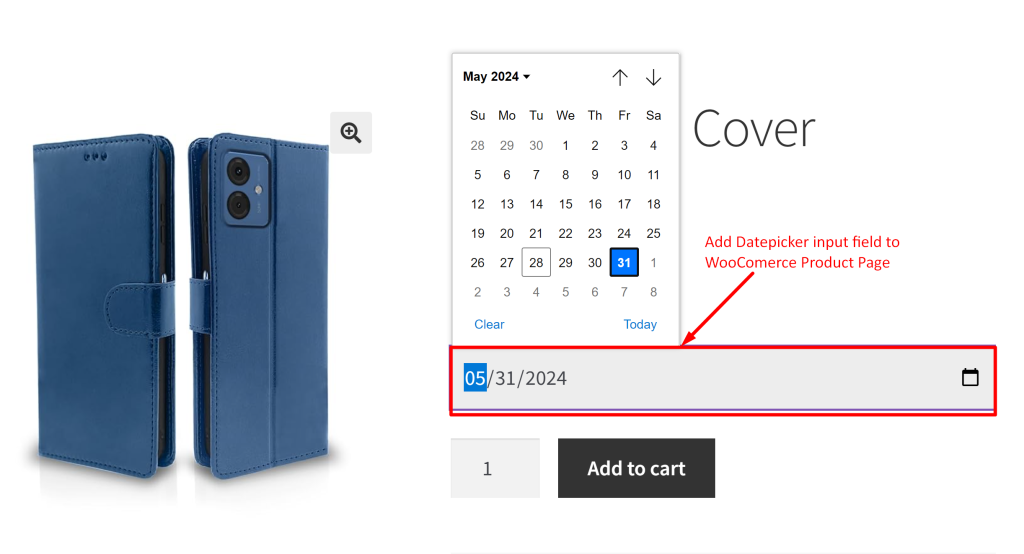
Ever thought about when a date picker becomes super important, especially on your product page? Well, for stores with booking services or events, it’s a big deal. Say your store sells services or event tickets for specific dates. With a date picker on the product page, customers can easily choose the date they want to book or attend.
Now, let’s look at how this datepicker input field helps customers when they’re ordering stuff.
Solution: Customize the WooCommerce Product Page with a Datepicker Input Field
This code snippet adds a custom date picker field to WooCommerce product pages, allowing customers to select a specific date related to their order.
add_action( 'woocommerce_before_add_to_cart_button', 'ts_display_custom_date_picker', 9 );
function ts_display_custom_date_picker() {
    echo '<div class="custom-date-picker">';
    woocommerce_form_field( 'custom_date', array(
        'type'         => 'date',
        'required'     => false, // Change to true if field is required
        'label'        => 'Custom Date',
        'placeholder'  => 'Select custom date...',
        'class'        => array('custom-date-picker-class'), // Add custom CSS class if needed
        'autocomplete' => 'off', // Disable browser autocomplete
    ));
    echo '</div>';
}

// Add custom date to cart item data for all products
add_filter( 'woocommerce_add_cart_item_data', 'ts_add_custom_date_to_cart', 10, 2 );
function ts_add_custom_date_to_cart( $cart_item_data, $product_id ) {
    if ( isset( $_POST['custom_date'] ) ) {
        $cart_item_data['custom_date'] = sanitize_text_field( $_POST['custom_date'] );
    }
    return $cart_item_data;
}

// Display custom date in cart and checkout
add_filter( 'woocommerce_get_item_data', 'ts_display_custom_date_in_cart', 10, 2 );
function ts_display_custom_date_in_cart( $cart_data, $cart_item ) {
    if ( isset( $cart_item['custom_date'] ) ) {
        $cart_data[] = array(
            'name'  => 'Custom Date',
            'value' => sanitize_text_field( $cart_item['custom_date'] ),
        );
    }
    return $cart_data;
}

// Save the custom date field value to the order items
add_action( 'woocommerce_checkout_create_order_line_item', 'ts_save_custom_date_to_order_items', 10, 4 );
function ts_save_custom_date_to_order_items( $item, $cart_item_key, $values, $order ) {
    if ( isset( $values['custom_date'] ) ) {
        $item->add_meta_data( 'Custom Date', $values['custom_date'], true );
    }
}

// Display custom date in admin order items table
add_filter( 'woocommerce_order_item_name', 'ts_display_custom_date_in_admin_order_items_table', 10, 2 );
function ts_display_custom_date_in_admin_order_items_table( $item_name, $item ) {
    // Check if the item has custom date associated with it
    if ( $custom_date = $item->get_meta( 'Custom Date' ) ) {
        // Append the custom date to the item name
        $item_name .= '<br><small>' . esc_html__( 'Custom Date:', 'your-textdomain' ) . ' ' . esc_html( $custom_date ) . '</small>';
    }
    return $item_name;
}
Output
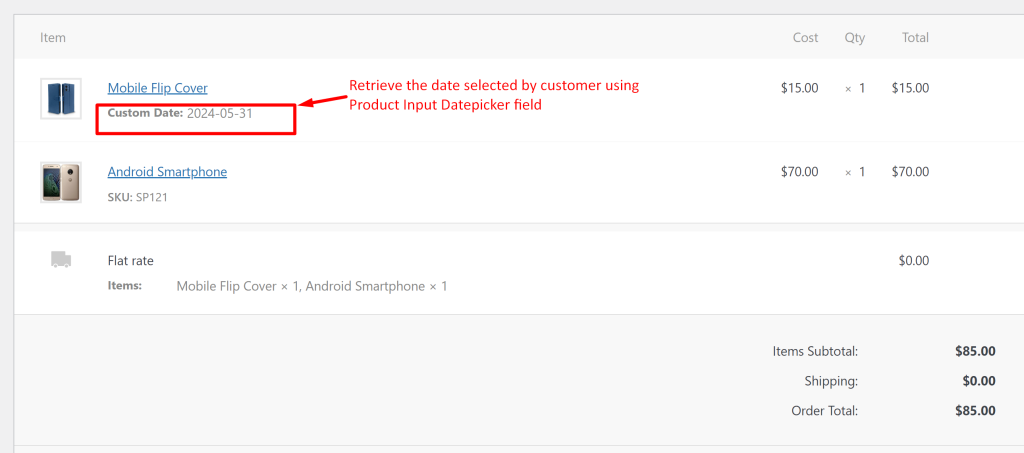
When a customer visits the product page, the code displays a custom date picker field above the add-to-cart button. Customers can select a specific date for booking to attend an event or for a service to be sceduled. This information is then stored and displayed throughout the checkout process and in the admin order items table.

The customer entered date will be saved and shown in the admin order details page inside the items table.

Disable Past Dates in Datepicker Displayed on WooCommerce Product Page
Previously, we explored how to add a date picker field into the WooCommerce product page, enhancing the booking experience of customers. On top of this WooCommerce customization, let’s turn our attention to a common requirement that admins would be looking for, particularly in the WooCommerce Events Calendar.
In this post, we will provide a solution that will disable past dates and only show the available dates from the current date.
Solution: Disable Past Dates in Datepicker Displayed on WooCommerce Product Page
We’ve made a small improvement to the initial part of the code from our previous code snippet so that it will now disable dates in the past. All other aspects of functionality remain unchanged from the original implementation.
Thus this part of the code snippet will set the available dates of the date picker input field from today’s date and disables all the past dates. This prevents users from selecting any date earlier than the current day.
// Display custom date picker field on product page
add_action( 'woocommerce_before_add_to_cart_button', 'ts_display_custom_date_picker', 9 );
function ts_display_custom_date_picker() {
    ?>
    <div class="custom-date-picker">
        <?php
        woocommerce_form_field( 'custom_date', array(
            'type'         => 'date',
            'required'     => false, // Change to true if field is required
            'label'        => 'Custom Date',
            'placeholder'  => 'Select custom date...',
            'class'        => array('custom-date-picker-class'), // Add custom CSS class if needed
            'autocomplete' => 'off', // Disable browser autocomplete
        ));
        ?>
    </div>
    <script type="text/javascript">
        document.addEventListener('DOMContentLoaded', function() {
            var today = new Date().toISOString().split('T')[0];
            document.querySelector('input[name="custom_date"]').setAttribute('min', today);
        });
    </script>
    <?php
}
Output
When a customer visits the product page on July 10, 2024, and clicks on the date picker input field, they will observe that past dates before July 10 are disabled. This means only dates from July 10 onwards are selectable.
Just like with the date picker, adding a time picker on product page can greatly enhance the functionality of your WooCommerce store, especially for businesses that offer time-specific services or deliveries. Imagine a scenario where customers can select their preferred time for a service appointment or delivery – this customization makes their shopping experience as convenient as possible.


Hi, thank you for the feature. Do you know how to disable past dates ?
Hi Pierre,
The post has been updated as per your requirement. Please refer to the code snippet below the heading ‘Solution: Disable Past Dates in Datepicker Displayed on WooCommerce Product Page’.
Thank you, actually I found a solution before seeing your message, I added this :
'custom_attributes' => array(
    'min' => date('d-m-Y'), // Set minimum date to today
)
It works great.
I have another question that I haven’t found the solution yet though, the datepicker element is only clickable on the little icon on the left (to show the calendar), is there a way to make the entire input clickable ?
Hi Pierre,
To make the entire date input field clickable and show the datepicker, add the following javascript code right after the closing </div> tag that contains the date input field.
echo '<script> document.addEventListener("DOMContentLoaded", function() { var datePickerInput = document.querySelector(".custom-date-picker input[type=date]"); datePickerInput.addEventListener("click", function() { this.showPicker(); }); }); </script>';Thank you very much.