In WooCommerce, radio buttons are typically used to present product variations such as size, color, or materials. However, with this WooCommerce customization, we can use radio buttons to offer extra features with an additional fee. This is great for store owners as it encourages customers to spend more by offering personalized options. Let’s walk through the steps to understand this functionality in detail!
Solution: Add Radio Buttons to WooCommerce Product Page
The code will add radio buttons on the WooCommerce product page and each buttons are associated with additional charges. Also, the code will dynamically change the product price based on the selected options.
// Display Radio Buttons on Product Page
add_action('woocommerce_before_add_to_cart_button', 'ts_product_radio_choice');

function ts_product_radio_choice() {
    $chosen = WC()->session->get('radio_chosen');
    $chosen = empty($chosen) ? 'add_text' : $chosen;

    $args = array(
        'type' => 'radio',
        'class' => array('form-row-wide'),
        'options' => array(
            'add_text' => 'Add a Text ($5)',
            'add_logo' => 'Add a Logo ($10)',
        ),
        'default' => $chosen
    );

    echo '<div id="product-radio">';
    echo '<h3>Customize Your Order!</h3>';
    woocommerce_form_field('radio_choice', $args, $chosen);
    echo '</div>';
}

// Capture selected radio option on the product page and send it to the server
add_action('wp_footer', 'ts_capture_selected_radio_option');

function ts_capture_selected_radio_option() {
    if (is_product()) {
        ?>
        <script type="text/javascript">
            jQuery(document).ready(function($) {
                $('input[name=radio_choice]').change(function() {
                    var selectedOption = $(this).val();
                    $.ajax({
                        type: 'POST',
                        url: '<?php echo admin_url('admin-ajax.php'); ?>',
                        data: {
                            'action': 'ts_set_ajax_data',
                            'radio': selectedOption,
                        },
                        success: function(response) {
                            // Optional: You can handle any response from the server here
                        }
                    });
                });
            });
        </script>
        <?php
    }
}

// Set selected radio option in session
add_action('wp_ajax_ts_set_ajax_data', 'ts_set_selected_radio_option');
add_action('wp_ajax_nopriv_ts_set_ajax_data', 'ts_set_selected_radio_option');

function ts_set_selected_radio_option() {
    if (isset($_POST['radio'])) {
        $radio = sanitize_key($_POST['radio']);
        WC()->session->set('radio_chosen', $radio);
        echo json_encode($radio);
    }
    wp_die(); // Always use wp_die() at the end of AJAX functions to avoid "0" response
}

// Add selected radio option to cart item meta
add_action('woocommerce_add_cart_item_data', 'ts_add_radio_option_to_cart_item_data', 10, 3);

function ts_add_radio_option_to_cart_item_data($cart_item_data, $product_id, $variation_id) {
    $radio_choice = WC()->session->get('radio_chosen');
    if ($radio_choice) {
        $cart_item_data['radio_choice'] = $radio_choice;
    }
    return $cart_item_data;
}

// Adjust the cart item price based on the selected radio option
add_action('woocommerce_before_calculate_totals', 'ts_adjust_cart_item_price', 20, 1);

function ts_adjust_cart_item_price($cart) {
    if (is_admin() && !defined('DOING_AJAX')) return;

    foreach ($cart->get_cart() as $cart_item) {
        if (isset($cart_item['radio_choice'])) {
            $radio_choice = $cart_item['radio_choice'];
            $product = $cart_item['data'];

            $original_price = $product->get_regular_price();
            $additional_price = 0;

            if ("add_text" == $radio_choice) {
                $additional_price = 5;
            } elseif ("add_logo" == $radio_choice) {
                $additional_price = 10;
            }

            $new_price = $original_price + $additional_price;
            $product->set_price($new_price);
        }
    }
}
Output
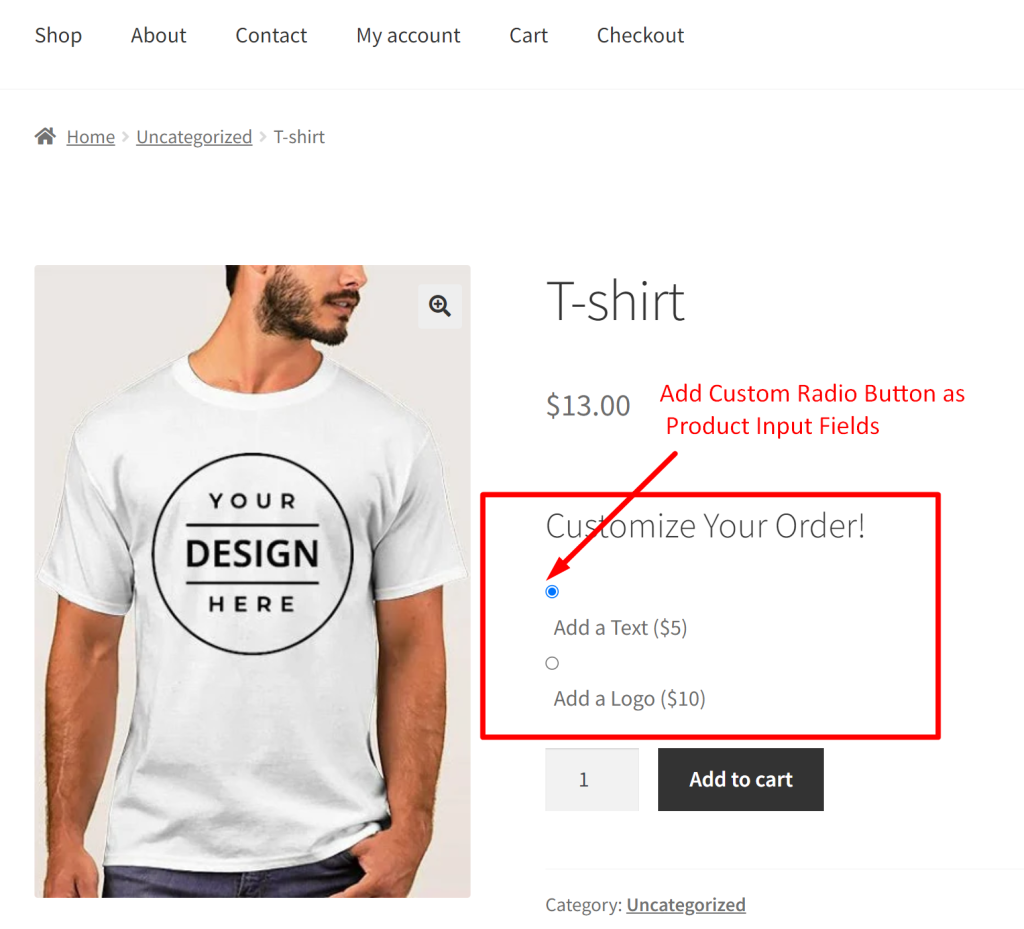
When customers visit the product page, they will see radio buttons labeled “Add a Text ($5)” and “Add a Logo ($10)” below the “Customize Your Order!” heading. As customers make their selections, the product price dynamically adjusts to reflect the cost of the chosen customization. For example, selecting “Add a Text” will add $5 to the product price, while selecting “Add a Logo” will add $10.

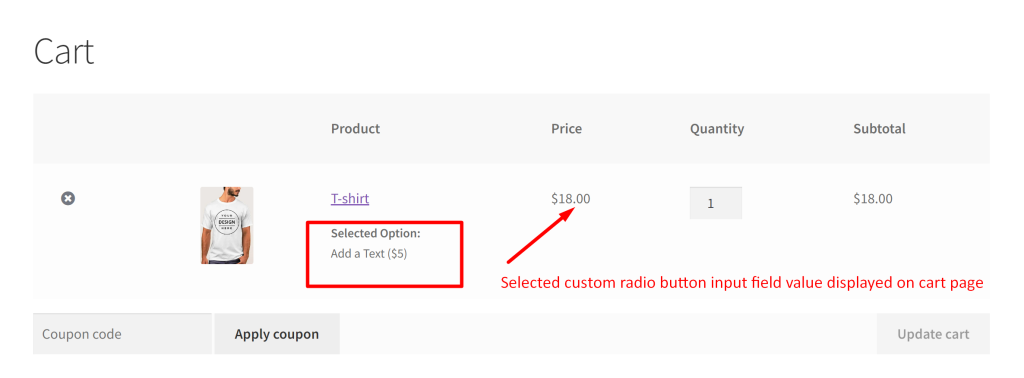
Once the customer adds the product to their cart and proceeds to the cart page, the product price will be adjusted according to the selected option. This adjustment is then reflected on the checkout page as well.
If customer has opted for ‘Add aText($5)’ the product price gets changed from the original price of $13 to $18 as shownn in the image below.

This feature lets customers see price changes based on their radio button selections. Similarly, adding dynamic prices based on custom quantity input field can encourage bulk purchases and boost sales. These strategies make your product page more attractive and cater to your customers’ needs and preferences.


