The introduction of the Gutenberg editor in WordPress has contributed towards reshaping the identity of WordPress to a large extent. From being a core content management system with features to add media and optionally, plugins for various needs, it’s now additionally a rich, media-centric WYSIWYG editor and web-page builder, with no compromise to the flexibility it always offered. In fact, the blocks that Gutenberg provides increase the flexibility to build pages in the way you want to.
The best advantage that Gutenberg offers over the previous editor (also called as the TinyMCE editor) is that it eliminates the need of knowing how to code, or the need of understanding WordPress structure to know how to add more functionality to your WordPress website or WooCommerce store. If, however, you are more comfortable with the old WordPress editor, you can always install this free plugin known as the Classic Editor by WordPress contributors which gives you an option to disable Gutenberg completely, or switch back and forth between the old editor and Gutenberg. Gutenberg also offers a Classic Editor block for users to use the classic editor functionalities within Gutenberg! Sounds too good to be true? Let’s dive into this post or rather a guide to using Gutenberg blocks for your WooCommerce store!
Gutenberg blocks can be accessed via any WordPress page. When you add a new page or edit an existing page inside WordPress, you can see a “+” symbol as you hover on the top left content area on the screen.
There are different kinds of blocks that Gutenberg provides for different uses:
While the blocks can be used to build a variety of pages, as a WooCommerce administrator or store manager, you would want to focus on the Home or Shop page the most. Hence, for the purpose of this tutorial, let’s create a home page for your store that is designed to boost your sales! We will be using WooCommerce blocks the most for this. These blocks were earlier part of a feature plugin by Automattic and were merged into WooCommerce version 3.5.
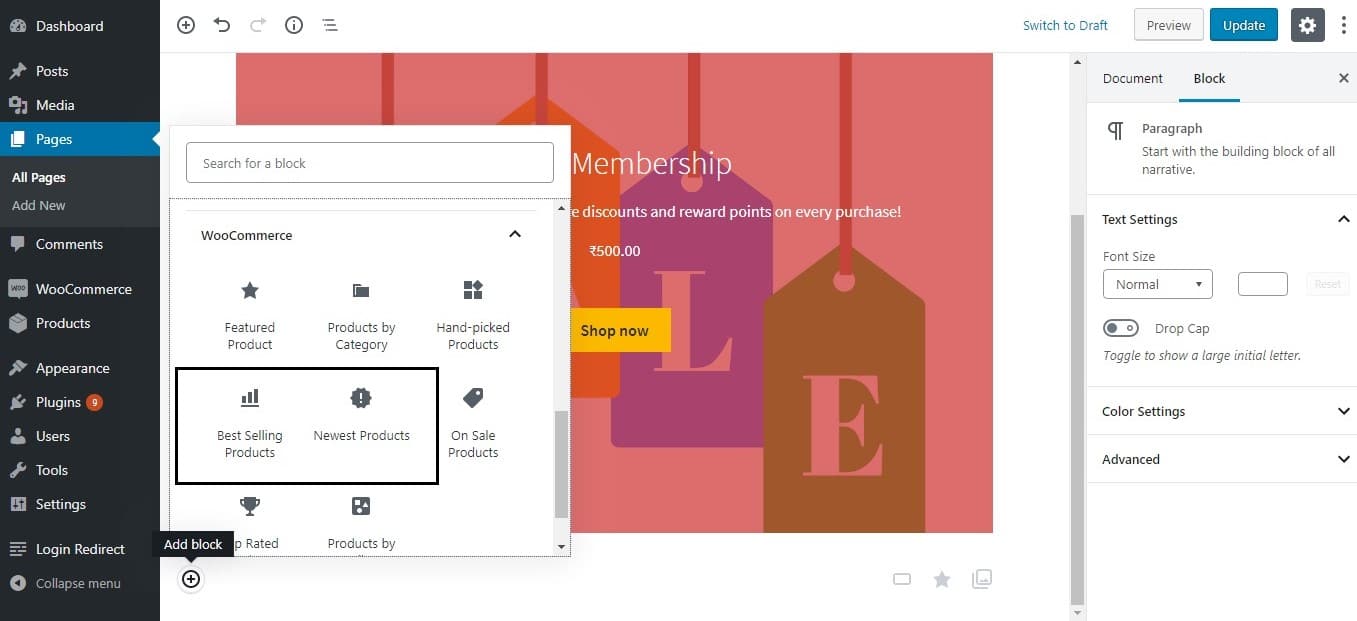
WooCommerce blocks contain different features or ‘blocks’ primarily related to displaying products on your page, that you can use to build your store. Following is the list of blocks available under WooCommerce blocks:
- Products by Category
- Newest Products
- Featured Product
- Best Selling Products
- On Sale Products
- Hand-picked Products
- Top Rated Products
- Products by Attribute
Let’s start with adding a Featured Product to the top of our Home Page. This can be any product that you want to highlight to your users / audience.
We have added a product known as “Store Membership”. As soon as a product is added, its image, description and price gets displayed. You can choose to hide these using the options on the right sidebar. A “Shop Now” button also gets added; the colour, text and the URL to which it points are all editable attributes.
The Overlay Color is an interesting feature that lets you set the colour and opacity of the product image that you have chosen to be the Featured product in this case:
You can also add a CSS class to this image. Similarly, the Shop now button can also be edited:
Next, let’s add some new arrivals and best-sellers of the store, so that both new and returning visitors will have something to take away from this page.
For this, we will first add a block known as Heading found under Common Blocks:
Once an appropriate heading such as “New Arrivals” is added, we can go ahead and add the respective block for the same. For both our purposes, we will be using WooCommerce blocks known as Best Selling Products and Newest Products. These blocks can again be found under WooCommerce blocks. Let’s add the Newest Products block.

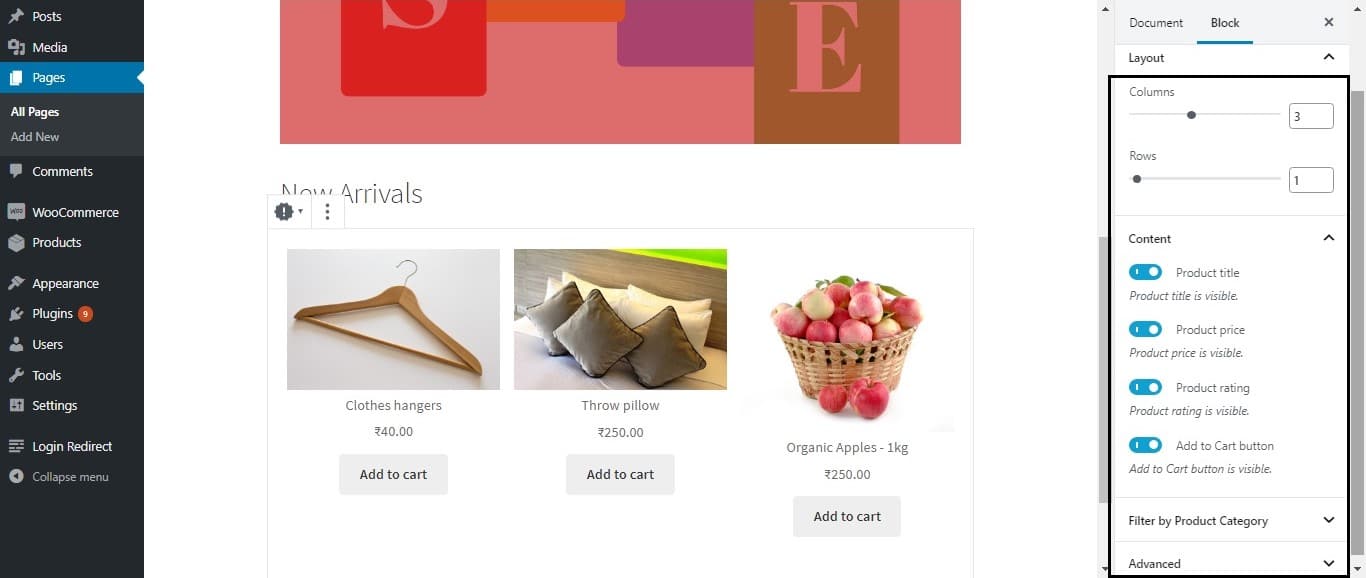
You can see that the Newest Products block pulls in the most recently added products from your WooCommerce store. You can choose to display as many products as you like for this block by setting the number of rows and columns to display, as well as filter the products by category using the options on the right sidebar:
In this way, we have added another row after the Featured Product row for new arrivals:
Next, let’s add the Best Selling products in a similar way (after adding the Heading block for it):
Now that we have created these rows for new as well as recurring visitors, let’s also add a row displaying products that are on sale to attract more sales. We will do this using the On Sale block under WooCommerce Blocks again (after using the Heading block to add a heading):
There are many more blocks that you can add under WooCommerce blocks based on your requirements. Let’s now add all the products to the Shop page. For this, you can choose the Products by Category block.
A lot of times, you would also find all these blocks under the Most Used category of blocks, but for the purpose of this tutorial, we selected those blocks from the category they have been assigned under. You can link all the headings to their respective pages, such as the Sale page, the Best Sellers page etc. for customers to view the complete list of products in that section.
On our Shop/Home page, we can add a button that says Browse Store, which will link to the Shop page.
To add a button, we have to choose from amongst the Layout Elements block.
We will link this button to the Shop page.
Similarly, you can create buttons below all the other blocks we created such as the “Best Sellers” block, the “On Sale” block etc. and create separate pages for all these, and link the buttons to their respective pages.
In order to create separate pages for separate type of products (best sellers or sale products), you can make use of shortcodes that will display these specific type of products on the respective pages. In this post, we have talked about how you can display different categories of products on the homepage (or any page) using various shortcodes.
This is how our page looks in the end:
Now, just click on Customize (on the front-end, upon previewing your page) to make it your front page and you’re good to go! This is how easy it is to create attractive front pages for your WooCommerce store using Gutenberg. Explore and experiment with the various blocks Gutenberg has to offer to utilise its features to the maximum!


how to add wishlist button to block
Hi,
To add wishlist buttons to products requires the wishlist functionality to be enabled, which is not enabled by default in WooCommerce. You may refer to plugins for this requirement, such as the YITH WooCommerce Wishlist plugin.