With v8.14.0 of Abandoned Cart Pro for WooCommerce plugin, you will be able to make use of the Exit Intent Popup to curb your cart abandonment rate. Let’s have a look at how you can create exit intent popups on your WooCommerce store.
Exit Intent Popups: Admin Settings
You can go to Woocommerce > Abandoned Carts > Settings > Popup Templates > Add New Template as shown below:

Adding New Popup Template
Here’s how our Page will appear when we have selected our Popup type as Exit Intent Popup:
If we proceed forward, we will find three sections: one for Guest users, second for Logged-in users, and third for offering coupon codes. Let’s have a look at them each starting with General Settings:
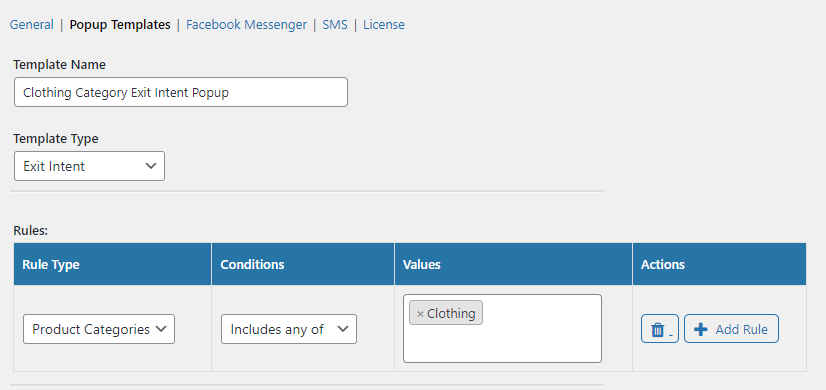
Template Name: Here, you will enter whatever name you would like to enter for your Exit Intent Template. For example, we will go with Clothing Category Exit Intent Popup as our name.
Template Type: Here, we have already mentioned that we would be choosing the Exit Intent dropdown option. Please note that by default you will find one Exit Intent Popup Template created for you. It will be named ‘Exit Intent for all pages’ and it will be deactivated. If you wish, you can customize this template.
Rules: Here, you can enter the specific rules you wish to apply for your popup by clicking on ‘Add New’. You can choose your Rule type from the three options that we provide, which are: Pages, Product Categories, and Products. For example, we will restrict the Exit Intent Popup to Rule Type ‘Product Categories’, Conditions will be ‘Includes any of’, and Values would be ‘Clothing’. If no rules are present then the exit intent popup will be displayed on all the pages. This has been the current behaviour with Add to Cart Popup as well.
1. Exit Intent Popup for Guest Users
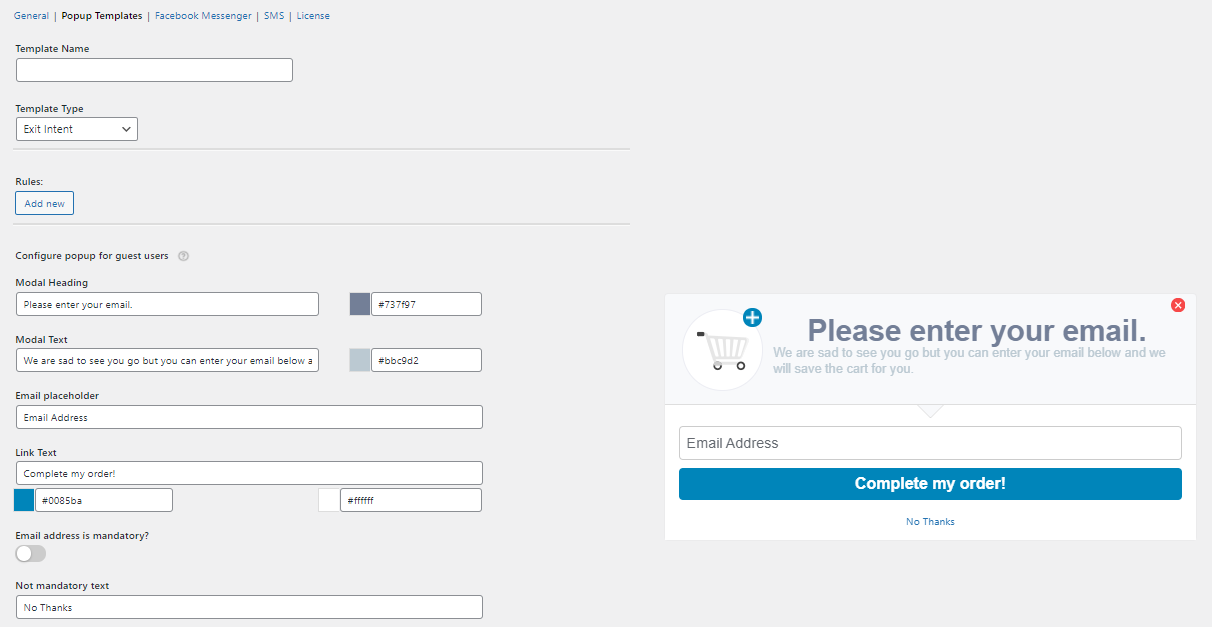
This setting will help you motivate the user to go to the checkout page via the popup. An important thing to note here is that this exit intent popup would appear for guest users by default where their email address has not been captured.
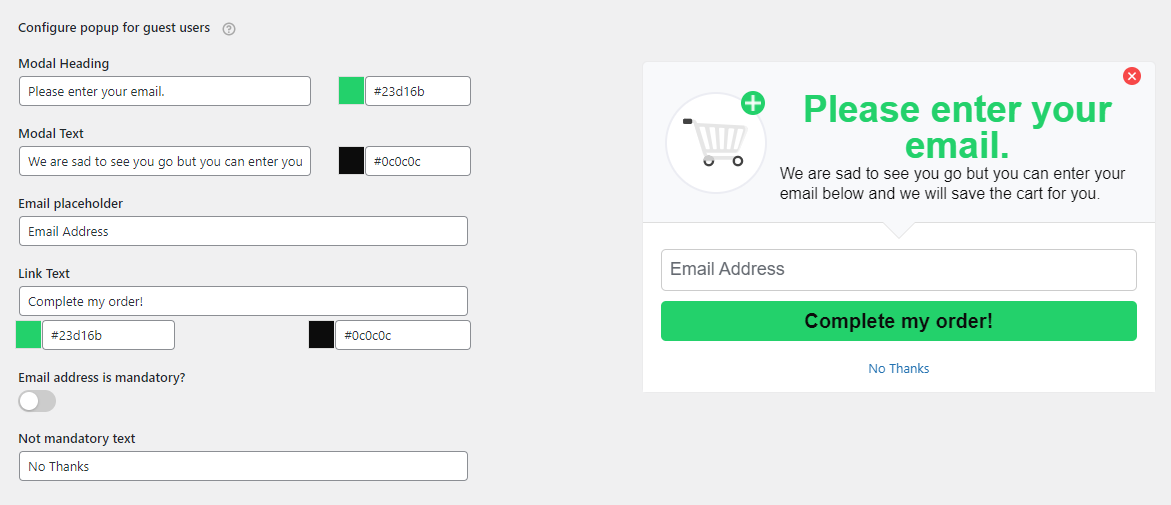
Modal Heading: This would be the very first text that would appear on your exit intent popup. For example, here we will keep the text as the same text which has been entered by default, which is ‘Please enter your email.’
Modal Text: This would be the subheading or the part where you would provide extra information. For example, by default, the text says ‘To add this item to your cart, please enter your email address.’
Email placeholder: This is the place where your guests will enter their email address
Link Text: Under the link text you can have the text as ‘Complete my order!’. This button will direct your visitors to the Checkout page.
Email address is mandatory?: If you enable this setting, then your visitor will have no choice but to enter their email address. If you wish to give them an option, then you will have to disable this setting. This would mean that the visitor will get a ‘No Thanks’ option. When they click on the No Thanks option, your visitor will be directed to the Checkout page without their email address being captured.
Here, we also have the option to customize the colour of our Modal Heading, Modal Text, and Link Text. Here’s how our settings will appear after we have made the changes:
2. Exit Intent Popup for Logged-in users
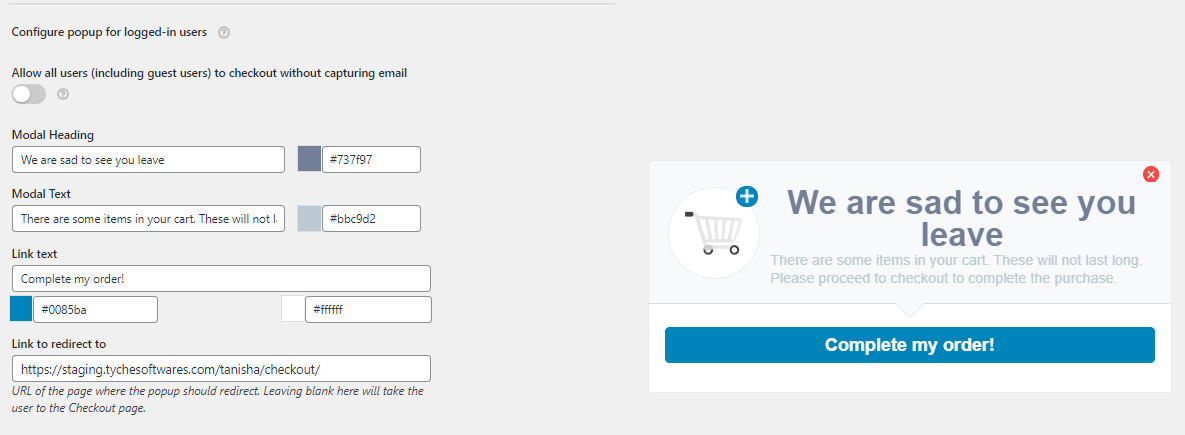
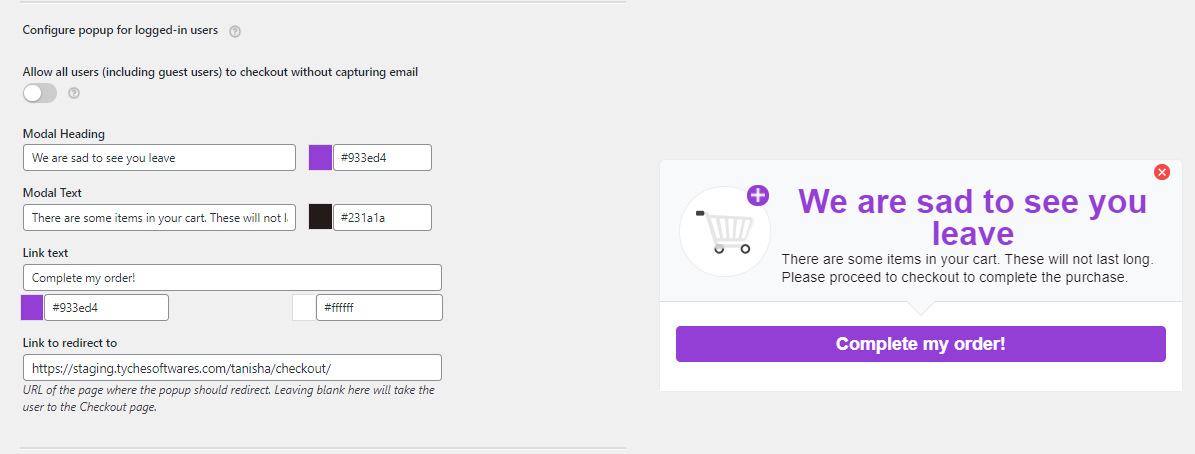
This Exit Intent Popup is for your logged-in users where it will force them to redirect to the checkout page. By default, this popup would appear for logged-in users. However, if you wish to make this exit intent popup appear for Guest users without email address, then you can enable the Allow all users (including guest users) to checkout without capturing email setting.
As discussed above, for this popup as well, you can enter your Modal Heading, Modal text, Link text and choose colours for them. One new setting that you will find here is the Link to redirect to option. Here, you will have to enter the URL of the page where your popup will redirect the customer. Usually, it would be the URL of the Checkout Page. If you leave it blank, then by default, the user will be taken to the Checkout page.
Here’s how the exit Intent pop for logged-in users will appear after we have set our settings:
3. Offering Coupon Codes on Email Capture for Exit Intent Popups
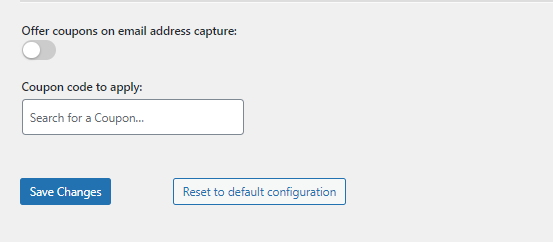
If you enable the option that says ‘Offer coupons on email address capture’ then you will get to view the following settings:
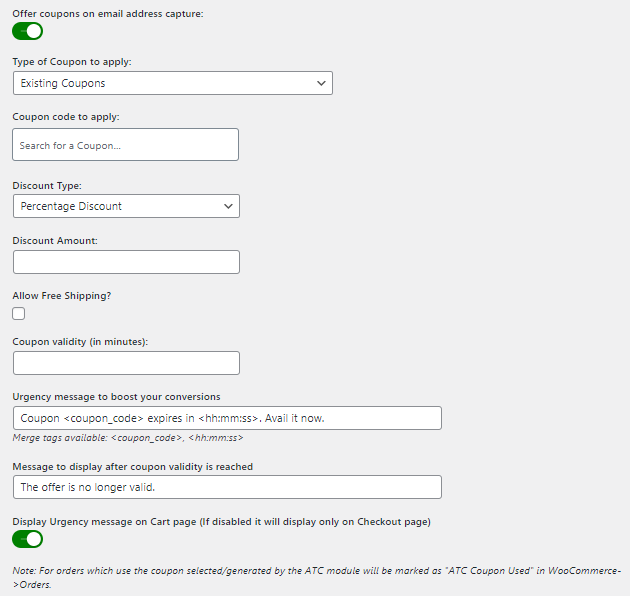
Under Type of Coupon to apply, you can choose whether you wish to apply an Existing Coupon or Generate a Unique Coupon code from the dropdown.
If you choose Existing Coupons then you will get an option called Coupon code to apply. Here you enter your coupons.
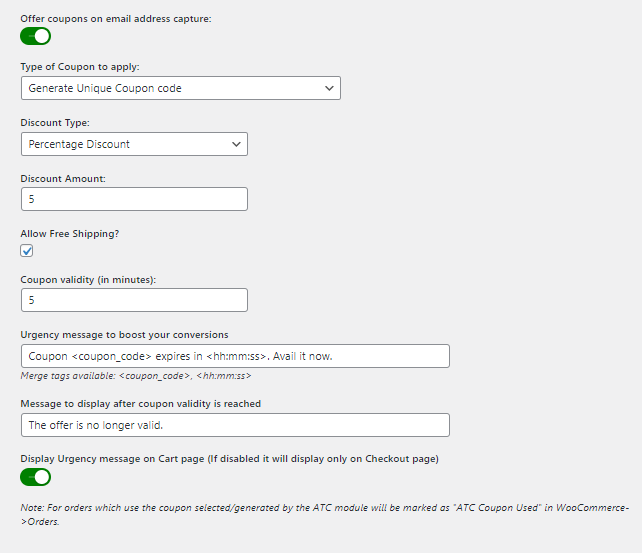
For now, we will go with Generate Unique Coupon code. When you select that, you will get the option to choose your Discount Type. In the dropdown, you can choose either Percentage discount or Fixed Cart Amount. We will go with the Percentage discount and enter our discount percentage as 5%. If you want you can Allow Free Shipping option by ticking its checkbox.
Next, irrespective of the type of coupon that you have selected you will get to view the following settings:
Coupon validity (in minutes): Here, you will enter for how long your coupon will be valid for. For example, let’s enter 5 mintues.
Urgency message to boost your conversions: In this text you can use merge tags such <coupon_code> or <hh:mm:ss> to create the effect of urgency.
Message to display after coupon validity is reached: this text will be displayed once your customer has surpassed their coupon validity time.
Display Urgency message on Cart page (If disabled it will display only on Checkout page): You can enable this setting if you wish to display the urgency message on your Cart Page as well. Here’s how the coupon code settings will appear once you filled them up:
Please Note: For orders which use the coupon selected/generated by the ATC module will be marked as “ATC Coupon Used” in WooCommerce->Orders.
Let us customize our exit intent popup for guest users to talk about the discount that we’re offering:
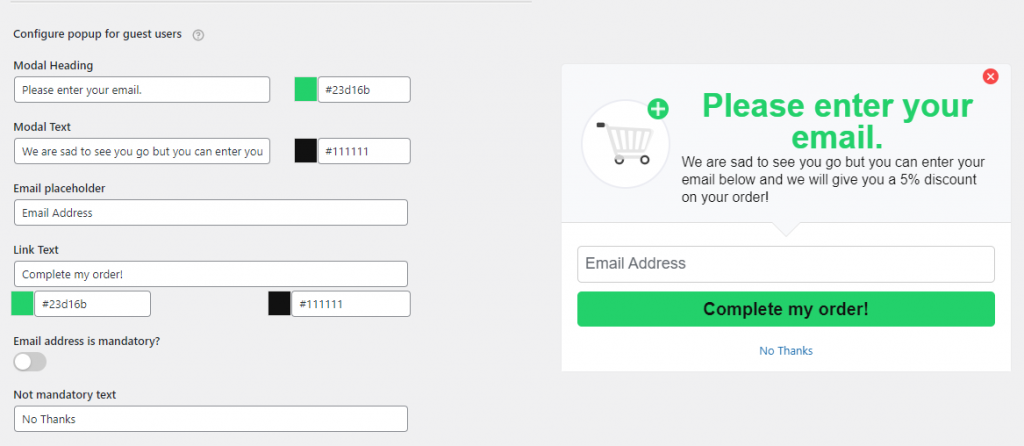
Settings for Exit Intent Popup for Guest Users offering a discount
Let us customize our exit intent popup for logged-in users to talk about the discount that we’re offering:
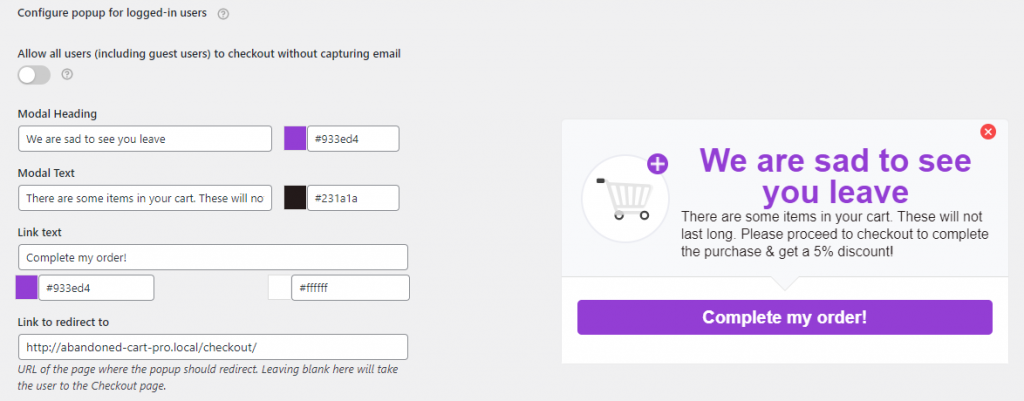
Settings for Exit Intent Popup for Logged-in users offering a discount
Exit Intent Popups: Frontend Display
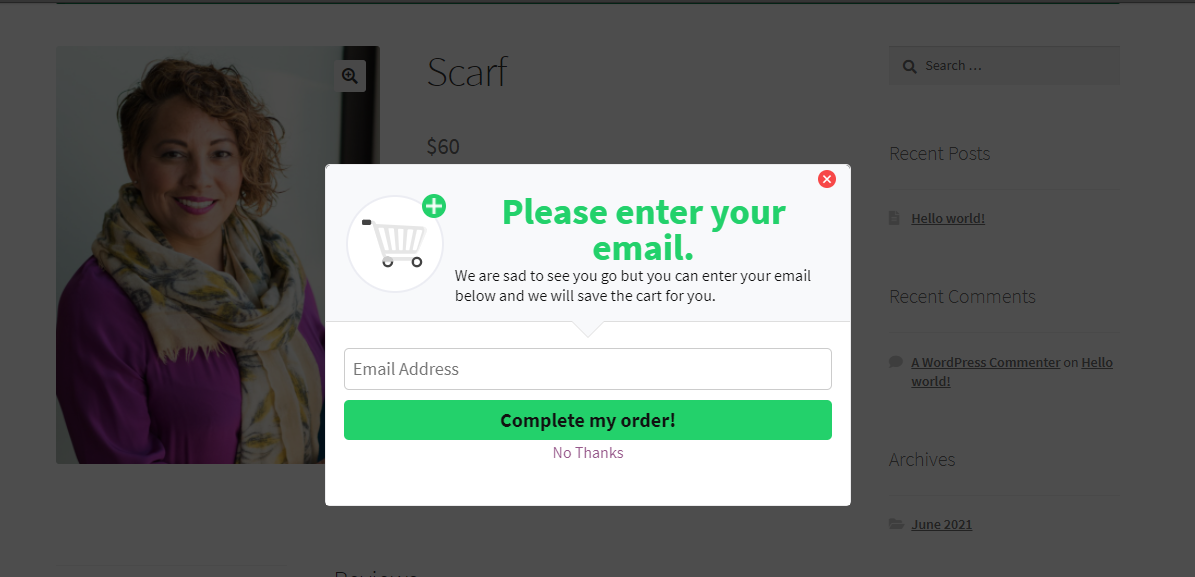
Let’s say a guest user has browsed your store and added an item, for example, a scarf, from the Clothing product category. Here’s how the Exit Intent popup will appear for you guest users when they are trying to exit:
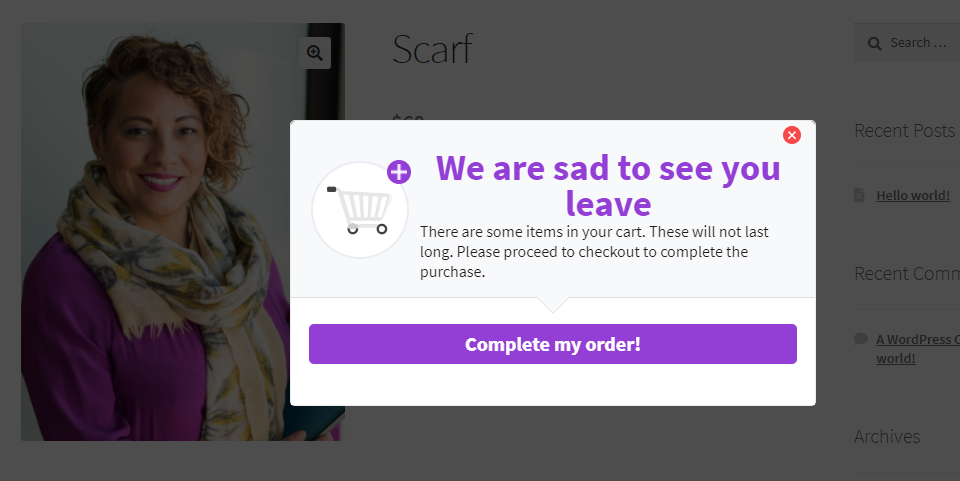
Next, let’s say that a logged-in user has browsed your store and added the same item to their cart. However, instead of checking out they trying to close their window. This is how the exit intent popup will be displayed to them:
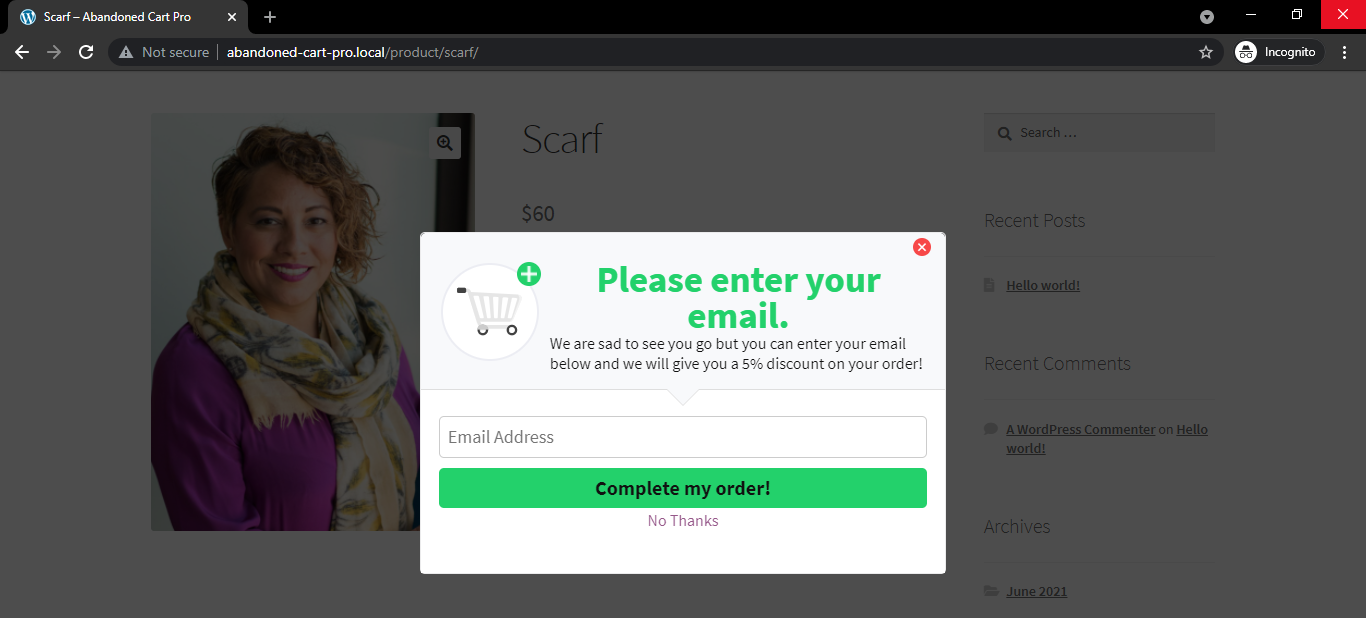
Now, let’s say that you are offering a 5% discount to your guest user if they enter their email address. Then, the exit intent popup will appear such:
Here’s how it will look like when the visitor has entered their email address and has been redirected to the Checkout Page:
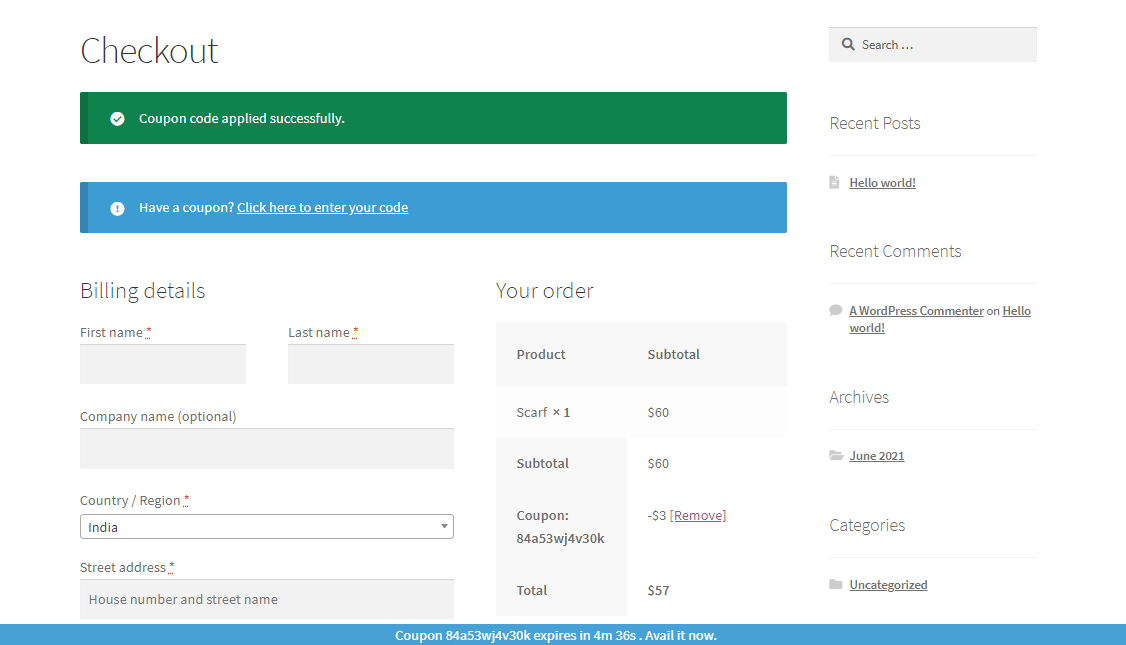
As you can see in the above image, the visitor will see the discount directly applied to their order and they will also view the banner which will display the time remaining until which they can use their coupon. Since we had offered a 5% discount for 5 minutes, the banner will start its countdown from 5 mins on.
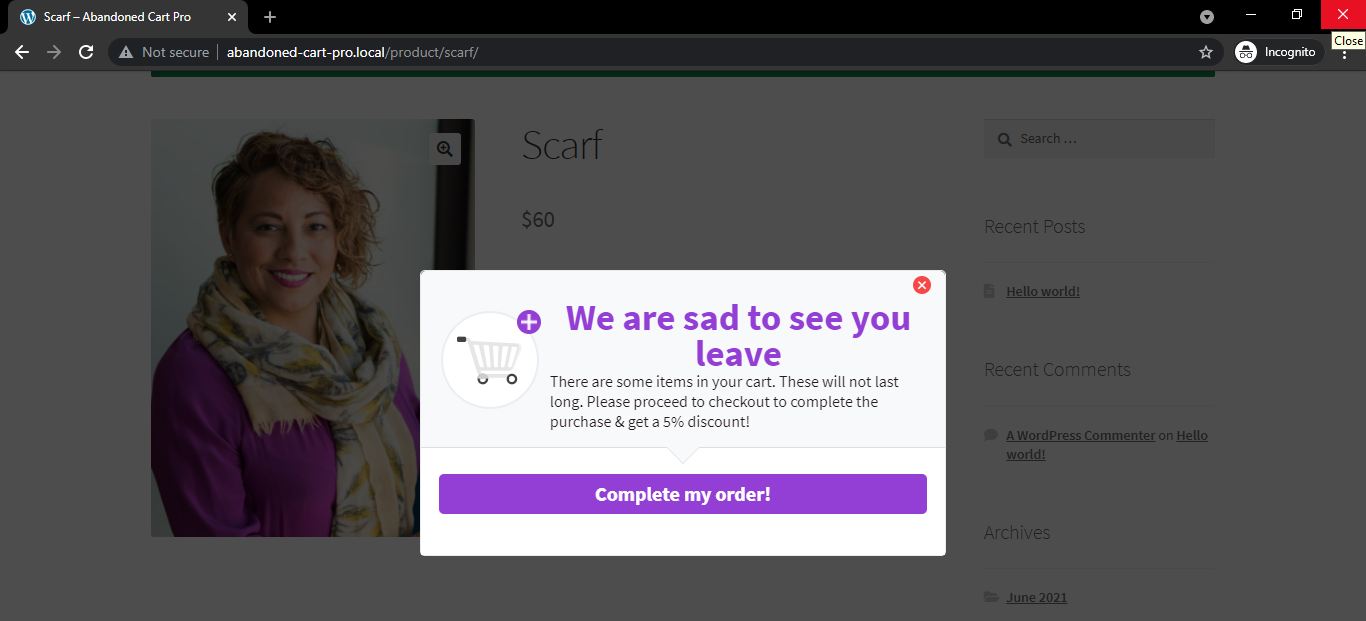
Now, let’s say that you are offering a 5% discount to your logged-in customer after they have added a product to their cart. Then, the exit intent popup will appear such:
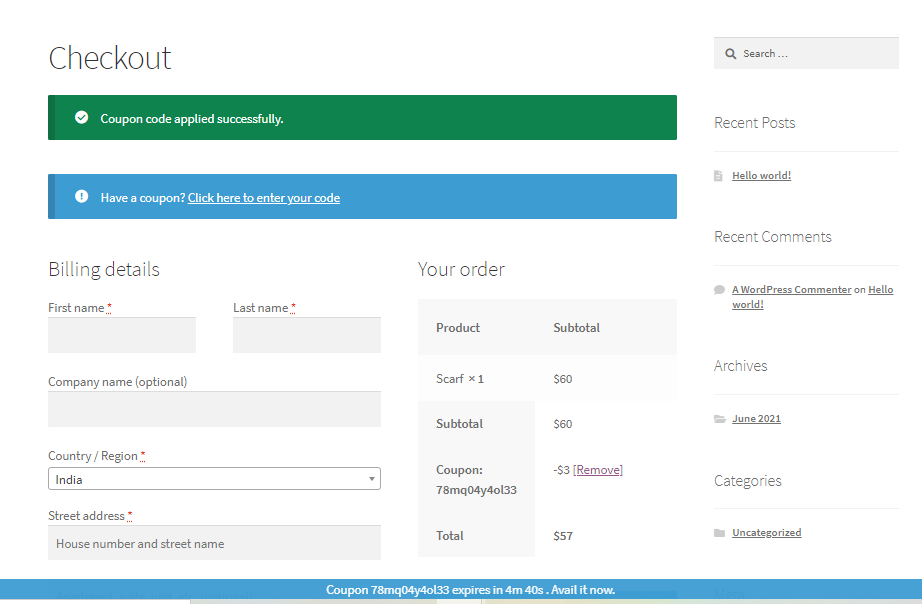
After your customer clicks on Complete my order! they will be redirected to the checkout page which will look like this:
Now, let’s say that you have the Add to Cart Popup enabled as well as the Exit Intent Popup enabled on your store. Let’s see what happens in such a scenario. When the visitor adds a product to their cart, then the Add to Cart popup will be displayed to them as such:
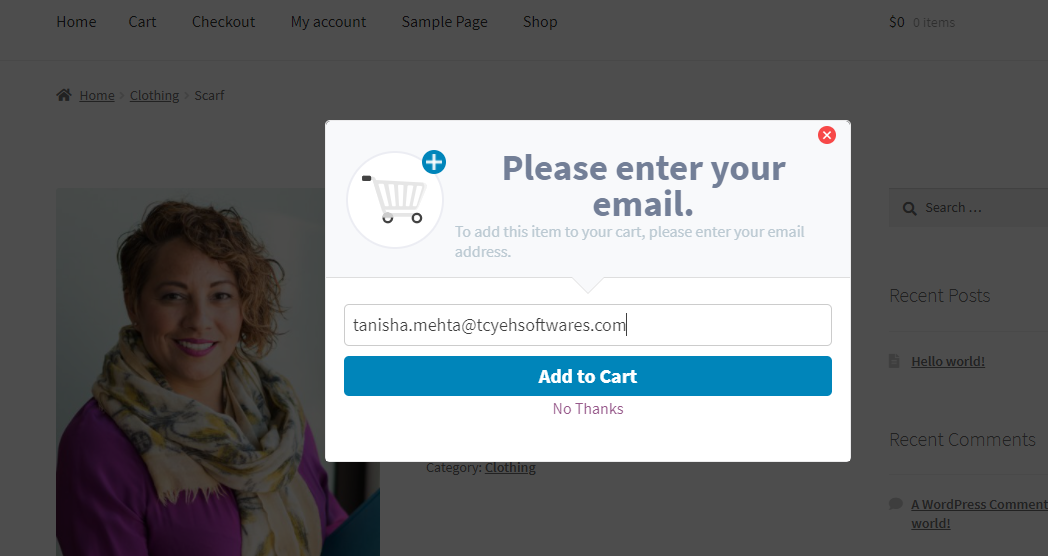
After they will enter their email address as shown in the image above, they will click on the Add to Cart button. This would mean that the product has been added to their cart. However, your visitor is now trying to exit the store after adding this product. In this case, the exit intent popup will be shown to them as you can see below:
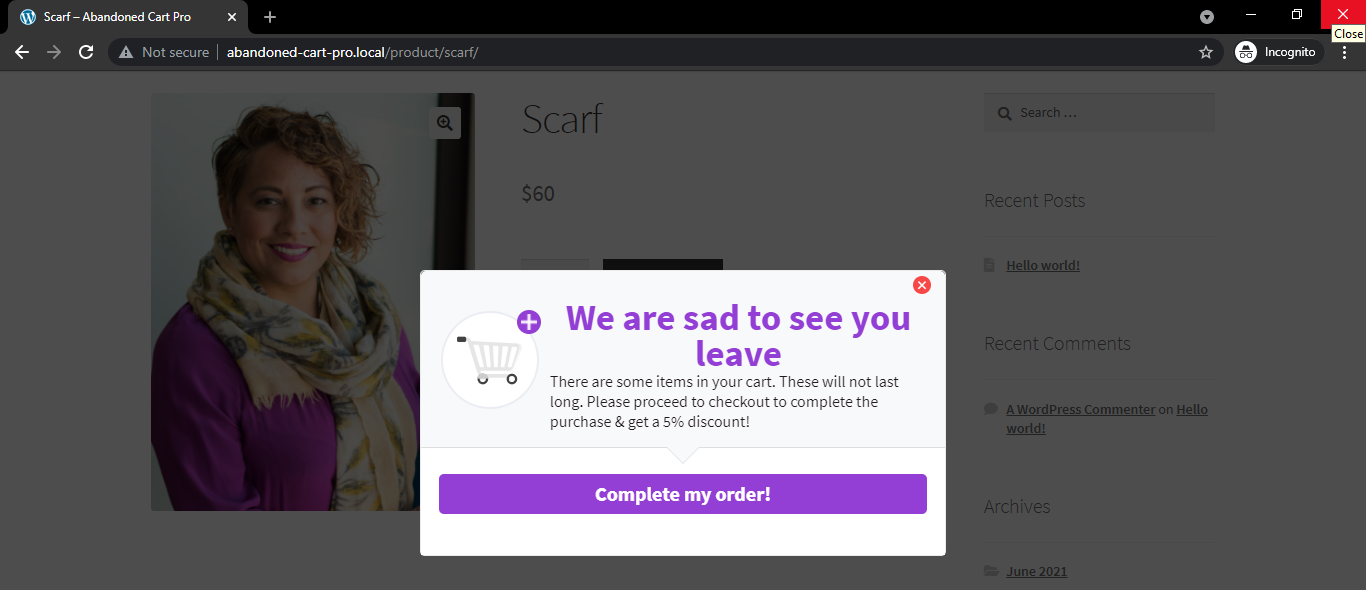
Here, the visitor will be motivated to complete their order with the help of the exit intent popup. If you are offering a discount just like you can see in the above image, then the discount code will be added for your customer on the checkout page once they click on Complete my order! button. Here’s how it will look like:
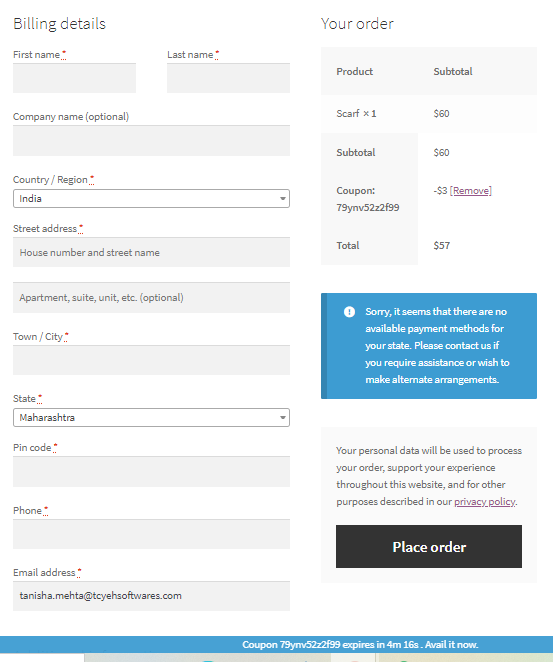
We can also see that the captured email address has already been filled in for the customer.
Exit Intent Popups: Stats
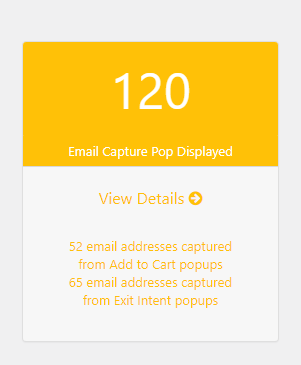
Just like the Add to Cart popup template, you can check the statistics of the exit intent popups on the Dashboard tab of the plugin as such:
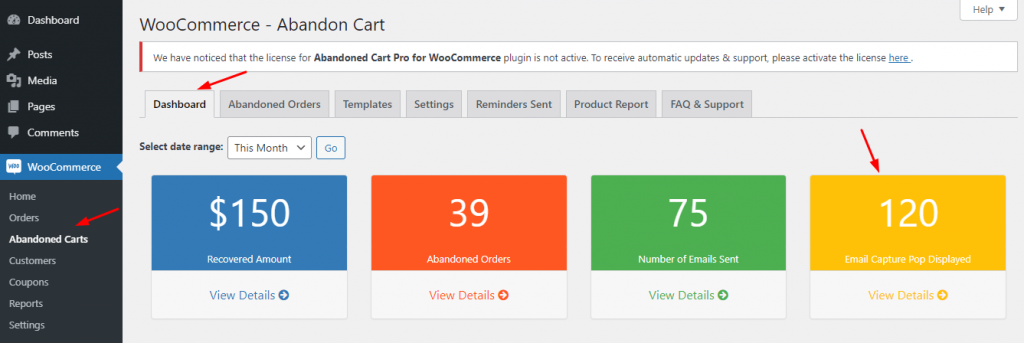
When you will click on ‘View Details’ you will find out how many email addresses were captured from Exit Intent popups like this:
In this way, you can configure our Exit Intent Popup templates to help you decrease the abandoned carts in your store.