Newly added email integrations in v8.17.0 of Abandoned Cart Pro for WooCommerce plugin now lets users connect our plugin with Klaviyo.
Better known as a Customer Growth Platform, Klaviyo is widely used by many e-commerce sites to automate their SMS and email marketing strategy. Using the integration, you will be able to send abandoned cart information as well as customer email addresses to it.
The Basics
To make this integration happen, you will need the following:
- WooCommerce plugin
- v8.17.0 of Abandoned Cart Pro for WooCommerce plugin
- a valid account with Klaviyo. You can log in to your Klaviyo account here.
Klaviyo offers different features that can be created. They are:
- Profiles
- Lists/Segments
- Campaigns and Flows
However, for this integration, you will only need to use Profiles, Lists, and Flows.
A. Klaviyo Admin settings
1) Get API Key
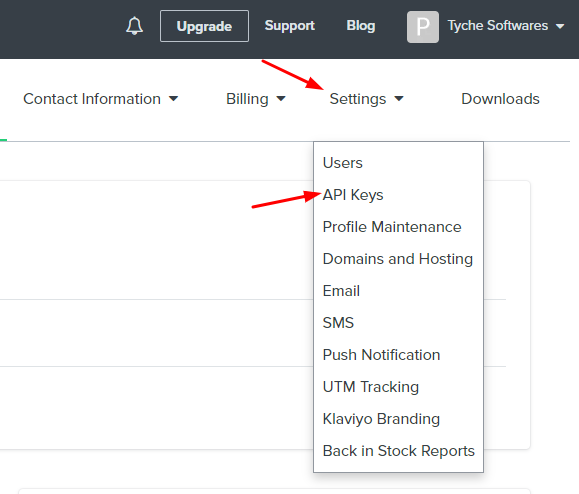
The first thing that you’ll need to do is grab the API Keys. Go to your Klaviyo Dashboard > Account as shown here:

Choose Settings and then API Keys:
Copy the ‘Public API’ Key and ‘Private API’ Key from here:
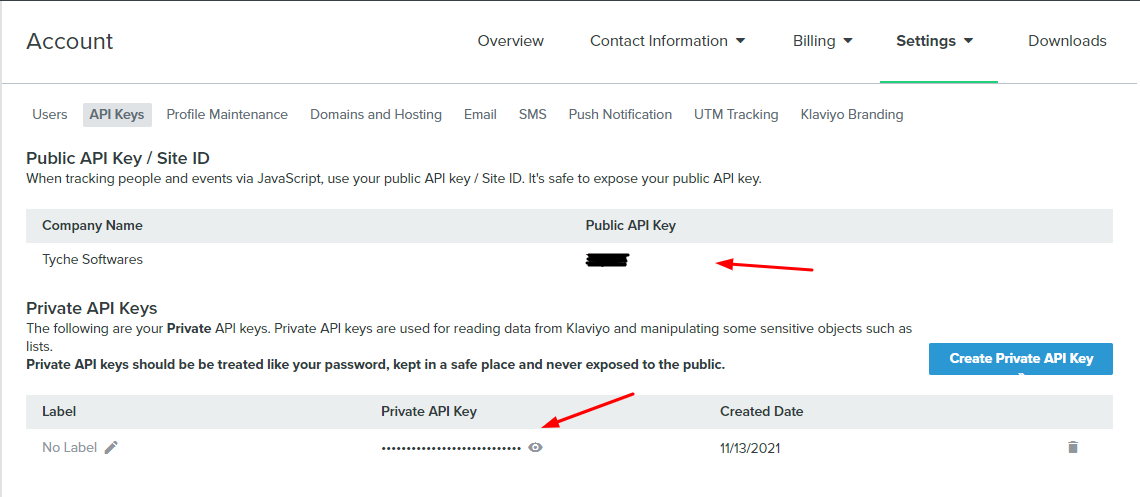
You will require to paste these in your Abandoned Cart Pro admin dashboard. This will be covered in section B. WooCommerce admin settings ahead.
2) Create a List
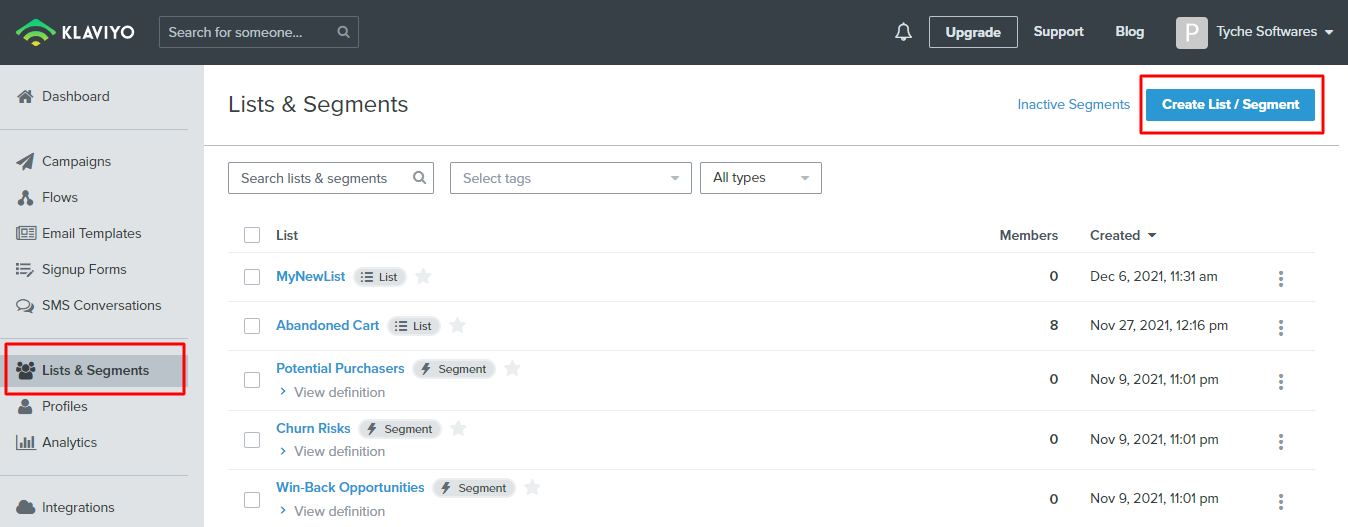
Next, you will have to create a List where the details of abandoned carts from your WooCommerce store will be stored. To do this, go to Lists & Segments > Create List /Segment:
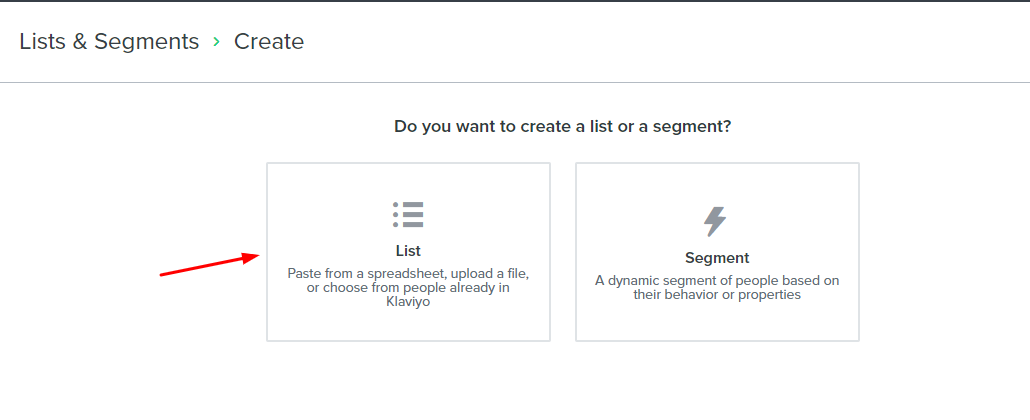
Choose the ‘List’ option:
Now, you will have to give this list a name. Let’s go with ‘Abandoned Carts from store’ as a name. Once done, click on the ‘Create List’ button:

This new list will be created. Go back to Lists & Segments tab where you will find this new list. Click on the three dots of this list and select ‘List Settings’.
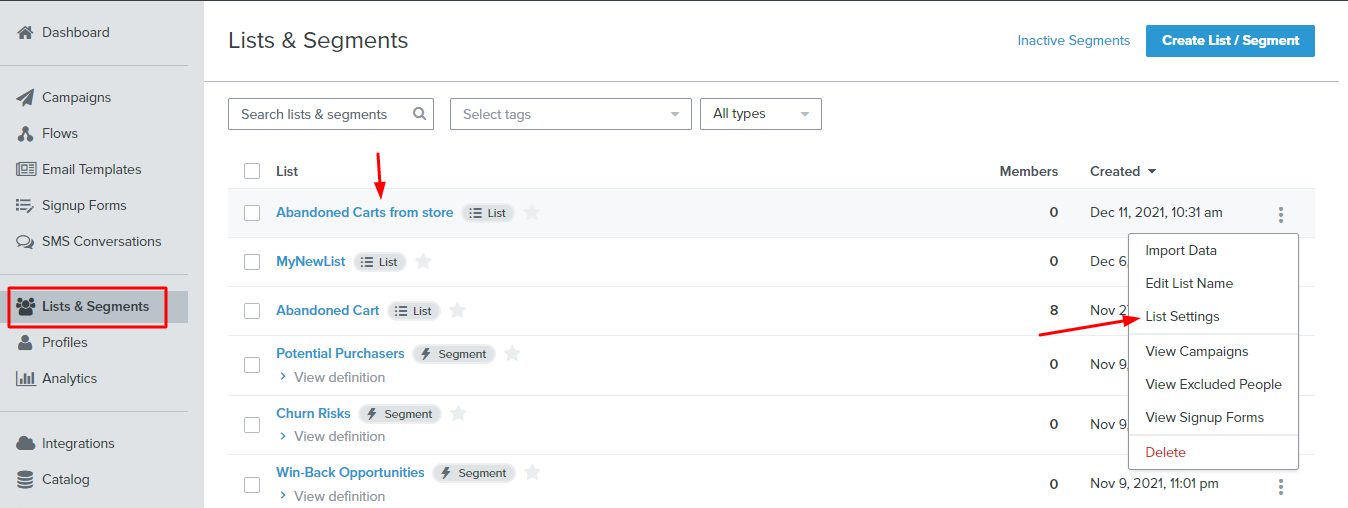
Scroll down to ‘Opt-In Process’ and select ‘Single Opt-in’ option. Lastly, click on ‘Update List Settings’
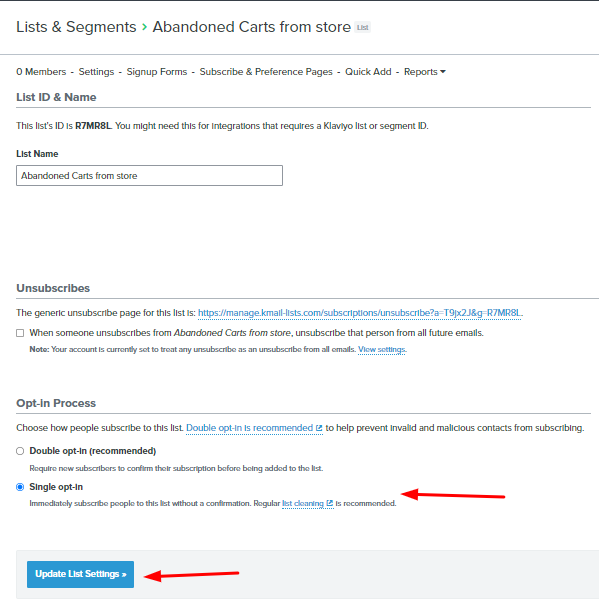
You have now configured a list. Next is creating a workflow to send abandoned cart email reminders.
3) Create a Flow
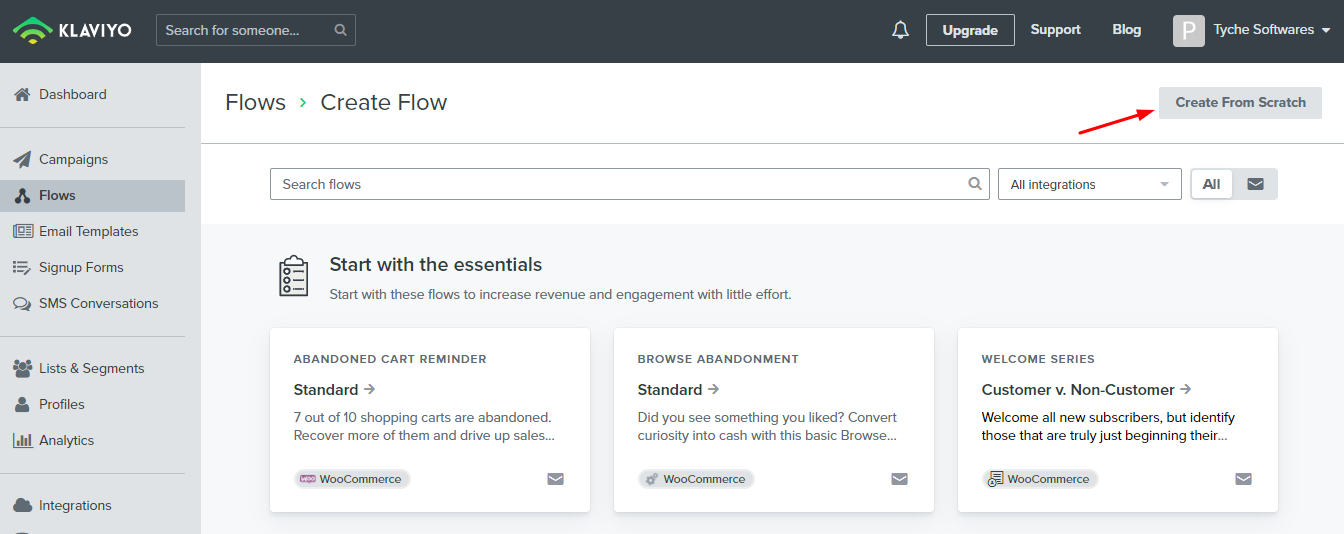
To create a workflow, go to the Flows tab and click on ‘Create Flow’ button.

Let’s go with ‘Create From Scratch’ option.
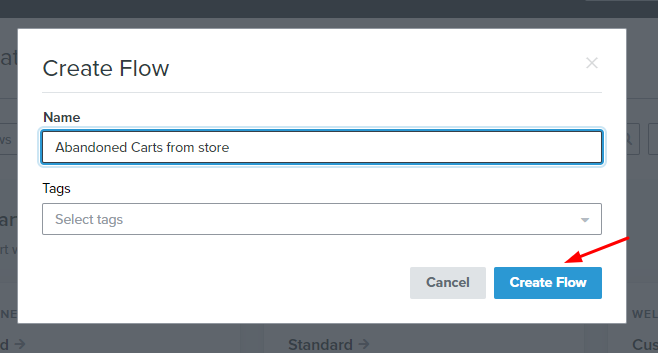
You can now title this new workflow. Let’s name it ‘Abandoned Carts from store’ and click on ‘Create Flow’.
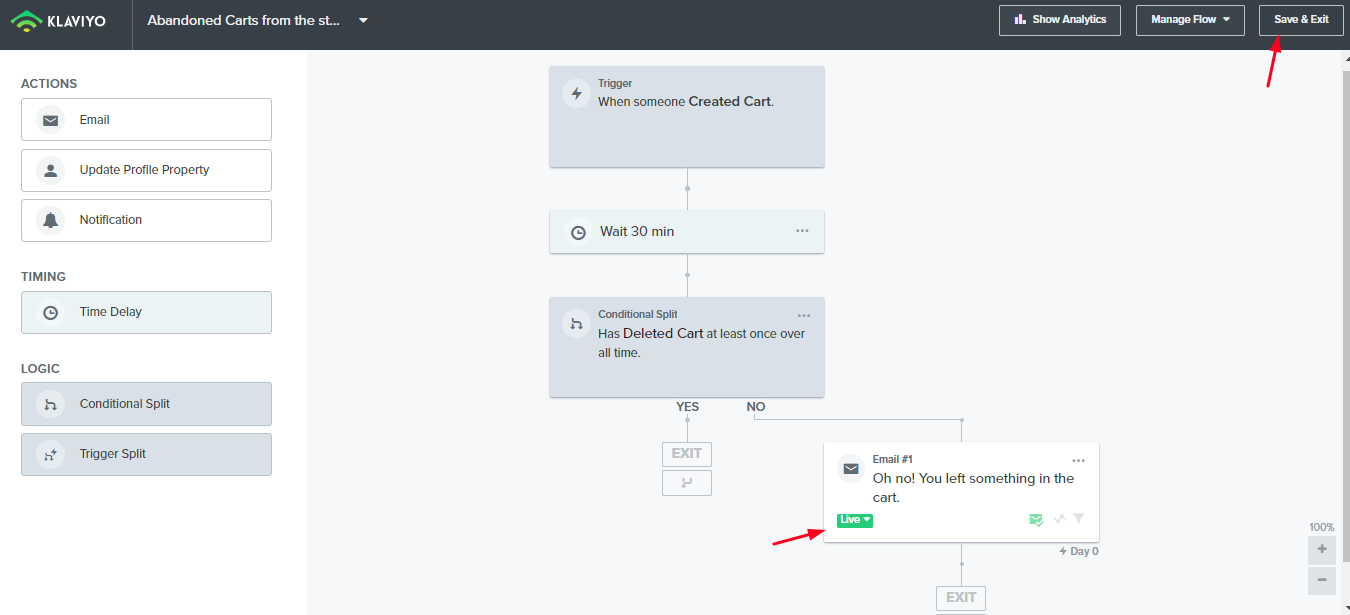
This Flow will be triggered upon Event/Metric ‘Created Cart’. For this, we will add a Metric first.
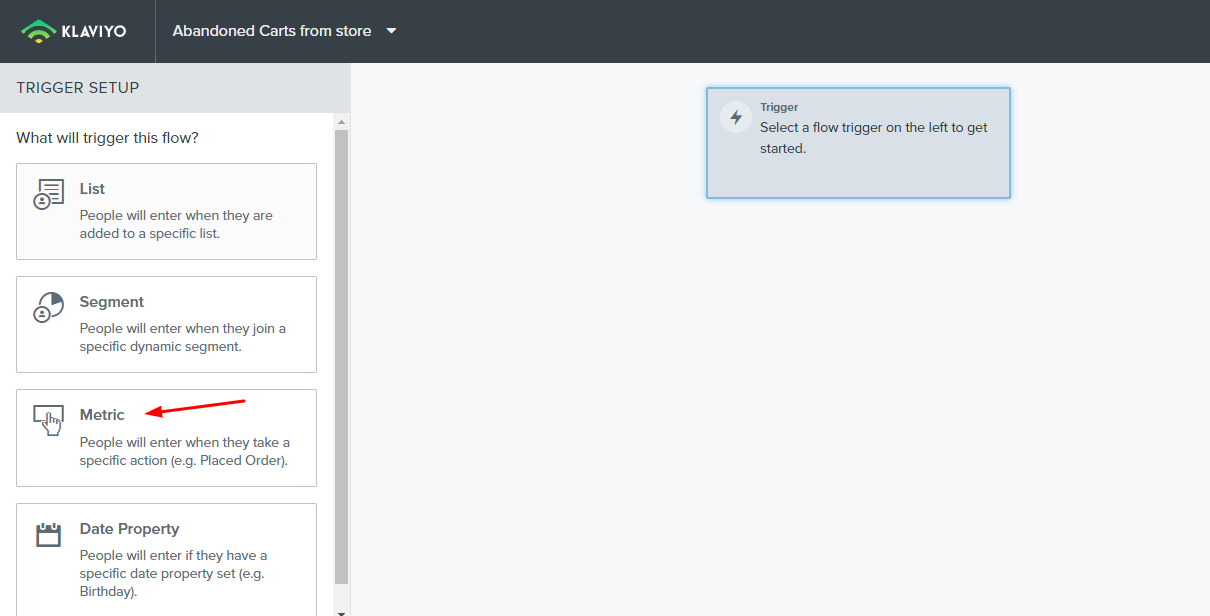
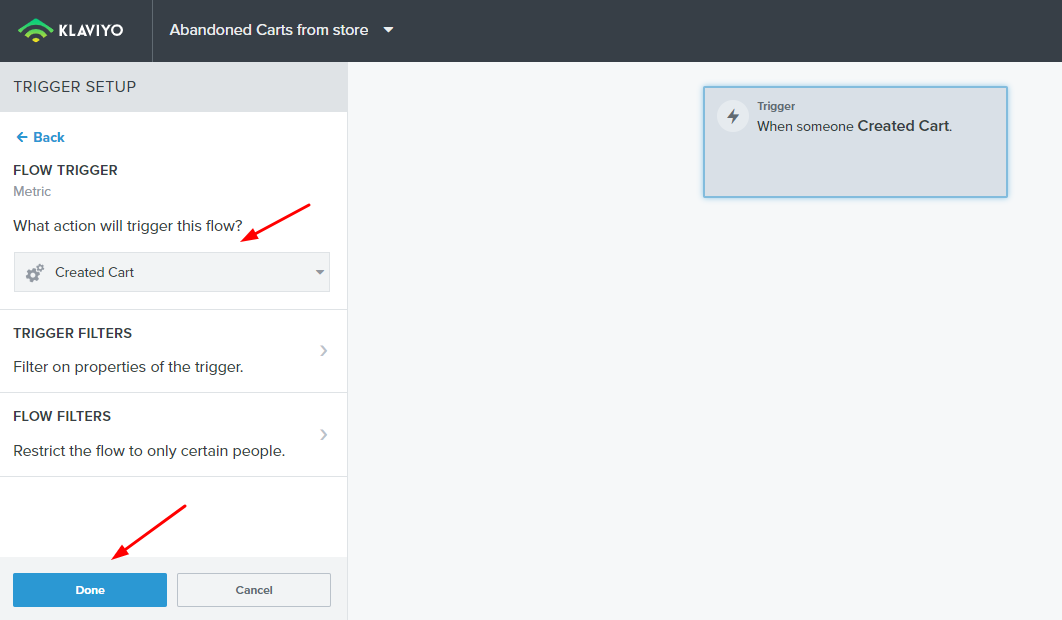
The metric will be ‘Flow Trigger’ and under ‘What action will trigger this flow’ you will have to select ‘Created Cart’ and then click on ‘Done’.
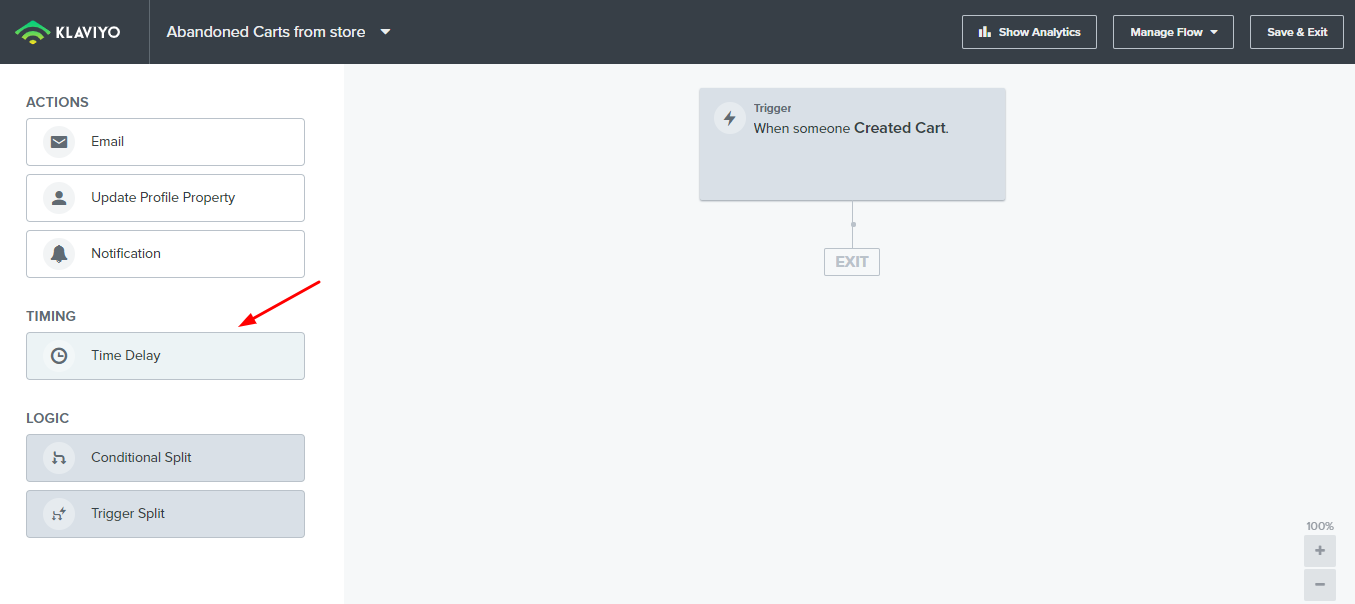
Next, let’s add a Time Delay. Drag it and add it to the flow:
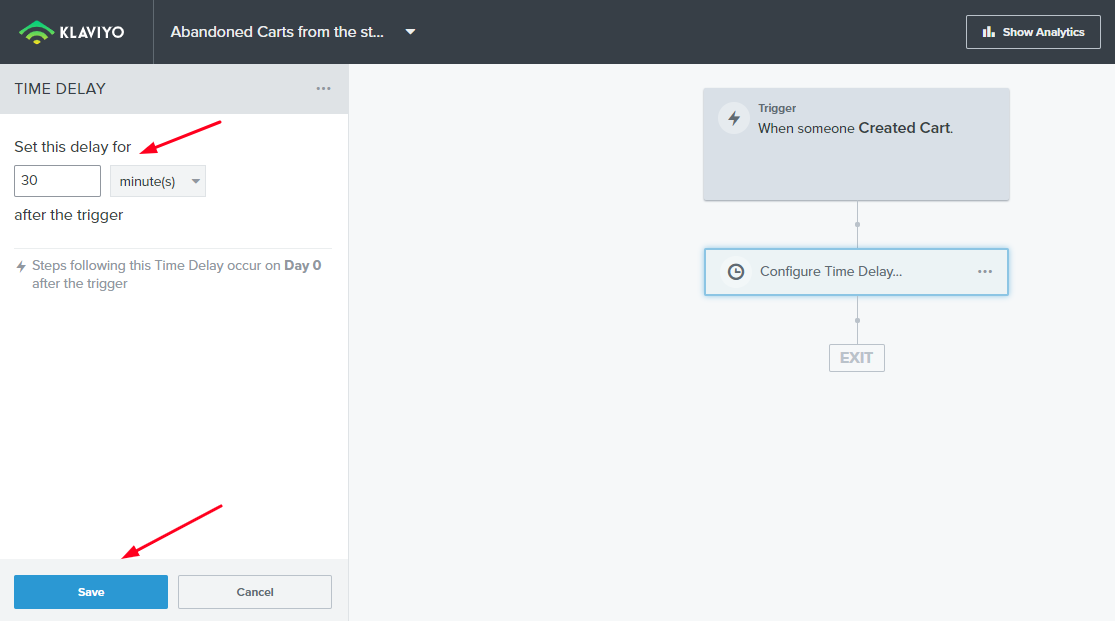
Set the delay to whatever you want. This would mean that after a delay of select time period, the person who abandoned the cart, will receive an abandoned cart email via Klaviyo. You can add the delay in minutes, days, months. For now, we will add a delay of 30 minutes and click on Save.
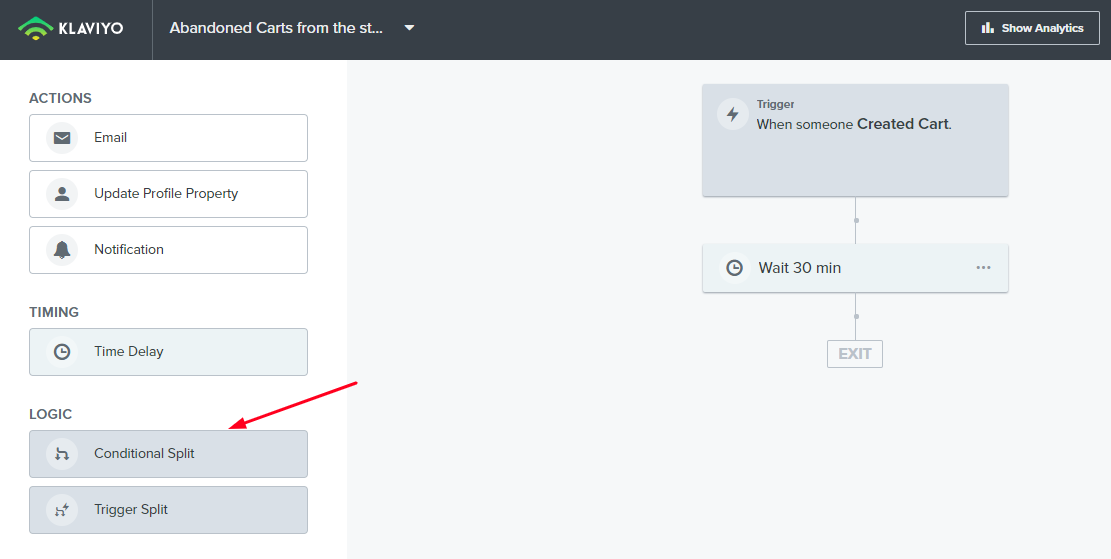
Now, you will add a ‘Conditional Split’.
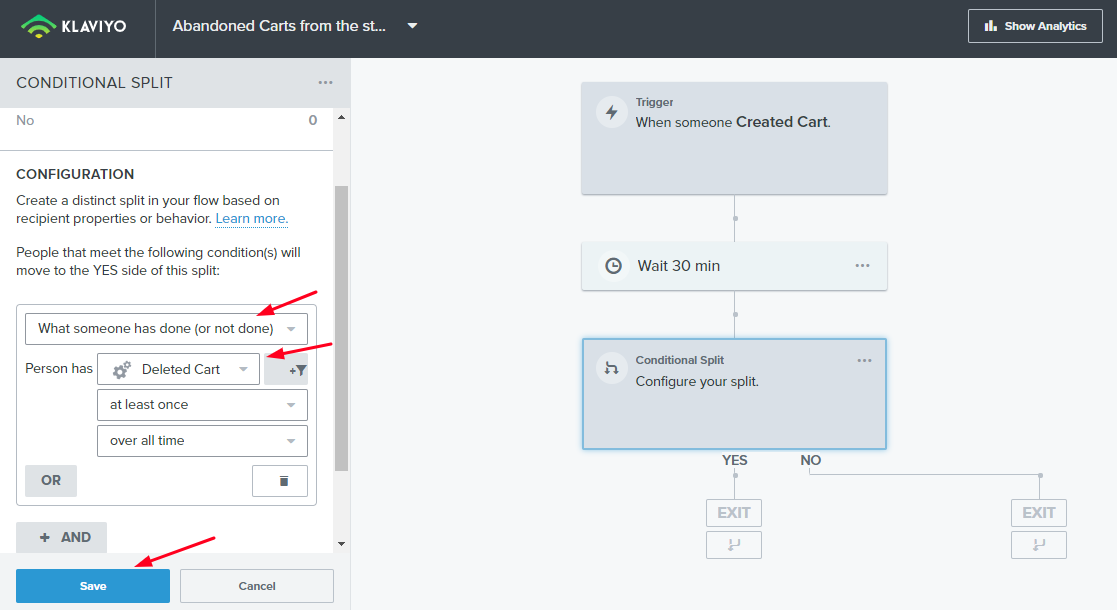
You will choose ‘What someone has done (or not done)’ as the condition. Under this, you will select ‘Deleted Cart’ and click on Save.
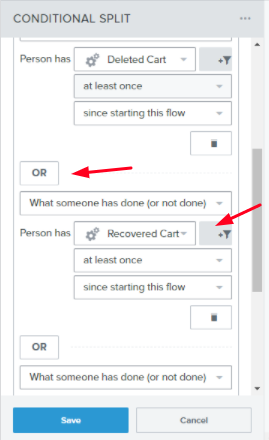
Over here, additional conditions can also be added using the ‘OR’ button. Apart from ‘Deleted Cart’ we can add ‘Ignored Cart’ or ‘Recovered Cart’.
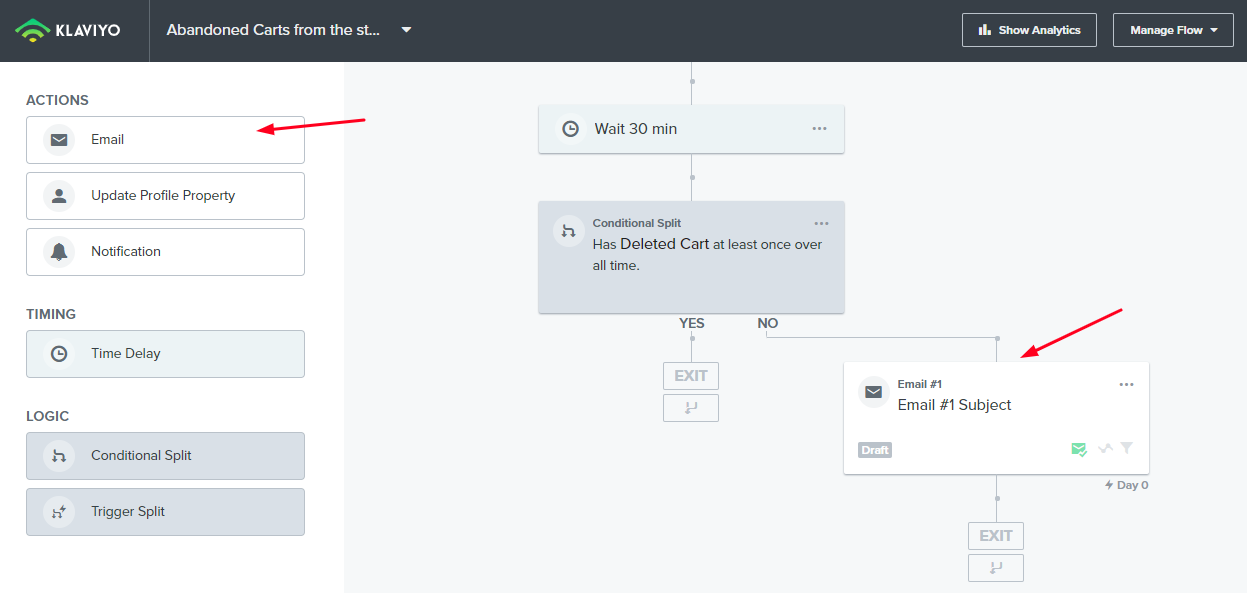
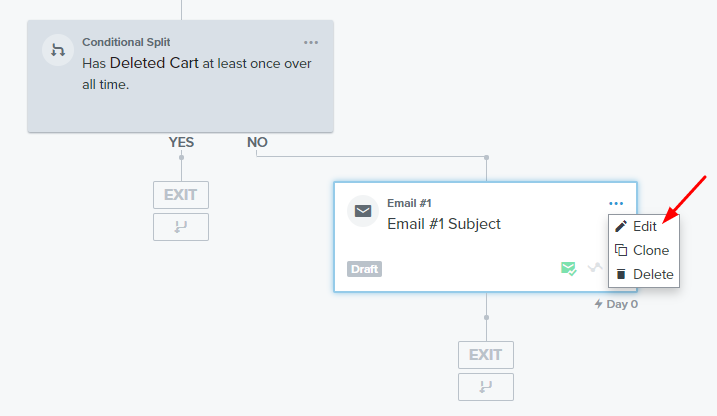
Proceeding forward, if the condition is Yes, then it will exit the flow. If No, then we will send an email. We will create this email by going to Actions and selecting Email. You select these conditions according to your needs.
Click on the Edit option of this email to configure its details.
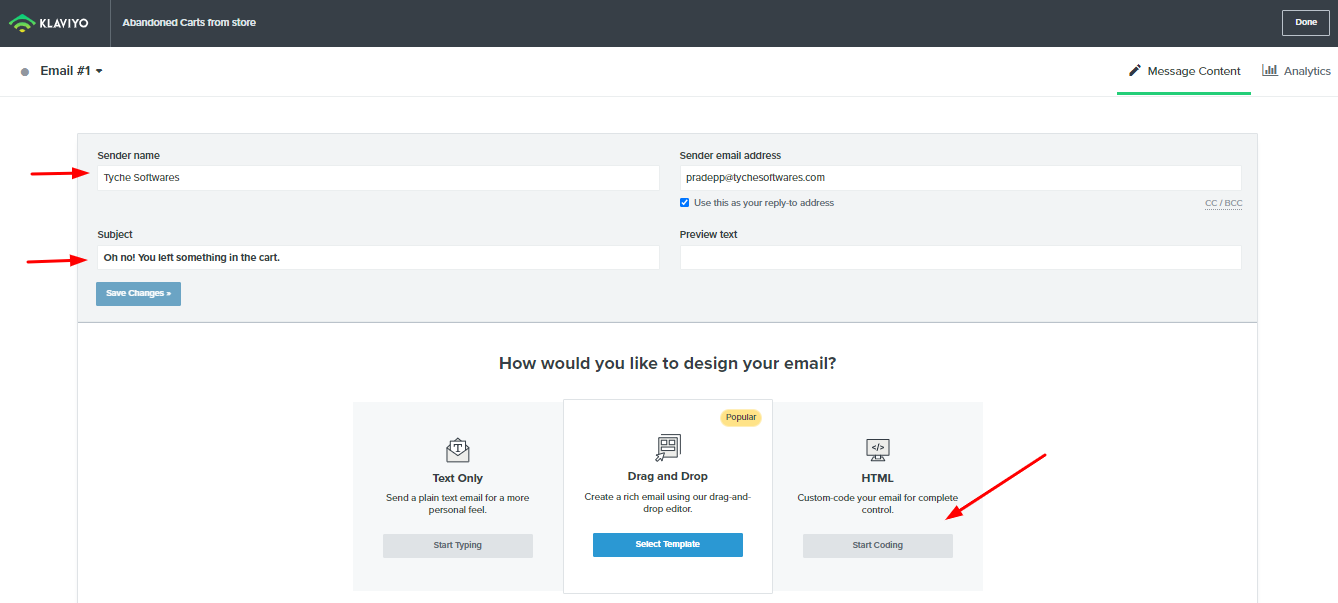
You can edit the sender’s name, subject, etc here. Next, select the 3rd option ‘HTML’ and click on ‘Start Coding’.
Here, Event/Metrics based variables can be added to the email template by clicking on ‘Preview Email’. Click on variables from events as shown in the image attached below:
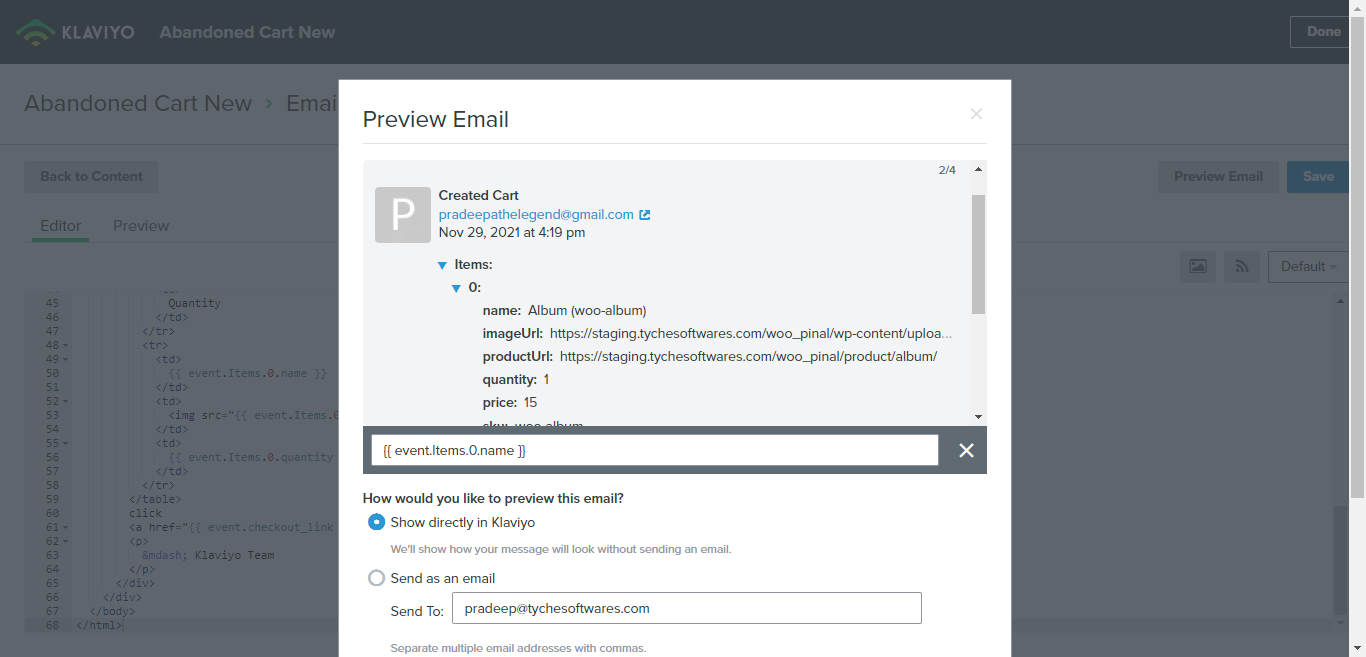
Once done, you can click on Save.

After the Email is added, set it to ‘Live’.
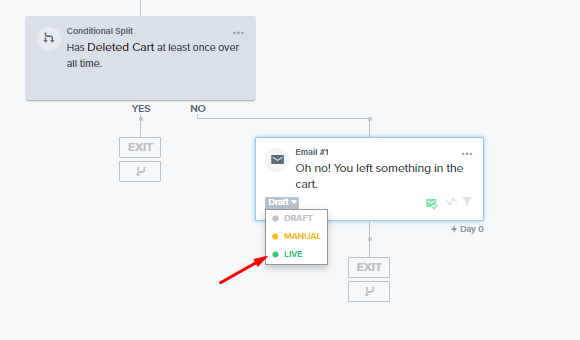
Lastly, Save it and Exit.
B. WooCommerce Admin settings
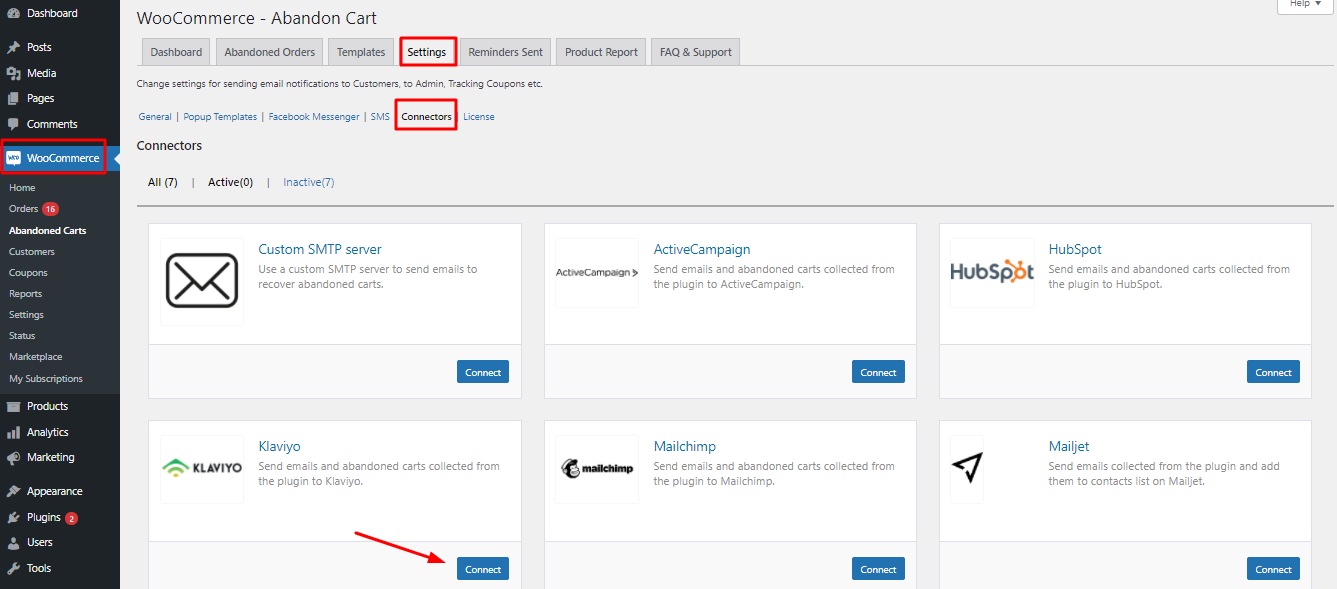
After configuring out the settings from Klaviyo’s side, it’s now time to figure them out from your WooCommerce Abandoned Cart plugin dashboard’s side. Go to WooCommerce > Abandoned Carts > Settings > Connectors. Go to the Klaviyo card and select Connect.
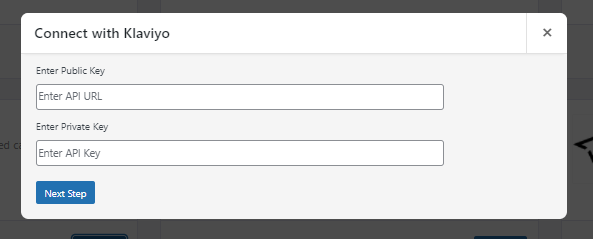
Now you will have to enter the Public and Private Keys that you had copied earlier from your Klaviyo Dashboard.
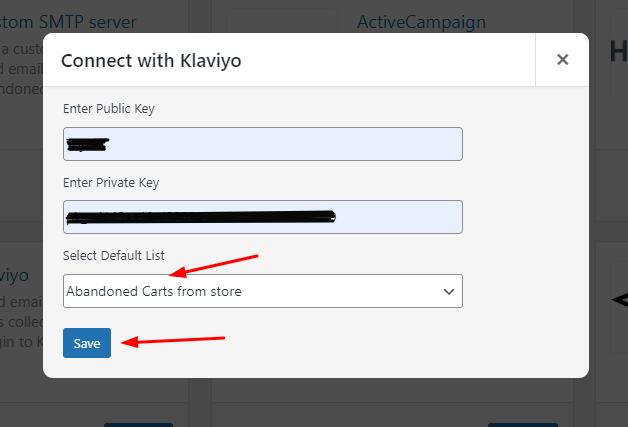
After entering them and clicking on ‘Next Step’ you will be asked to select a default List. Since we created ‘Abandoned Carts from store’ list, we will choose that and Save it.
Once connected, you will see the ‘Disconnect’ option.
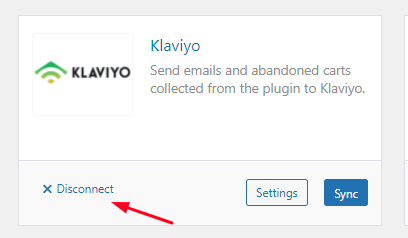
The Sync button will also be visible to you once a connection is established. This button helps sync any carts which were captured by the plugin after the connection has been activated and were not exported due to some reason when the carts were captured. If you wish to learn how individual carts be exported, then read here.
If the integration fails, then one common solution to try out is re-checking the API URL & API Key by copying & pasting them again.
Once the integration is established, the Abandoned Cart Pro plugin will start sending all the new abandoned cart user information (email address, first name, last name) to Klaviyo. Please note that the previous abandoned cart information will not be sent.
From there, Klaviyo will send all abandoned cart emails.
Let’s say a guest user abandoned their cart and with the Abandoned Cart Pro plugin, you have captured their email address. This email address will be available on your Klaviyo Dashboard under ‘Profiles’ as a Contact. See below:
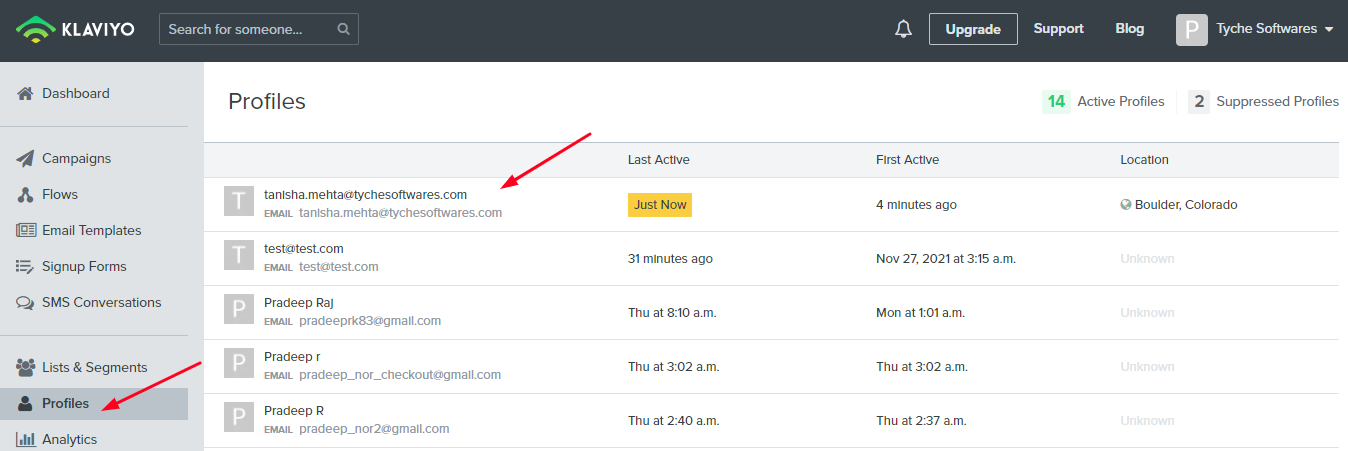
If you select this email address, you will get all the additional contact details such as Phone Number, Name, etc. depending on whether they are captured on your WooCommerce site. Please note that this contact will be added to the ‘Contact List’ saved in the settings.
You will also be able to find Metrics/Events like ‘Created Cart’, ‘Modified Cart’, ‘Deleted Cart’ etc here.
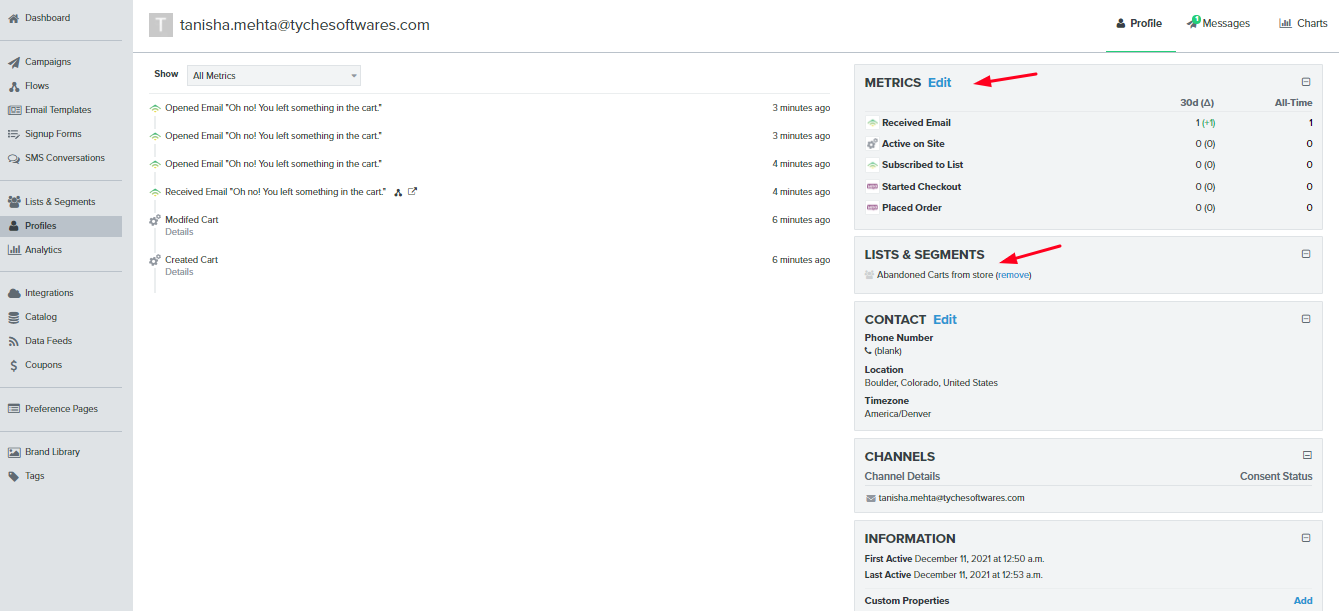
You will also be able to see if the Abandoned Cart reminder email was sent or not over here. As you can see in the image above, an abandoned cart reminder email was sent to this email address and it was even opened by the customer.