We are now moving ahead from discussing about in-built functionality of the plugin to different new features that we have introduced to enhance the usability of Abandoned Cart Pro for WooCommerce plugin. Today we will look into how to achieve a higher recovery rate by sending unique email templates to selected customers in Abandoned Cart Pro plugin.
This is a new feature added in this plugin to help initiate a recovery process by sending custom emails after shopping carts get abandoned. For this you will need to set the details of email template and coupon codes by clicking on ‘Send Custom Email’ option under Abandoned Orders tab.
Send Custom Email option appears once you mouse hover the email address of the customer whose cart is abandoned as shown below:
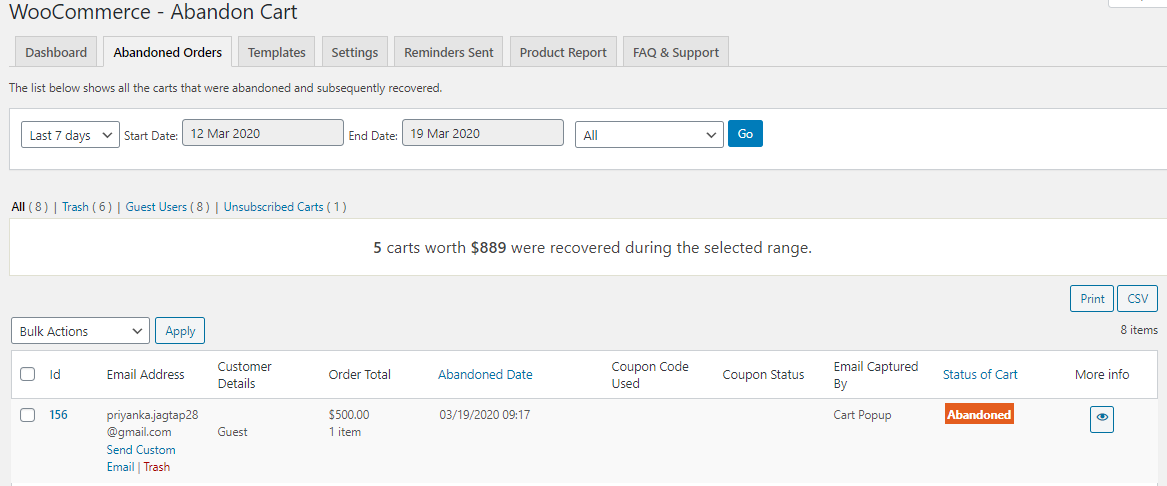
Click on Send Custom Email option
When you click on Send Custom Email, you will be taken to the Templates tab where you are asked to set the details for the template which will be sent to the selected abandoned cart.
The Send Custom Email page has been divided into 2 parts as below:
1st part:
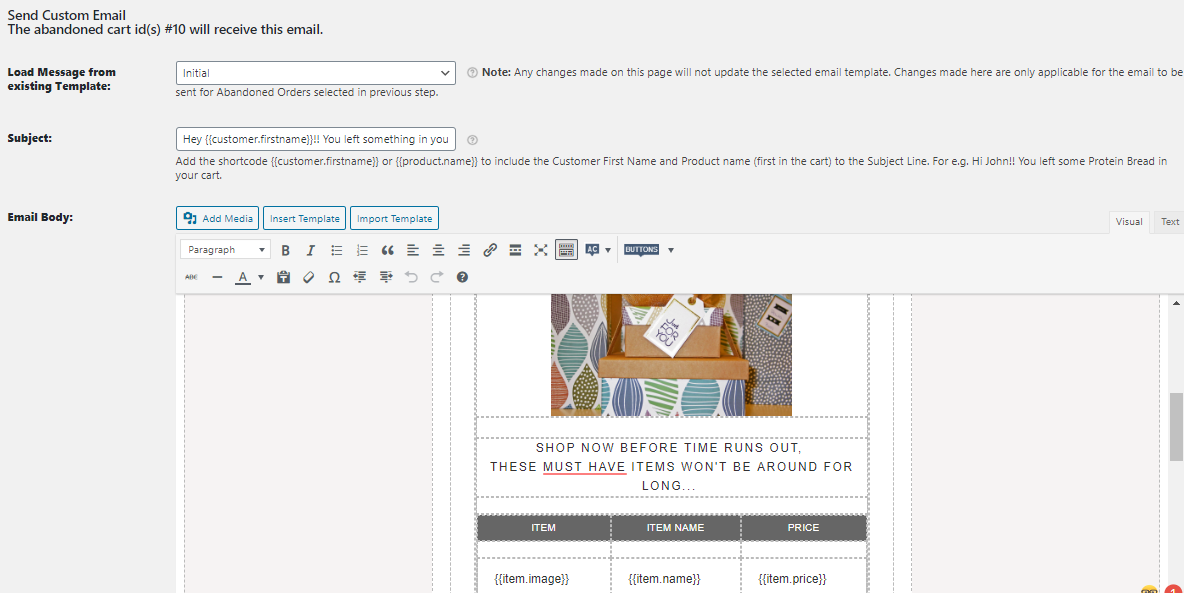
1st part of Custom Email
2nd part:
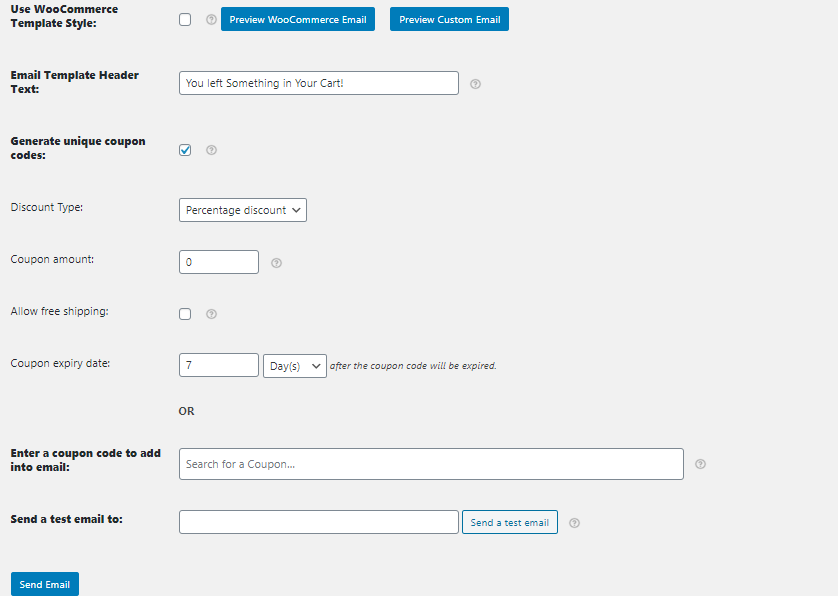
2nd part of Custom Email
Note: For cart if we have send abandoned cart email via Send Custom Email option, then the automatic reminder email will be not sent to the same cart.
Now, lets talk about each segment of these parts in detail:
Load Message from Existing Template:
This item allows you to add the data of the existing created template which you have selected from the dropdown list.

Existing email templates dropdown
The main purpose of this dropdown is for sending reminder emails using specific email templates to important customers on regular basis. Therefore you will have to create one such template which you wish to send to these specific set of customers to initiate recovery. Bear in mind not to activate this template at the start until you want to send the email to the customer(s) and only have the body and contents of the template ready for use.
Thus when you have to send custom email, you need to select this created template and all the saved data will get populated and then click on the Send Email button to send the email. Hence in this instance, you have selected ‘Initial’ which means all the data recorded under Initial template will get loaded here.
Thus it will help you to achieve a higher recovery rate by sending unique email templates to selected customers.
Note: If you make any changes to the selected email template from the drop down then its contents will not get overwritten or update that particular template. These changes are only applicable for those Abandoned Orders which you have selected in the previous step.
Subject:
Here this is the subject of the reminder email which is by default ‘WordPress: Did you have checkout trouble?’ The word ‘WordPress’ is the site title name, so the subject includes ‘<site_title_name>: did you have checkout trouble?’
You can change this subject as required and also personalize it by adding a merge code to the subject. For instance, you can write ‘Hi {{customer.firstname}}!! You left {{product.name}} in your cart’ to the Subject Line. This will be displayed as ‘Hi John!! You left some Protein Bread in your cart’ in the Subject Line.
It is important to have a good subject line that induces the lost customer to feel like opening the email in the first place so as to make them proceed towards making the transaction.
Email Body:
Email body field allows you to write the email contents which gives details of the abandoned cart. It includes customer’s full name, cart details like name of the product, when was the cart abandoned and product price, quantity and the total price of the cart.
You can customize the email body depending on what you wish to highlight in the mail that will force the customer to come back to the store to make the purchase. For this, the different items which are provided for the email content can be used as follows:

Items provided for email content
Add Media – This will help you to add an image to the email body which is saved on the computer or device you are using.
Text editor – Basic text editor options for bold, italics, bulleting, indentation, underline, strike through, placement of text or paragraph, justifying the paragraph etc are given. But the 2 most important items introduced in this plugin is ‘AC’ and ‘Buttons’ dropdown as shown above on the right side of the image.
AC – This gives a list of mergecodes that can be used in the email body whereas Buttons show a list of different type of buttons that can be explored.
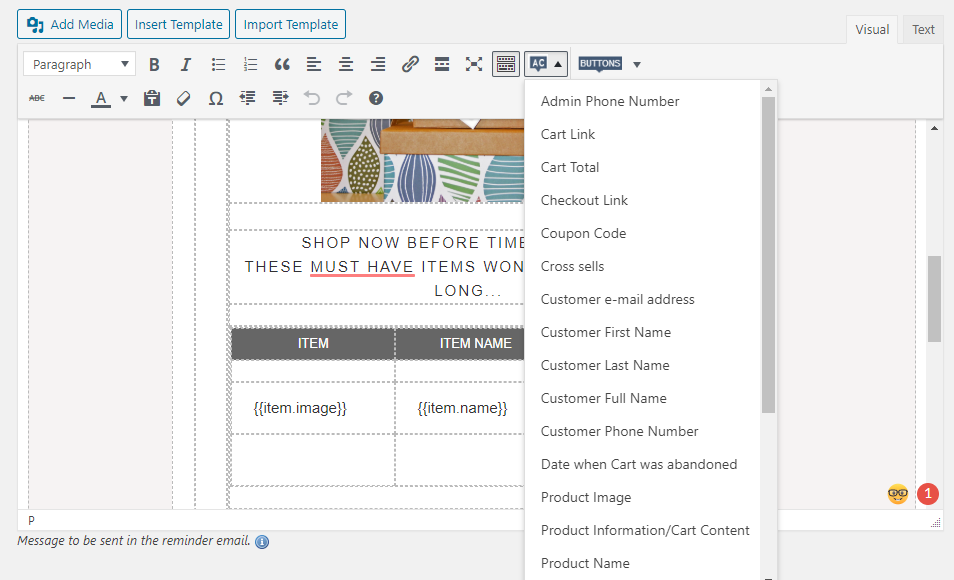
List of merge codes
To understand the details of merge codes you can click here to get to the previous post which outlines detailed information on them.
Use WooCommerce Template Style:
Here you have 2 options, either you can select the default WooCommerce Template Style by ticking the checkbox or choose not to by keeping it blank.
If you click on Preview WooCommerce Email button, the Email preview will appear as follows:

Preview of WooCommerce Email option
And if you click on Preview Custom Email button, the Email preview will appear as follows:
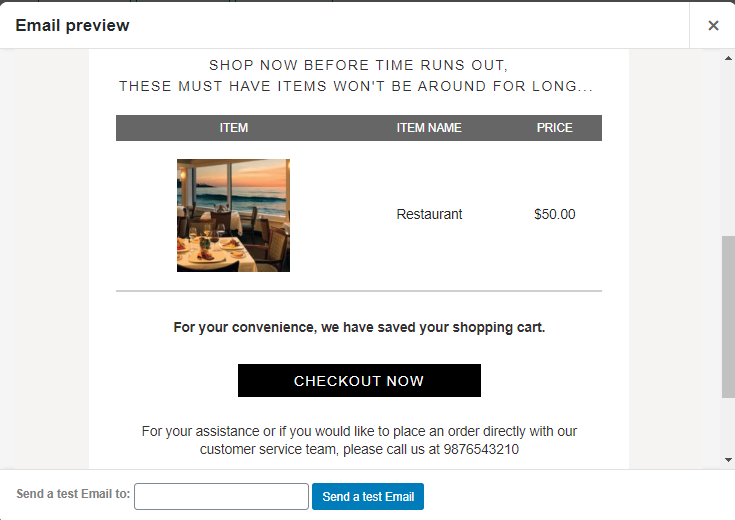
Preview of Custom Email option
The template styling is taken from the WooCommerce setting and if you want to change the design and styling then you can do it from the WooCommerce – Settings – Emails Menu.
Email Template Header text:
Anything you type here appears on the header of the template which is the blue band as shown in the above image. By default, it is ‘Abandoned Cart Email Template’ text written for the template. This is only applicable when the ‘Use WooCommerce Template Style’ is checked.
Enter a coupon code to add into the email:
Coupon codes play a significant role in converting non-purchasers to purchasers. You can make unique coupon codes by selecting the parent code.
In order to understand more about how to make a coupon code, you can click here to get directed to the post which has detailed explanation on the same.
Generate Unique coupon code:
To generate a unique coupon code, you need to have a parent code assigned first. The selected coupon code in the setting ‘Enter a coupon code to add into the email’ will be treated as the parent coupon code and all the settings of this coupon code will be inherited and copied to the unique coupon code.
The generated unique coupon code will be replaced with the coupon code mergecode ({{coupon.code}}) if mentioned in the abandoned cart email body.
Note: If a new template is made, then you need to add the parent coupon code and enable the setting ‘Generate Unique Coupon Code’ to generate the unique codes. If you are using the default templates (Interim / Final), then you do not require to do any settings because the plugin will automatically generate 5% for ‘Interim’ and 10% discount codes for ‘Final’ email template.
If you wish to overwrite the Default templates coupon codes then you can add a parent coupon code and enable the Generate Unique coupon code setting.
Send a test email to:
This field helps you to add an email address where you can receive a test email for this template before sending it to the customer. Hence you can verify the email and confirm the contents before sending it to the customer.

Test email sent successfully
Note: All the merge codes used in the body while sending the test email will be replaced with static content as we do not have actual data to replace it.
Once all the details of the reminder emails are added on the Send Custom Email page, you need to click on ‘Send Email’ button to send the mail to the customer of the selected abandoned order.
Once the email is sent to the customer manually, there will be a confirmation message that appears on top of the page as shown below:
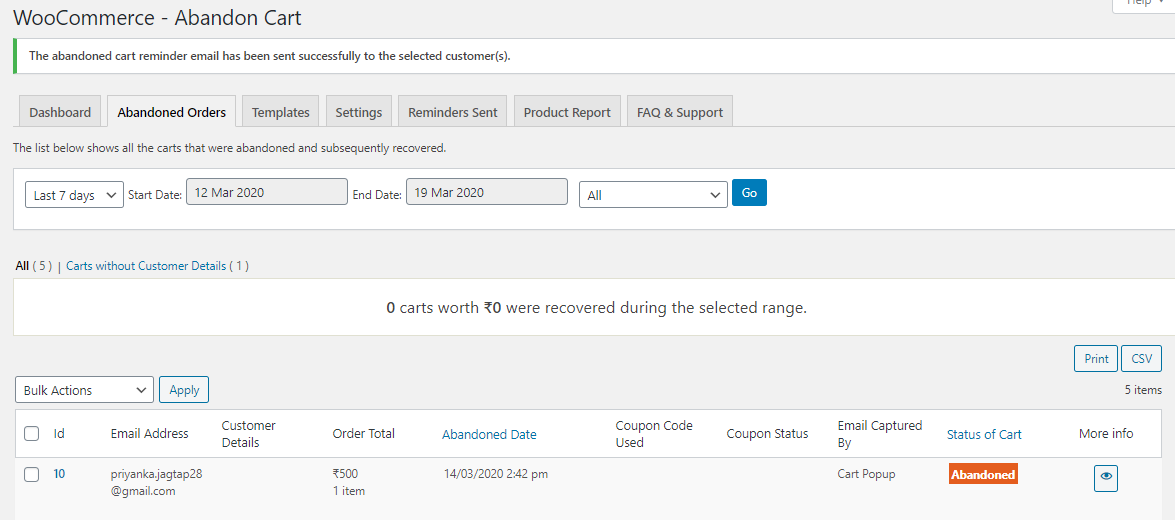
Confirmation message after sending email
This action will also reflect on the Reminders Sent Tab, where the abandoned order for which the manual reminder email was sent will have ‘(manual)’ written next to the name of the template, used to send the email as shown below:
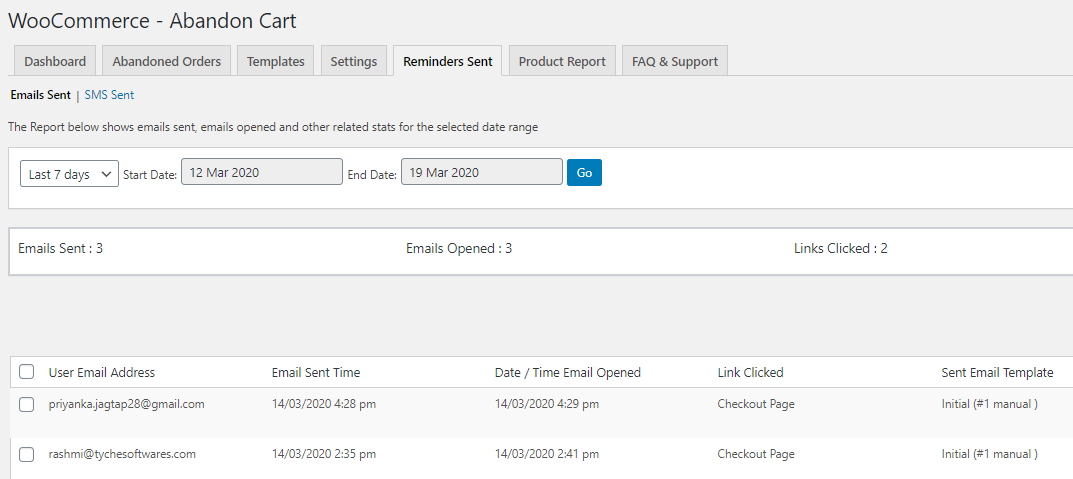
Email details under Reminders Sent tab
Bulk Action:
There is a provision to set a manual follow-up for multiple abandoned orders in just one click using Bulk Action option. In order to perform this, you need to select the specific abandoned orders and select ‘Send Custom Email’ from the dropdown and click on ‘Apply’ button as shown below:
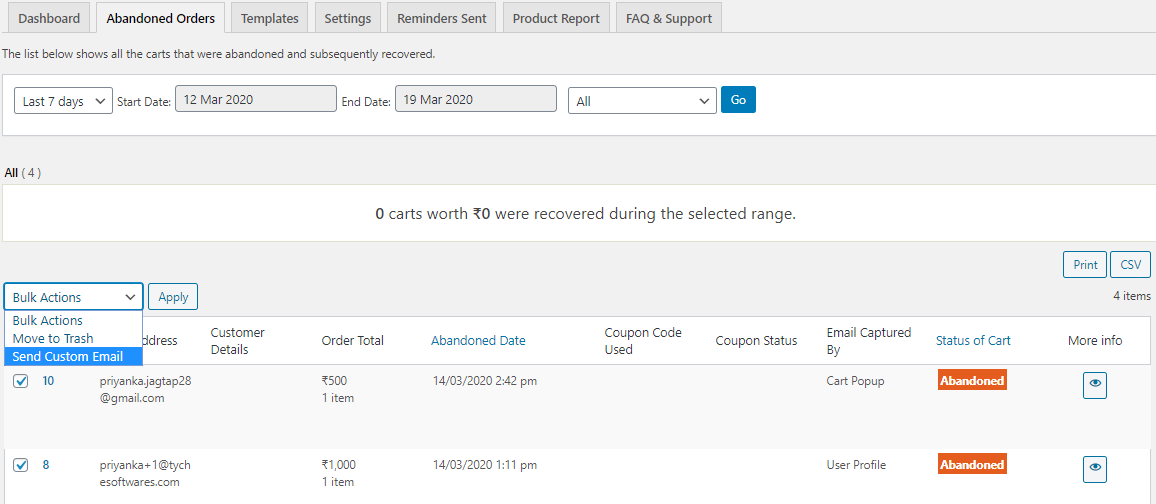
Bulk action for sending custom email
Conclusion
Different features and options which get added to the existing functionality not only makes the life of the admin easy but also helps customers have a pleasant experience of shopping online. Thus such features help make Abandoned Cart Pro for WooCommerce plugin best in the market to resolve problems related to the abandonment of shopping carts.