In v5.0.0 of Booking & Appointment Plugin for WooCommerce, we have introduced our first Gutenberg Block called Available Bookings Block. This block allows showcasing the available bookings of products in List/Calendar view.
Available Bookings Block feature is available for both WordPress 5.0 (Block Editor “Gutenberg”) or newer version and WordPress 4.9 (Classic Editor) or older version.
Let’s say you are allowing your customer to book your products and this booking functionality is implemented on your website using WooCommerce and our Booking & Appointment Plugin for WooCommerce. Now you want to showcase all those Bookable products and their availability in a way so that customers can see what all products are bookable and on which dates those products are available to book.
The simple solution to that is Available Bookings Block. Using this block you can list required products along with their availability for booking. In the below screenshot, you can see the preview of the Available Bookings Blocks and its different settings for changing the view according to.
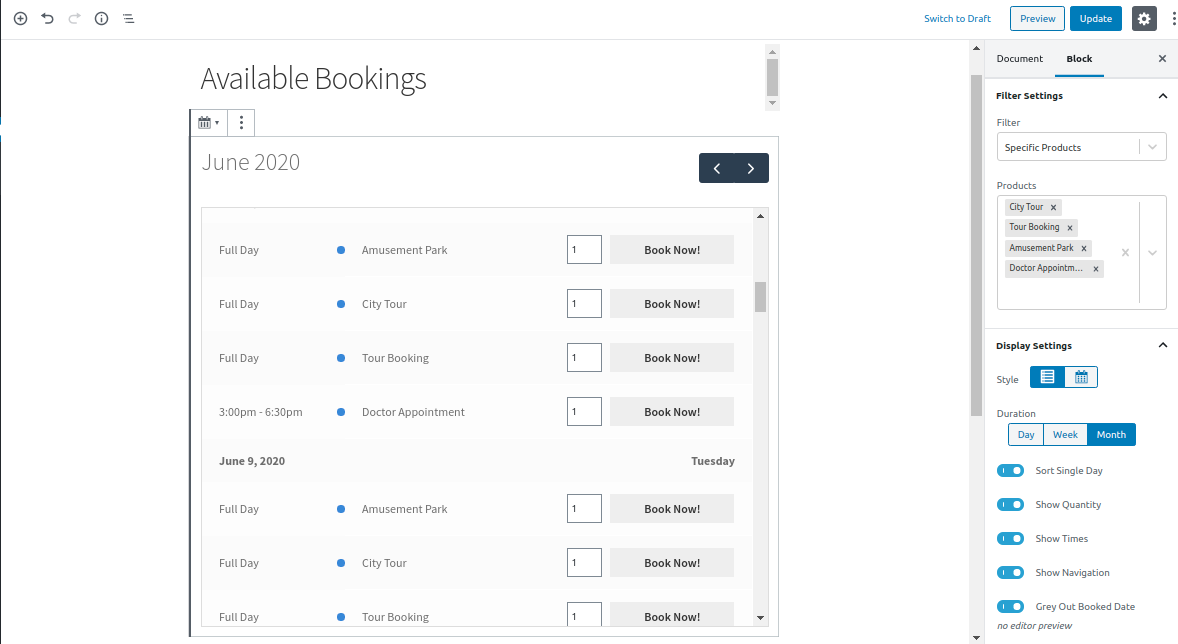
In this post, we will see how to use Available Bookings Block available in our Booking plugin step by step.
1. Available Bookings Block (Block Editor)
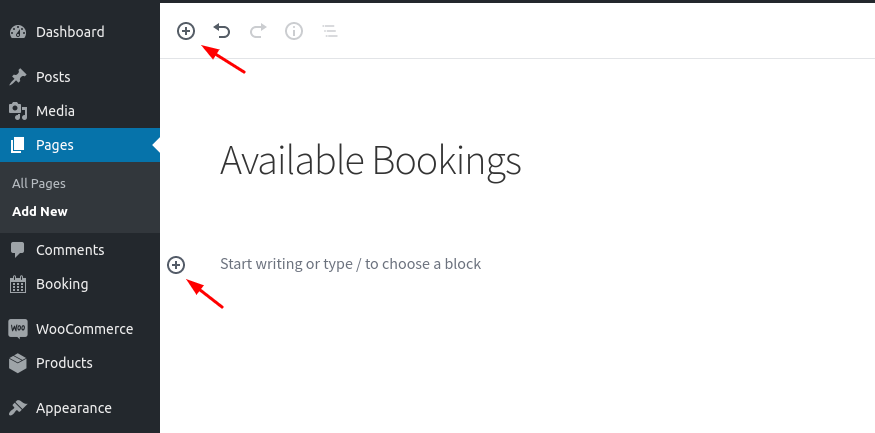
Let’s create a new Page by clicking on the Page->Add New menu and set the title to the page. To add Available Bookings Block, click on Add Block icon available on the page as shown in the below screenshot.
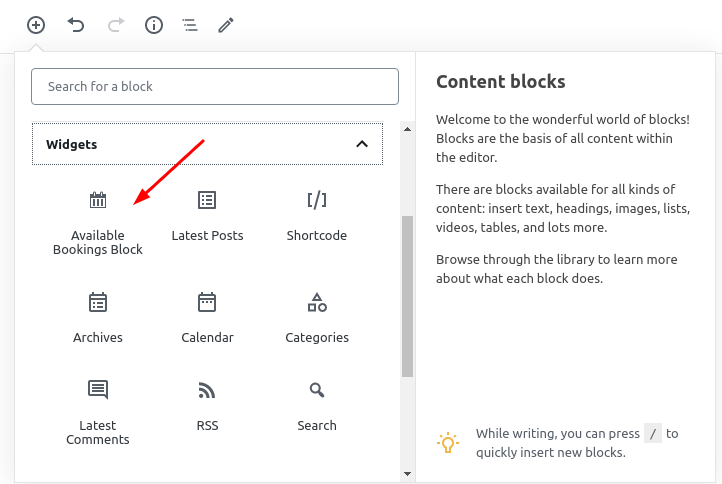
The Available Bookings Block can be found under the Widgets Category. You can also search for the blocks using Seach for a block option as you can see in the below screenshot.
Clicking on Available Bookings Block will add the Block on the page. On the right side section, all the available settings of this block will be listed. In the below screenshot, you can see the preview of the block and its default settings. With the default settings, all the available products will be displayed in the List view.
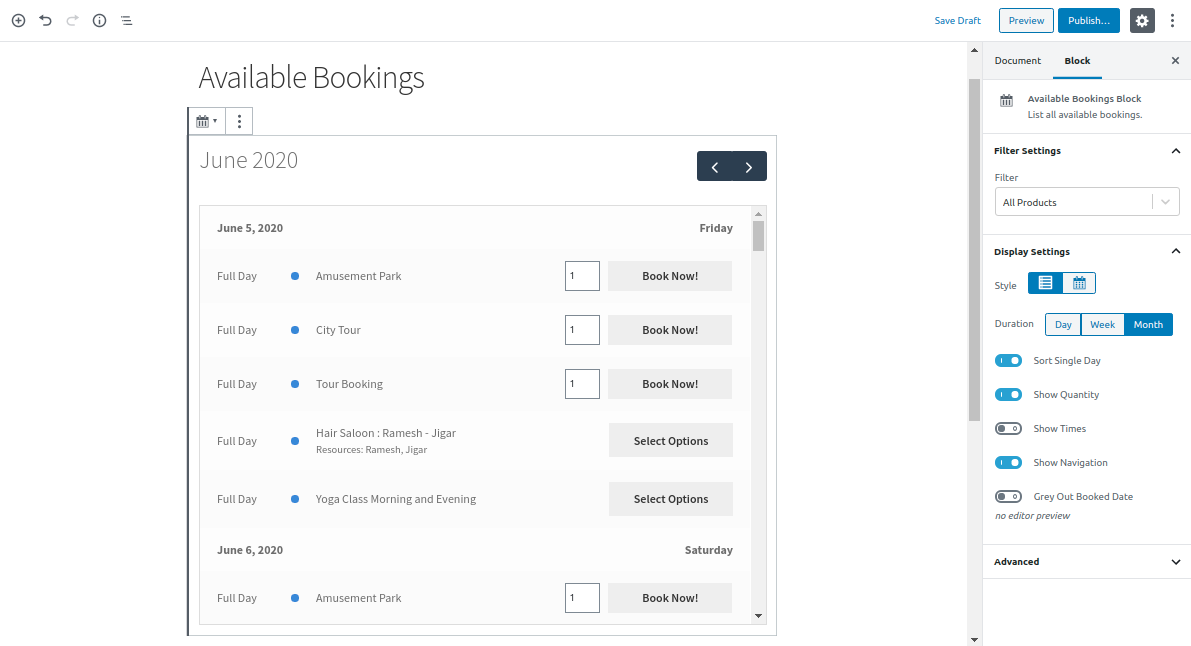
Now let’s publish the page by clicking on the Publish button and view it on the front end of the page.
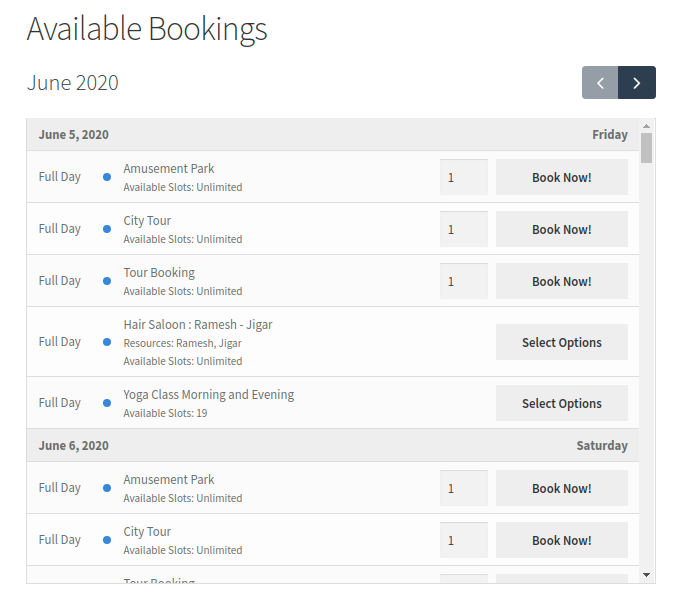
As you can see in the above screenshot, all the bookable products which are available on the particular date is being listed in the view. Currently, All the products are being listed in the List view and for the whole month, because in the Filter Settings section, ‘All Products’ is selected in Filter option and in the Display Settings section, Style & Duration is selected as ‘List’ & ‘Month’ respectively.
Understand the different sections of view.
On the left top, Month and Year is being displayed and it indicates the month & year of the current view.

On the right top, the navigation bar is present. This will be used to navigate to a different day, week, or month depending on the duration you have selected in the settings.

In the Main section, all the Available Products are being displayed under its respective Date and Day as the heading. As you can in the below screenshot, the Date is June 5, 2020, and the Day is Friday. Under that, the records are listed in 4 different columns. Let’s understand what information is being displayed in each column.
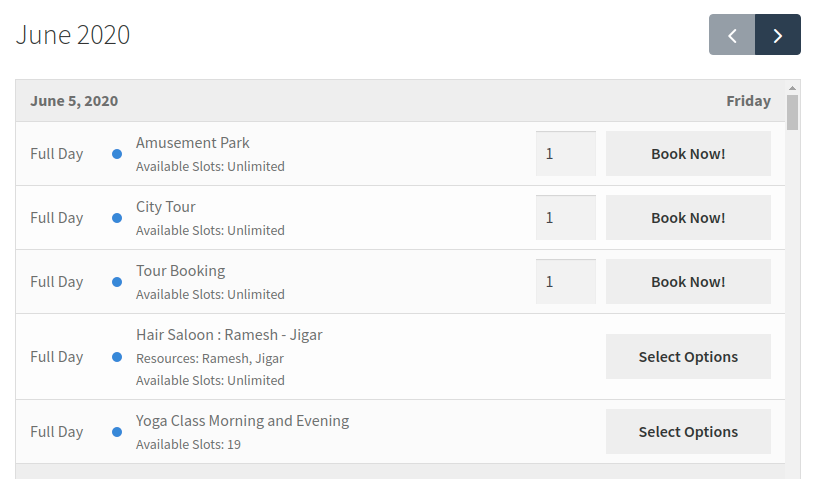
Column 1: It will show whether the product is bookable for the full day or for a specific time slot. If it’s bookable for the full day then Full Day text will be shown and if it is bookable for specific time slot then timeslot range will be shown e.g 10:00 am – 12:00 pm.
Column 2: Here, the product title will be shown and below that, it’s availability information will be displayed.
Column 3: The Quantity selector field will be displayed here if Show Quantity option is enabled under the Display Settings.
Column 4: In this column, Book Now! OR Select Options button will be displayed. The Book Now! button will be displayed only for Simple Products that satisfy any criteria that are listed below.
1. Product setup with Single Day Booking Type.
2. Product setup with Fixed Time Booking Type and Show Times option is enabled under Display Settings of Available Bookings Block.
If the above criteria don’t fulfill then the Select Options button will get displayed and clicking on the Select Options button will redirect customers to the product page where the date will be auto-selected.
Well, that was all about the view which your customer will see on the front end page where Available Bookings Block is being used.
As we are already looking at the Month duration of the List view, let’s see how the List view will appear when the Duration option under Display Settings is selected as Day OR Week.
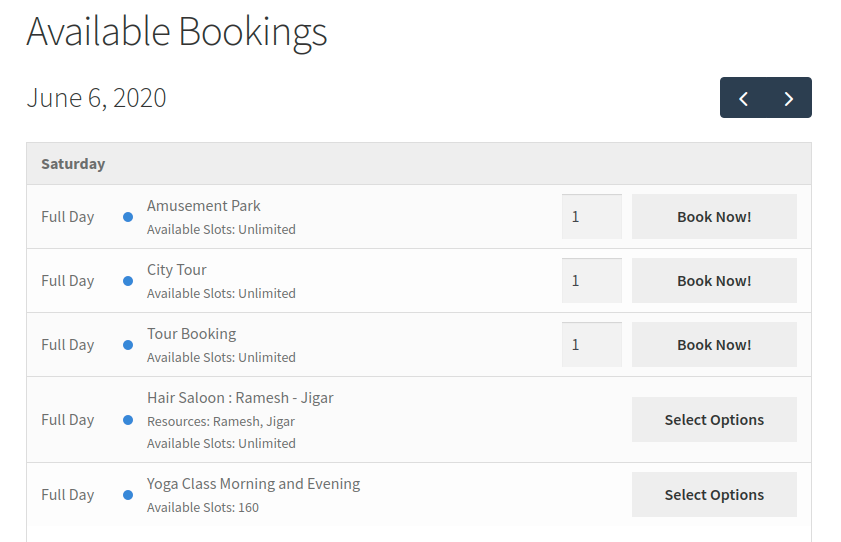
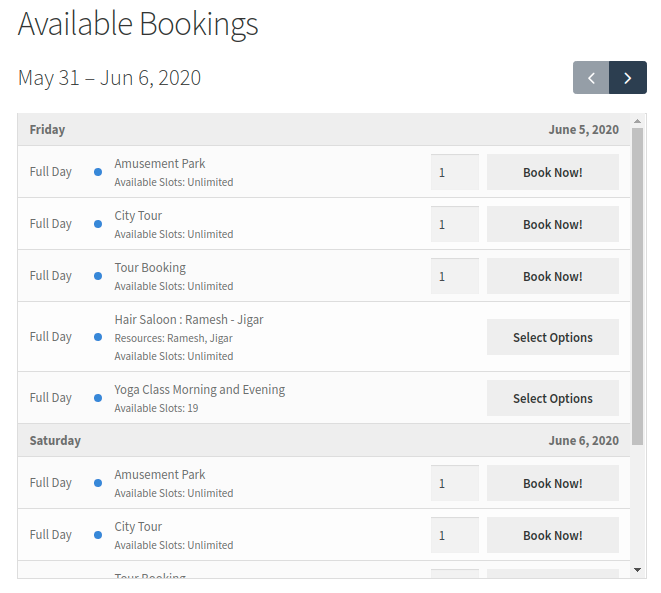
Now let’s see Filter Settings and Display Settings of the Available Bookings Block.
Filter Settings
The following are the list of options available in the Filter option under Filter Settings.
- All Products
- Booking Type
- Specific Products
- Specific Categories
- Resource Based
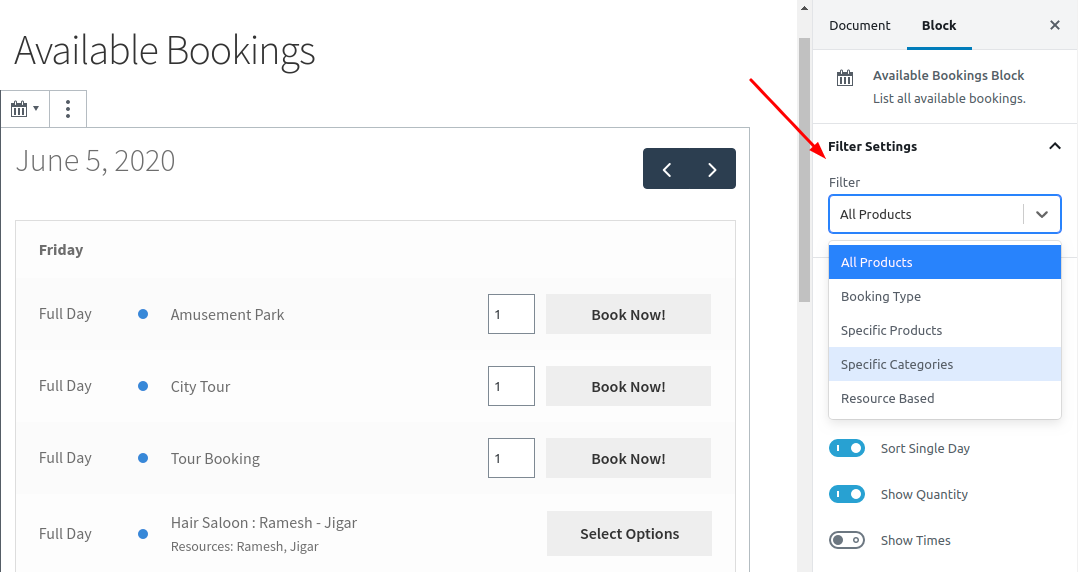
Let’s see each filter one by one.
All Products: When adding Available Bookings Block to the page, by default ‘All Products’ option will be selected in the Filter option. This means all the bookable products will be listed in the view.
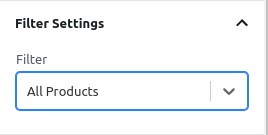
Booking Type: In our Booking Plugin, we provide 4 different ways to set up the Bookings. Single Day, Multiple Nights, Fixed Time, and Duration Based Time. Selecting Booking Type option in Filter will show all these Booking Types and among that, you can select one Booking Type and in the list, all the products will be listed which are created with the selected Booking Type.
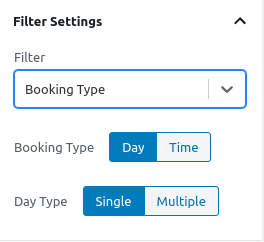
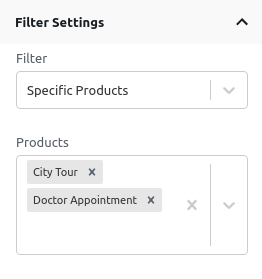
Specific Products: If you want to show only specific products in the view then you can select Specific Products in Filter option and below that a field to select products will appear and there you can select required products.
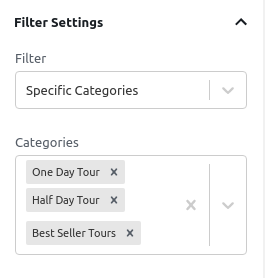
Specific Categories: Using product categories you can list the bookable products. As shown in the below screenshot that the One Day Tour, Half Day Tour, and Best Seller Tours categories are chosen under the Categories field that means only those bookable products which have any of these categories will be listed in the view.
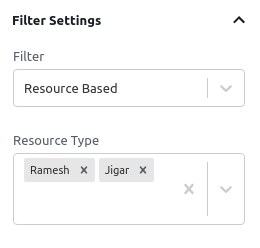
Resource Based: This filter will allow listing only the products which have a specific resource assigned.
Display Settings
The following are the list of options available in the Display Settings section.

Style: List and Calendar are two options that can be used to show the available bookings of products in List View or in Calendar View. Default: List
We have already seen the list view above so below is the screenshot for the Calendar view.

Duration: Day, Week, and Month are three options available to display the available bookings for products in the duration of Day, Week, or Month. Default: Month
Sort Single Day: This option is for showing all the Single Day Bookable products first in the list of available products. By default, this option is enabled.
Show Quantity: This option allows to show/hide quantity field selector from the view. If it’s disabled then the quantity field will be removed from the view and quantity will be considered as 1. The below screenshot is without quantity field.

Show Times: This option is particularly used for ‘Date & Time’ Booking Type. By default this option is disabled and that means it will list only a single record for the bookable product even if the product is set up with many different timeslots. If it’s enabled then, it will list bookable product records according to the added timeslots for the product. So if the product having five different timeslots then five records will be listed in the view for each timeslot.


Show Navigation: Allows this option to show/hide navigation ( Prev / Next ) button.


Grey Out Booked Date: Enabling this option will list locked-out products on the date as Sold Out and the layout of that list will be grey out. But when this option is disabled then it will not list the product.

2. Shortcode for Available Bookings Block (Classic Editor)
The only difference between Block Editor (Gutenberg) and Classic Editor for Available Bookings Block feature is that in Block Editor you can see the live preview of the changes made in settings on the same page, whereas in Classic Editor you have to use shortcode along with its attributes on the page selected and publish or preview the page to view all the available bookable products on front end.
The users of the Classic Editor can use the functionality of Available Bookings Block feature by using [tyche-bookings] shortcode. This shortcode can be used along with the following attributes to control the bookable products that need to be shown.
Attributes:
view=’list’ ( list, calendar)
filter=’all’, ( all, type, products, categories, resources )
type=’day’, ( day, time )
dayType=”, ( only_day, multiple_days )
timeType=”, ( date_time, duration_time )
products=”, ( product ids separated by comma )
categories=”, ( category ids separated by comma )
resources=”, ( resource ids separated by comma )
duration=’month’, ( day, week, month )
showQuantity=’true’, ( true, false )
showTimes=’true’, ( true, false )
showNavigation=’true’, ( true, false )
sortingSingleEvents=’true’, ( true, false )
greyOutBooked=’true’, ( true, false )
As a first step, please install the Classic Editor plugin from WordPress Plugins->Add New if you don’t already have it active.
Let’s create a new Page by clicking on the Page->Add New menu and set the title to the page.
If you want to display all available bookable products for one week in calendar view then the shortcode is [tyche-bookings view=’calendar’ duration=’week’]
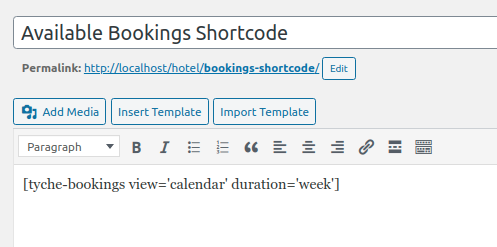
Along with the shortcode, select an appropriate title and publish the page by clicking on the Publish button. As you can see in the above screenshot, we have used view attribute with its value as calendar and duration attribute with its value as week. On the front end of the website, the view of this shortcode will appear as shown in the below screenshot. All the available bookable products will be displayed in calendar view for duration selected one week.

When the view attribute is not specified in the shortcode, all the available bookable products will be displayed in the List view by default.
Let us take a real example of 3 use cases using the shortcode with different attributes & values to show selected products, show all products of one category & show selected resources.
Here we have created a product Basic Pedicure, assigned a category Skin Care and added two resources Sophia & Maria.
1. Shortcode for showing availability of some specific products
In order to do this, you will first need to find out the product id of those products that you want to show.
Whenever you add a new product, a product id is automatically assigned to it. On the Products page in admin, when you hover the mouse over the product, you can see the Product id with other settings such as Edit, Quick edit, Trash, View, Duplicate. As you can see in below screenshot product Basic Pedicure has id 501 and assigned a category Skin Care.

Shortcode for showing only some specific products is [tyche-bookings filter=’products’ products=’498, 449, 447, 501′ duration=’week’]

In the above screenshot we have used attribute filter with its value as ‘products’ and attribute products with its value as ‘498, 449, 447, 501’ wherein 498, 449, 447 and 501 are product id’s. We have also used attribute duration with its value as week.
On the front end page, the above shortcode will appear as shown in the below screenshot. As you can see only those products are displayed having that particular id for one week. Basic Pedicure product with id 501 is displayed on the front end.

Let’s say for instance your store has 20 bookable products out of which you want to show only 14 bookable products on the front end page, then those 14 products can be shown using a shortcode.
2. Shortcode for showing all products of a specific category
You will have to first find out category id of that particular category you want to show. Assigning a category to products is also equally important. Hovering the mouse over each category will show URL in the bottom left where its particular id is present. You can find all categories under Products -> Categories page. As you can see Skin Care is a Category with id 27. You can see the id in URL in the “tag_ID” parameter.

The shortcode for showing all products of a selected category is [tyche-bookings filter=’categories’ categories=’27’]

After using above shortcode and updating the page, the front end page view will display all available bookable products in that category. As you can see in the below screenshot, Skin Care category has id 27 and this category has only one product Basic Pedicure. So the available bookings of the Basic Pedicure product are displayed for both the resources that we had assigned. We can also add more products to a particular category as needed.

3. Shortcode for showing a specific resource from all available resources
If you are using the Resources feature from the Booking plugin, then you may want to show the availability of selected resources. First, you will need to fetch the resource ids of the resources. When you go to Bookings->Resources you can see all the resources assigned to different products. Hovering the mouse over each resource will show URL in the bottom left where its particular id is present. As you can see in the below screenshot we have added two resources to the product, Sophia and Maria, having id 507 and 506 respectively. Hovering the mouse over Sophia, Resource id 507 can be seen in the URL.

The shortcode for showing the booking availability of a specific resource is [tyche-bookings filter=’resources’ resources=’507′ duration=’day’]
As you can see from below screenshot, we have selected only one resource id in the shortcode along with duration as one day.

After updating the page, front end page view of this shortcode can be seen in the below screenshot where you can see that the available bookable different time slots for resource Sophia are displayed for the product Basic Pedicure.

Assigning such products id’s, category id’s, or resource id’s in shortcode will show the availability of the selected bookable products in List/Calendar view.
You can show, add or remove all bookable products or some bookable products by using the shortcode.
You can also try Available Bookings Block feature on our demo site with different products or you can create your own product.
You can use these settings according to your business requirements to show available bookings of your product on the front end of your website. This way, all the available booking of your products will be shown in one view and your customer can book it from one place.
This was all about Available Bookings Block of Booking & Appointment Plugin for WooCommerce. If you have any questions then feel free to drop an email on support@tychesoftwares.freshdesk.com