v5.6.1 of the Booking & Appointment Plugin for WooCommerce allows integration with Outlook Calendar. Please note that the Outlook Calendar integration is available as an addon and only customers who have an Enterprise License can take advantage of this integration. Starter and Business Plan customers can continue to use the Google Calendar Sync & Zoom Integration.
ADMIN SETTINGS
1. Activating your Outlook Calendar License
Simply go to Booking > Activate Outlook Calendar License. Enter your License Key in the ‘License Key’ field and click on the ‘Active License’ Button. You can then click on the ‘Save Changes’ button. Once you have activated your license, you will also be able to Deactivate it by clicking on the ‘Deactivate License’ button as shown below:
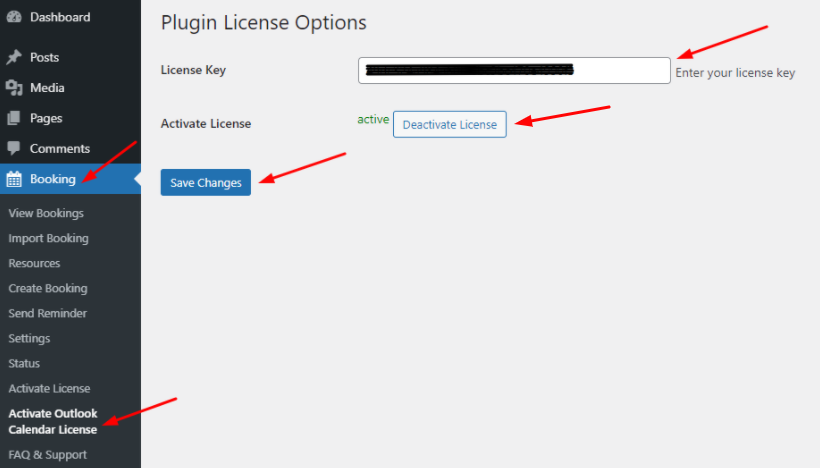
Don’t forget to click on ‘Save changes’ after it.
2. Outlook Calendar Settings
a) General Settings
After updating your Booking & Appointment plugin to v 5.6.1, you can go to Booking > Settings > Integrations > Outlook Calendar Sync > General Settings. Here’s how it will appear:
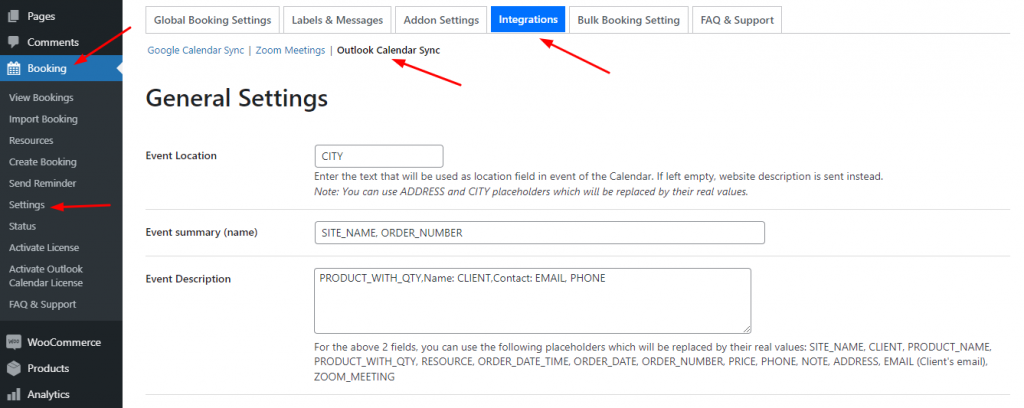
Under General Settings, you can personalize the information of how the bookings will appear on your Outlook Calendar. You can set different settings such as Event location, Event Summary (name), and Event Description.
Event Location: In this field, you can add the location that you wish to see on your Calendar. You can even replace the CITY placeholder with ADDRESS. Both the placeholders will be replaced by actual values.
Event Summary (name): Here, by default, you will find the placeholders SITE_NAME, ORDER_NUMBER added. You can replace it with other placeholders such as PRODUCT_WITH_QTY, RESOURCE, ORDER_DATE_TIME, etc.
Event Description: In this field, by default, you will find the placeholder PRODUCT_WITH_QTY, Name: CLIENT, Contact: EMAIL, PHONE added. Just like Event Summary, you can replace these placeholders with other such placeholders as ORDER_NUMBER, PRICE, ZOOM_MEETING.
b) Outlook Calendar Sync Settings
If you scroll down you will find the ‘Outlook Calendar Sync Settings’. Here, under ‘Integration Mode’ you need to choose the option ‘OAuth Sync’. By default, this setting will have the option ‘Disabled’ selected.

In order to configure the OAuth Sync, you will have to follow the instructions given just below it to find your Client ID and Client Secret. Firstly, go to the Azure portal and sign in to either your work, school, or a personal Microsoft account. Once, you’ve done this, you can go to the Panel located on the left-hand side of the page and find the ‘Azure Active Directory’ option.
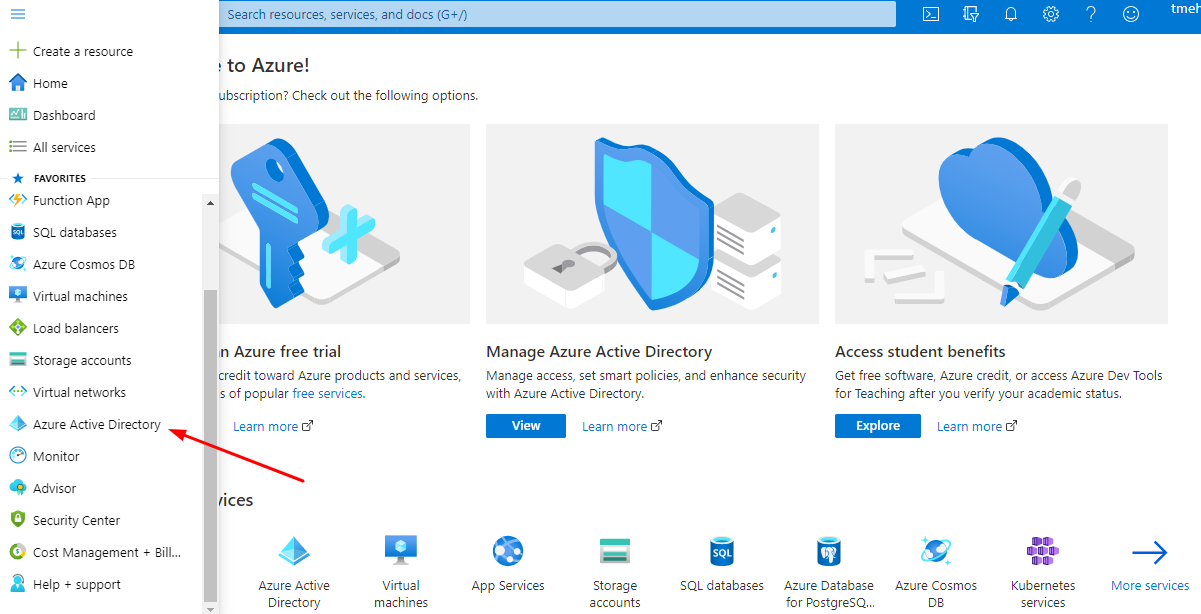
Click on it and then find the ‘App Registration’ option located under ‘Create.’
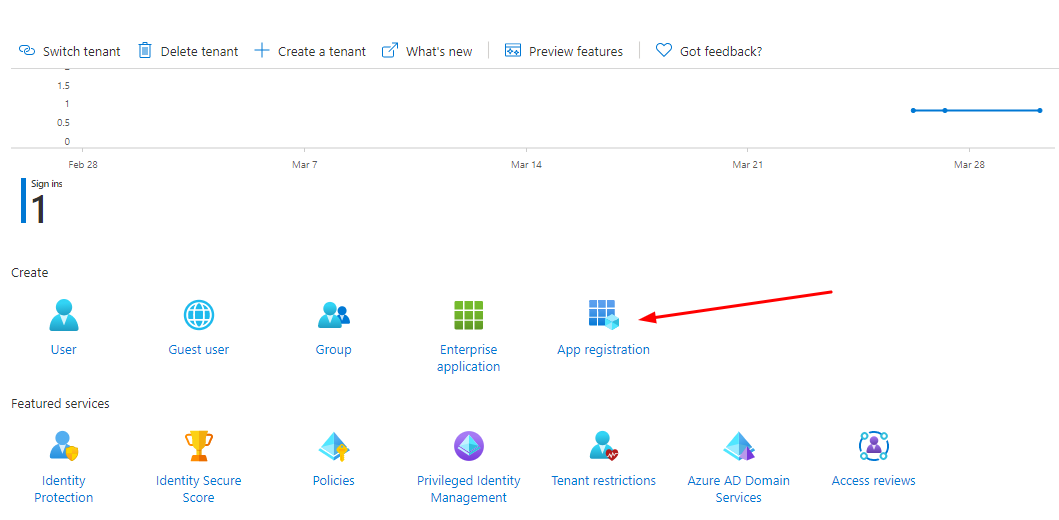
You will now have to register your application. Fill in the ‘Name’ field to whatever you’d like to fill it with. For example, let’s say that you filled in the Display name as ‘TS’. Then under ‘Supported account types’ choose the option ‘Accounts in any organizational directory (Any Azure AD directory- Multitenant) and personal Microsoft accounts (e.g. Skype, Xbox).
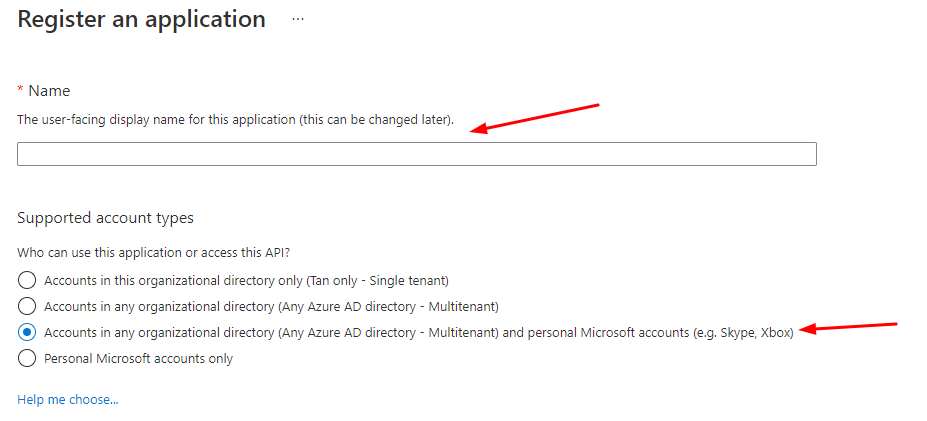
Following this, the Redirect URI (optional) will be set to ‘Web’ by default. Proceed with it by simply pasting your unique Redirect URI in the ‘e.g’ field. You will find this Redirect URI located in the Settings tab of your Booking & Appointment Plugin. Simply go to Booking > Settings > Integrations > Outlook Calendar Sync > Outlook Calendar Sync Settings > Redirect URI.

Once you have found it, copy it and paste it in the ‘e.g’ field. Then, click on the ‘Register’ button.

Azure AD will now assign your application with an Application ID a.k.a Client ID. You will find this on the Overview page as shown below:

Please copy this Application (Client) ID and paste it in the Client ID field located under your WordPres site Booking > Settings > Integrations > Outlook Calendar Sync > Outlook Calendar Sync Settings > Client ID.

After finding your Application (Client) ID, next, you will need your Client Secret. For this, go to ‘Certificates & secrets’ and click on the ‘New client secret’ option.
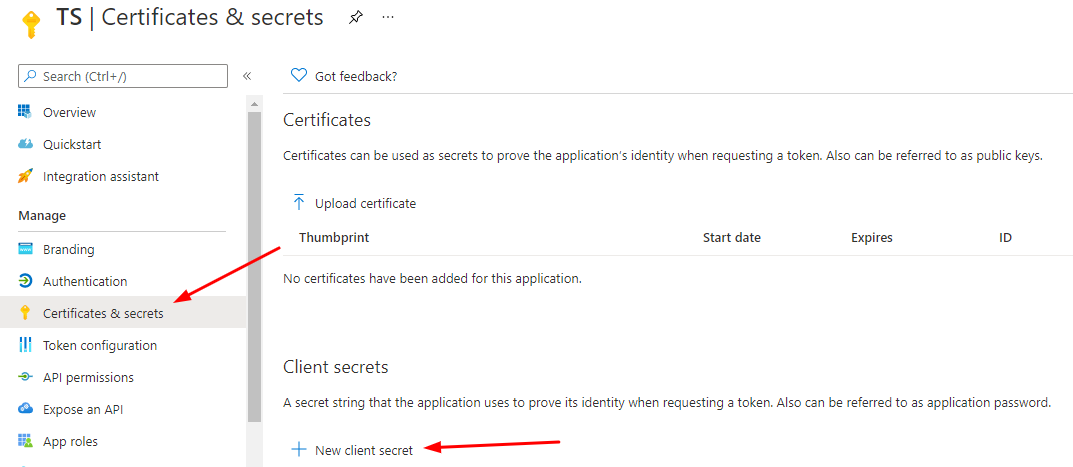
You can give a Description of your Client Secret if you’d like. Under ‘Expires’ choose the option ‘Never’ and then click on ‘Add’.

The Client Secret will be located under the ‘Value’ option which is just between ‘Expires’ and ‘ID’.

Make sure to copy the Value because this will become your Client Secret. After copying it, simply paste it for the Client Secret field located on your WordPress site under Booking > Settings > Integrations > Outlook Calendar Sync > Outlook Calendar Sync Settings > Client Secret.

The next thing that you will need to do is go back to the left-hand side panel and find the ‘API permissions’ option as shown below:
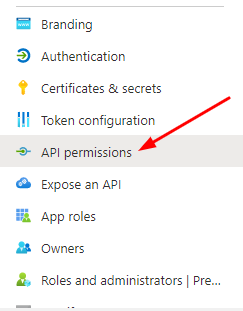
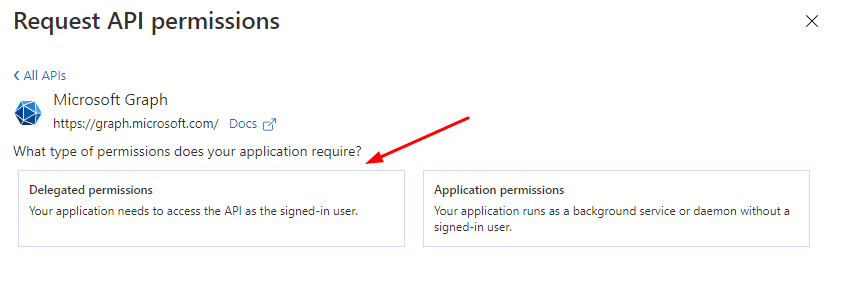
Click on it and under ‘Request API permissions’ choose ‘Microsoft Graph’.
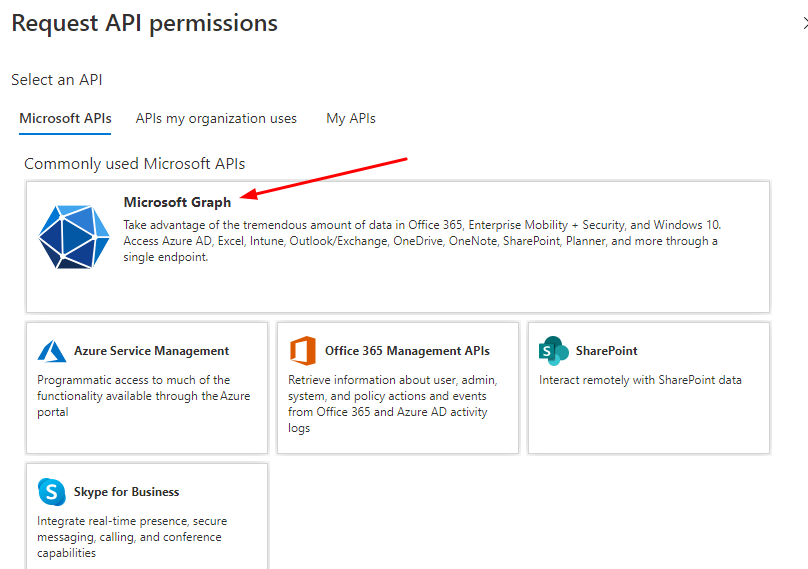
Proceed forward by selecting ‘Delegated permissions’ under ‘Microsoft Graph’.
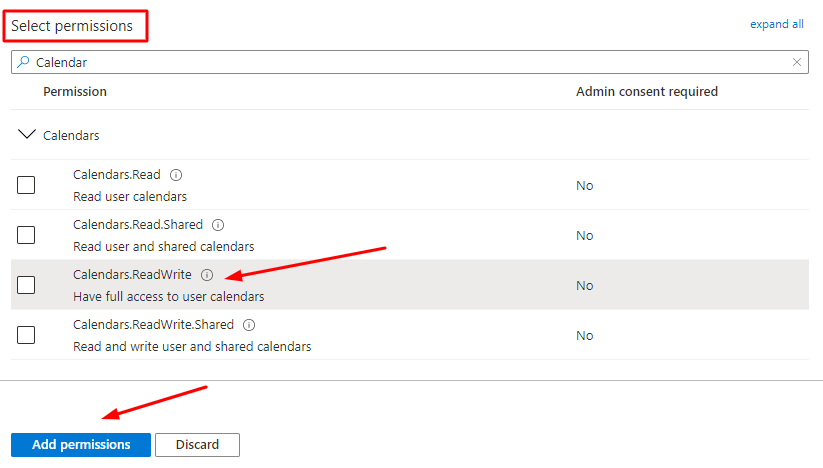
Next, search for the ‘Calendars.ReadWrite’ in the search panel, select it once found and then click on ‘Add permissions’.
Now, you can go back to your WordPress site and enter your Client ID and Client Secret in the respective vacant fields. Save these settings first by clicking on ‘Save Settings’ and then choose the ‘Connect to Outlook’ button.

Once you connect your Outlook Calendar, you can select the exact Calendar you wish to Sync with your Bookings! For example, in the dropdown, you will see the calendars that you’ve set up/created in your Outlook Calendar.

You can go ahead by choosing your preferred calendar and clicking on ‘Save settings.’
FRONTEND VIEW
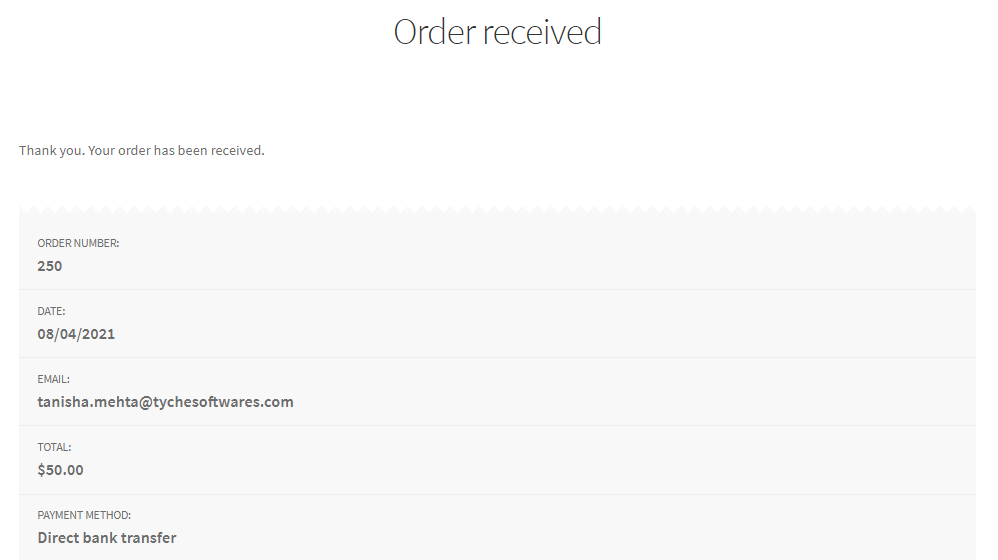
Let’s say that a customer has booked Guitar lessons for beginners on your site for 12th April 2021. Here’s how the Order Received Page of it will appear:
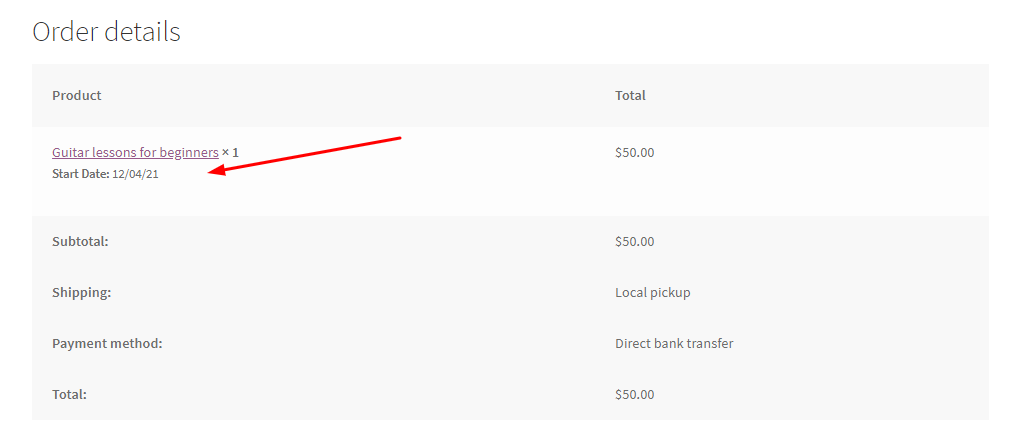
Now, if you wish to view this order on your Outlook Calendar, simply login to your Outlook account, and on the left-hand side panel, find the Calendar icon. Click on it to open your Outlook Calendar where your bookings will appear.
Please note that in order to have a uniform view of the Order Time on your Outlook Calendar, you will have to keep your Website Timezone and Calendar Timezone as the same.
You can change your Website Timezone by going to WordPress Dashboard > Settings > General > Timezone.
To change your Outlook Calendar Timezone, go to Settings > All Outlook settings > General > Current Timezone.
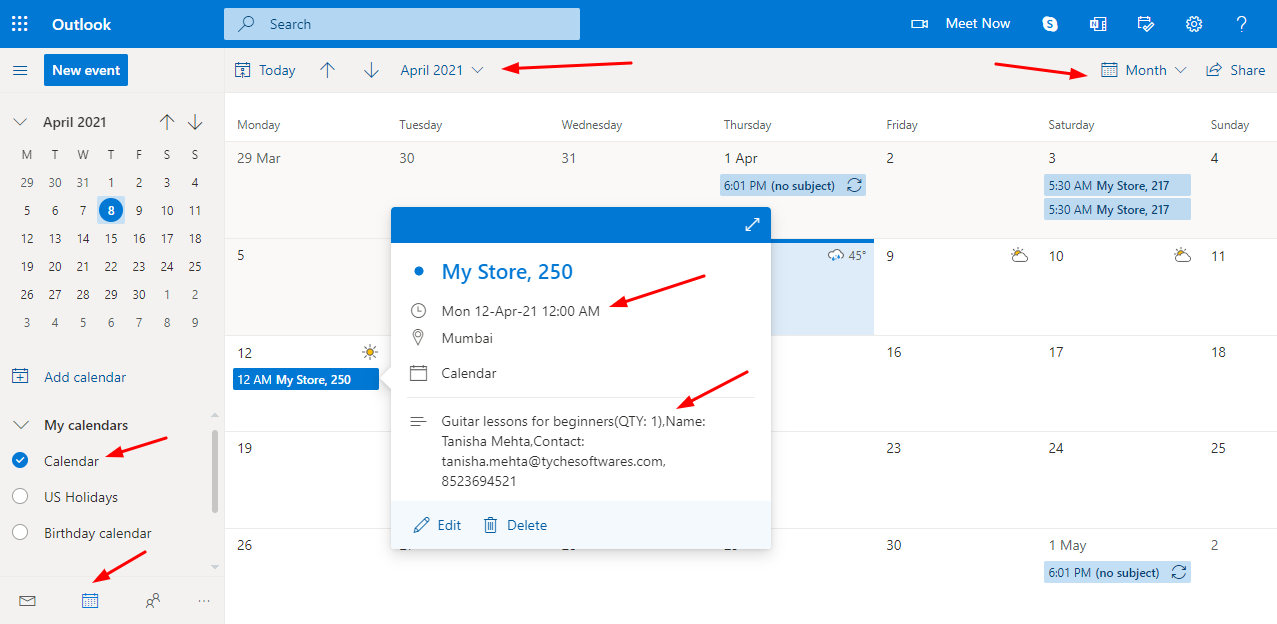
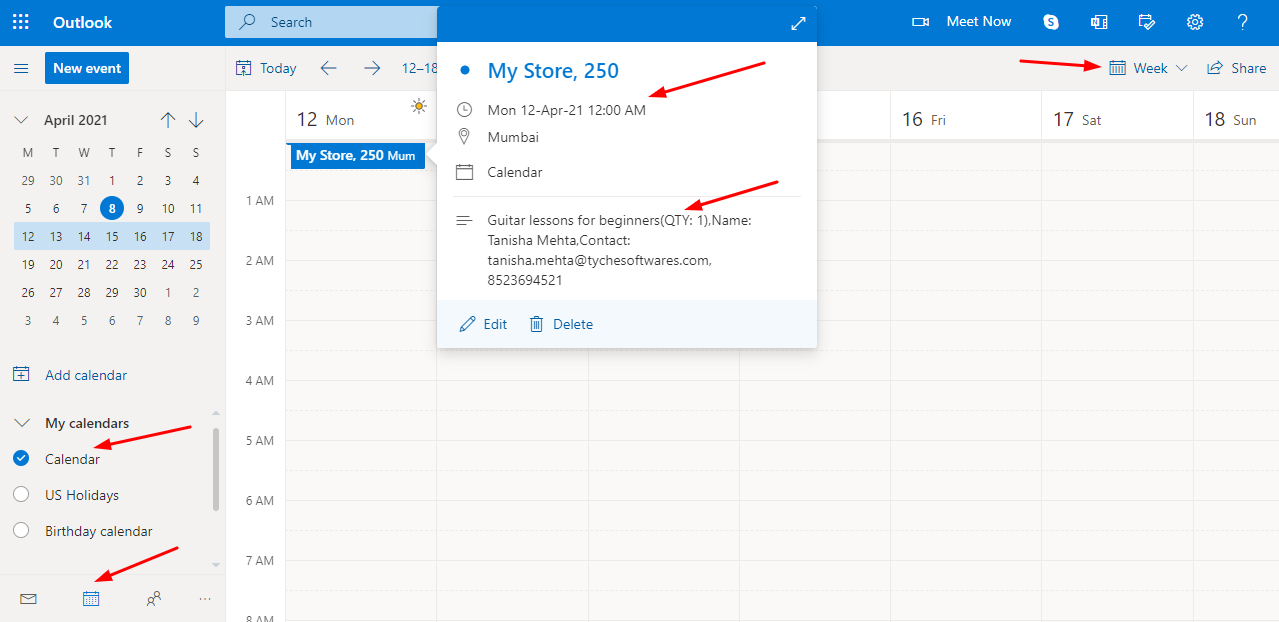
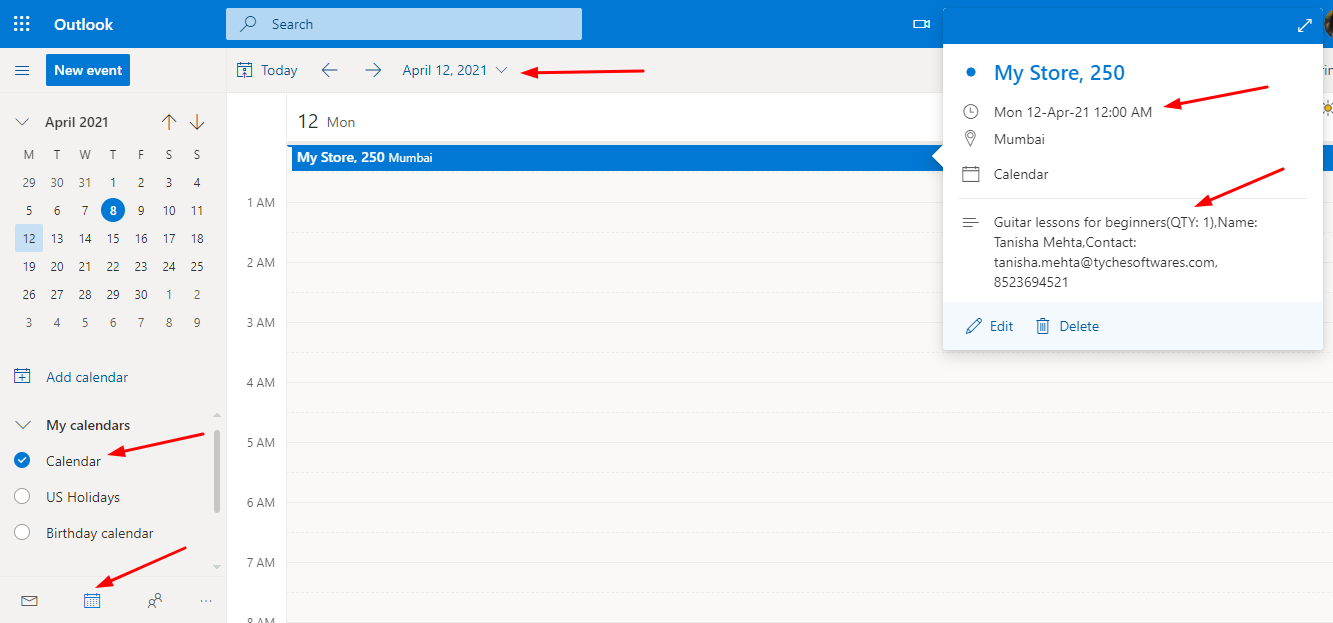
Here’s how the ‘Guitar lessons for beginners’ booking order will show when you click on ‘Month View’, ‘Week View’ & ‘Day View’ respectively:
MONTH VIEW
WEEK VIEW
DAY VIEW
In conclusion, this integration will help you keep a track of your bookings directly on your Outlook Calendar.