To setup automated export of the bookings to a Google Calendar, please follow the steps below to setup the integration. Alternatively, you can watch below video to understand how the export of the bookings to google calendar works and how you can setup on your website using Booking & Appointment Plugin for WooCommerce.
Content
- Google Developer’s Console
- Create Project
- Enable the Calendar API
- Create Credentials
- Create Service Account
- Setup the Key File Name
- Service Account Email Address
- Create Calendar
- Enter the Calendar ID
- Test the connection
- See Bookings in your Google Calendar
- Troubleshooting
- FAQ
Step 1: Google Developer’s Console
To use the integration to Google Calendar, go to the Google Developers Console to setup a project and enable the settings as needed.
Step 2: Create Project
Create a new project. Click on Projects->Create Project button. A popup will appear asking for Project Name and Project ID. Enter a Project Name of your preference.
Step 3: Enable the Calendar API
Once the project is created, the project folder is loaded. Go to the Library link on the left-hand menu. Choose the Calendar API.
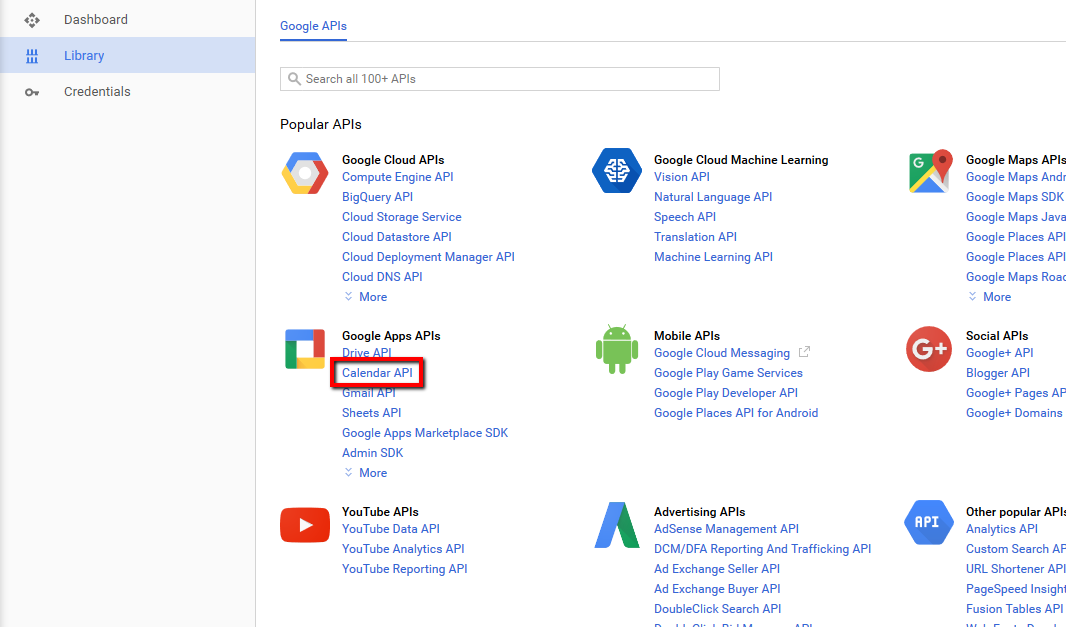
Click on Enable.
Step 4: Create Credentials
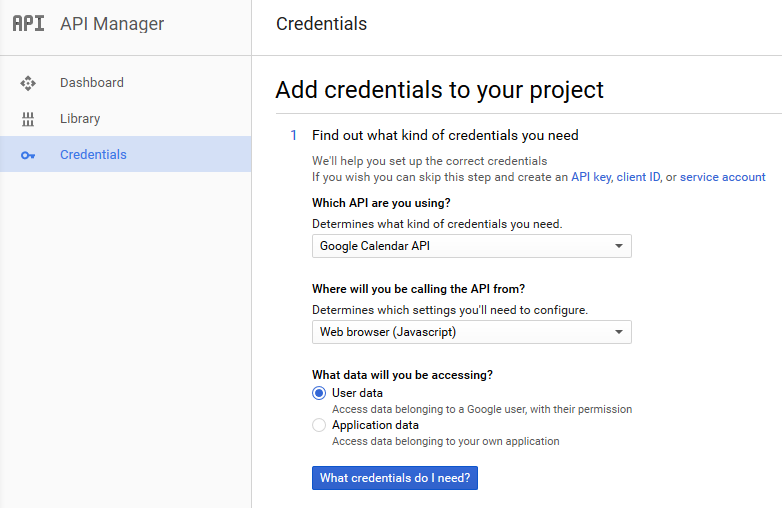
A notification will be displayed informing you that you may need to create credentials. Click on the Create credentials button.

- Setup Web Browser (Javascript) as the source.
- Setup User Data as the data that will be accessed.
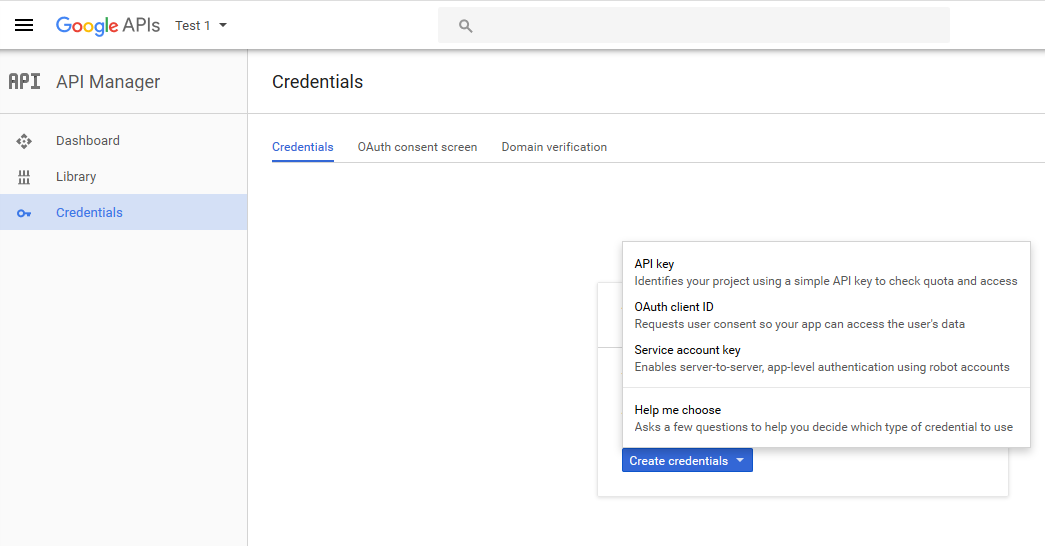
Alternatively, go to API Manager->Project->Create Credentials. Click on Create Credentials->OAuth Client ID.
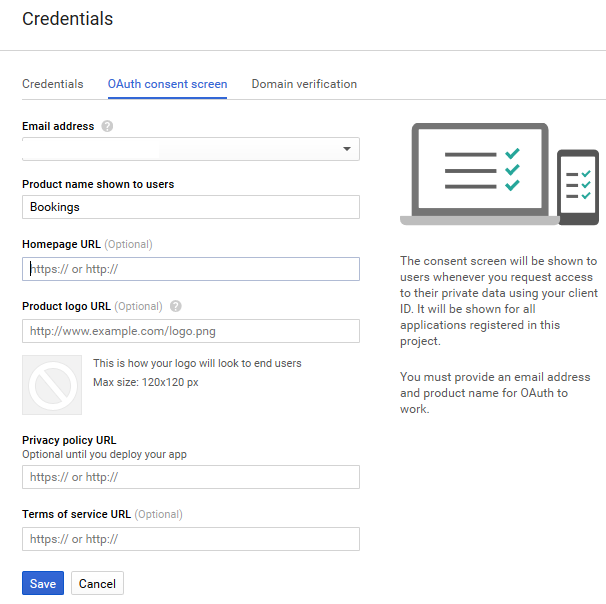
Go to OAuth consent screen. Enter a Product Name of your preference (e.g. Bookings) and save. You can enter extra customization options.
Once saved, go to Create Credentials and set the Application Type as Web Application. Enter a Name of your preference and click on Create.
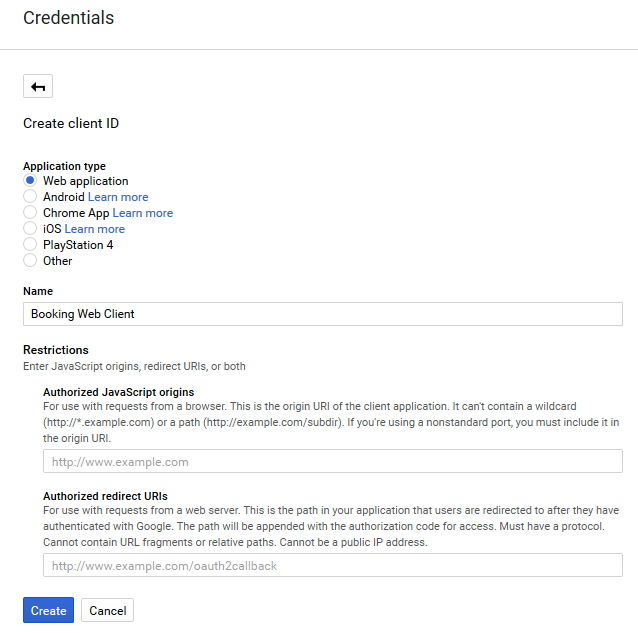
This will generate the OAuth Client.
Step 5: Create Service Account
Click on Create Credentials->Service Account Key. Set the Key Type to P12. Click on Create.
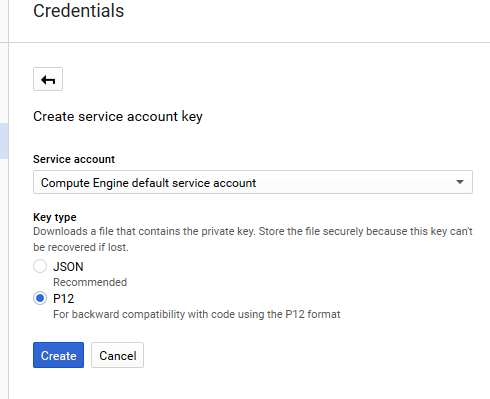
This will open a pop-up window asking to save the file. Please save the file. This file needs to be uploaded to /plugins/woocommerce-booking/includes/gcal/key/ using the FTP client program. This file is required as you will grant access to your Google Calendar account even if you are not online. So this file serves as a proof of your consent to access your Google calendar account.
Step 6: Setup the Key File Name in Booking Settings
Copy the Key File Name (excluding the .p12 extension) in Booking->Settings->Google Calendar Sync->Key File Name.
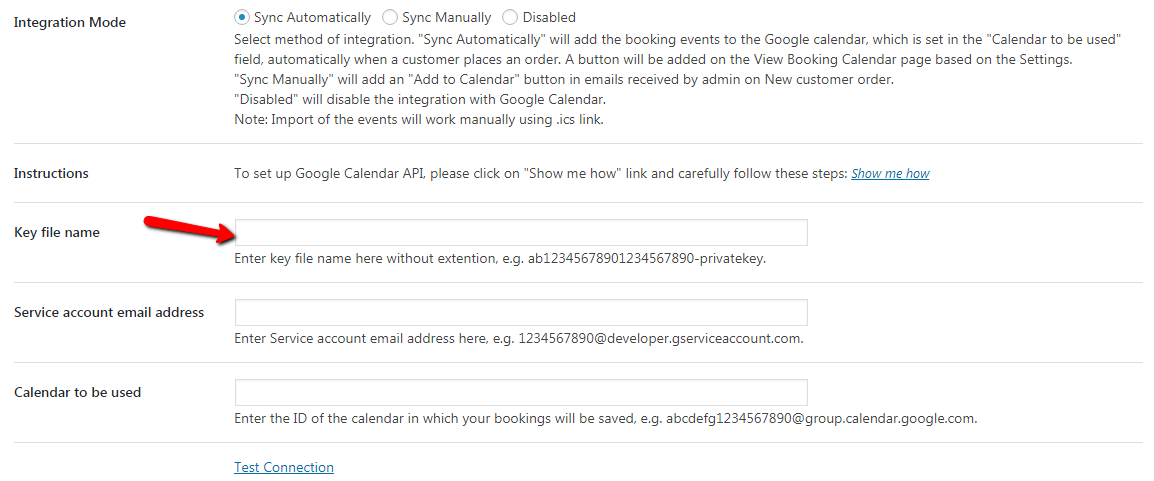
Step 7: Service Account Email Address
Go to Create Credentials->Manage Service Accounts. Copy the Service Account ID and save it in Booking->Settings->Google Calendar Sync->Service Account Email Address field.
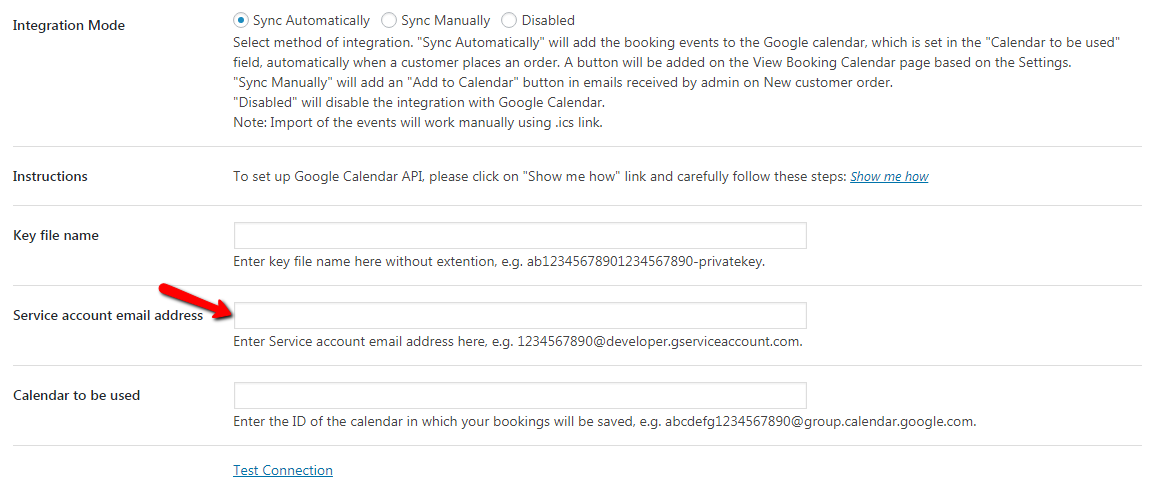
Step 8: Create Calendar
Go to My Calendars->Create New Calendar. Please try to not use the Primary Calendar. Give the Calendar a name of your preference. Ensure that the Calendar Timezone matches the WordPress Timezone on your site.
In Share with specific people, enter the email address entered in Service Account Email Address field. Set the Permission Settings to Make changes to events. Click Add Person. This will ensure that the application can create new events.

Click on Create Calendar.
Step 9: Enter the Calendar ID
Once the calendar is created, copy the Calendar ID from the Calendar Settings to Booking->Settings->Google Calendar Sync->Calendar to be used.
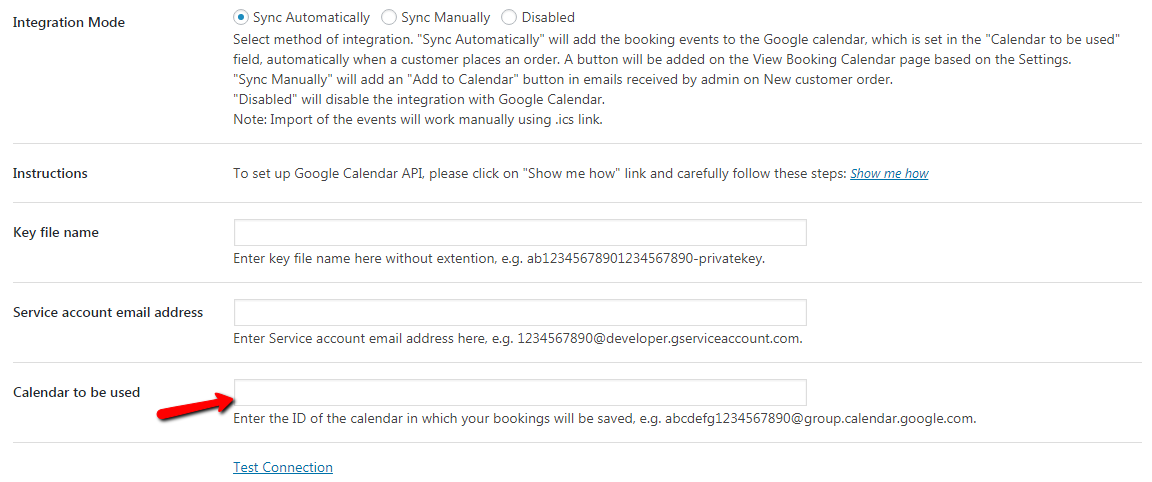
Step 10: Test the connection
Save the settings in Booking->Settings->Google Calendar Sync and click the Test Connection link. This should add a current dated event in your calendar.

In case if you wish to use different calendars for each of your bookable products, the steps 1 through 7 will need to be executed only once. After which you can create individual calendars and save the settings (with the corresponding Calendar ID) for each product in Products->Edit Product page->Booking->Google Calendar Sync Settings.
See Bookings in your Google Calendar
Once the settings are done, the plugin will export the bookings to the calendar as soon as an order is placed.

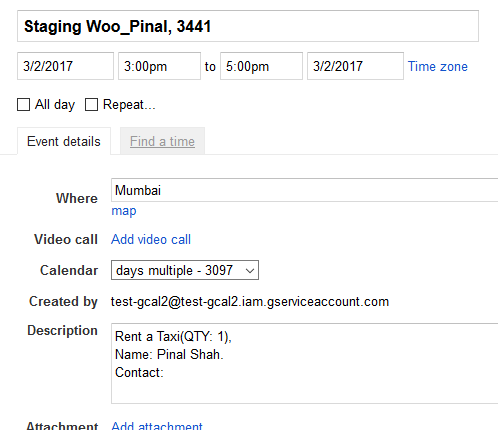
The event will contain the order and client details based on the merge tags inserted in Booking->Settings->Google Calendar Sync->General Settings.
Troubleshooting
Error: invalid_client – no application name

This error can happen when trying to connect to the Google API for the first time. To solve this, go to the Google Developer Console and select your project, then go to API & auth->Consent and fill in the PRODUCT NAME field.
FAQ
1. What information about booking is sent to the Google Calendar?
When a new booking has been made on your site, the event summary and event description is created based on the settings in Booking->Settings->Google Calendar Sync->Event Summary (name) and Event Description fields.
A variety of merge tags are available. You can setup the description and summary to best suit your needs. In a scenario where no settings have been saved, the default values for both the fields are used.
2. Are bookings added to the Google Calendar automatically synced to the booking calendar on my site?
Yes, the plugin provides 2 way sync. Settings are required for import. If the import is setup at the global level i.e. Booking->Settings->Google Calendar Sync->Import Events, then the events are imported but not mapped (i.e. orders are not created and availability is not updated). Such events are listed in Booking->Import Bookings page where they can be mapped to the desired product and the booking calendar is automatically updated.
If the import is setup at the Product level i.e in Products->Edit Product->Booking->Google Calendar Sync Settings and automated mapping is enabled, then the events are imported, orders are created and the booking calendar is updated automatically.
The frequency for import can be setup in Booking->Settings->Google Calendar Sync->Import Bookings->Run Automated Cron after X minutes.
3. Test Connection failed. What should I check first?
If you have followed all the steps above and yet the test connection has failed, the first thing to check for is the bkap-log.txt file.
If it contains a message indicating that the event could not be inserted as the calendar was not found, then the most likely reason for this could extra leading and trailing spaces in Booking->Settings->Google Calendar Sync->Calendar to be used field.
If it contains a message indicating access to the calendar was forbidden, then it could be possible that the Service Account email address permission has defaulted to ‘See all event details’ instead of ‘Manage changes to events’ in the Sharing options for the calendar.
If all of the above is set correctly and yet the events are not being created, please feel free to contact us.
4. Which ICAL feed address should be used for Import?
If the calendar is a private calendar, then please use the ICAL feed from the ‘Private Address’ field in the Calendar Settings.
If the calendar is a public calendar, then please use the ICAL feed from the ‘Calendar Address’ field in the Calendar Settings.
5. Events are imported fine. But the event summary and description on Booking->Import Bookings page is simply displayed as ‘Busy’ and ‘Available’.
This happens for a public calendar when ‘Share only my free/busy information (Hide details)’ is enabled in Calendar Settings->Share this Calendar tab.
The above-mentioned setting should be disabled for a public calendar to ensure that the plugin can import the event details as well.
Updated on June 6, 2017, by Chaitali Mehta:
General Settings & Customer Add To Calendar Button Settings of Google Calendar Sync
Let us study some of the General Settings of Google Calendar Sync that can be customized as per your requirement. These changes will be reflected in the Google Calendar for each event as it is exported whenever a booking comes in.
You need to go to Booking->Settings->Google Calendar Sync. On this page, you will find General Settings with 3 different fields as shown below.
- Event Location
- Event Summary
- Event Description
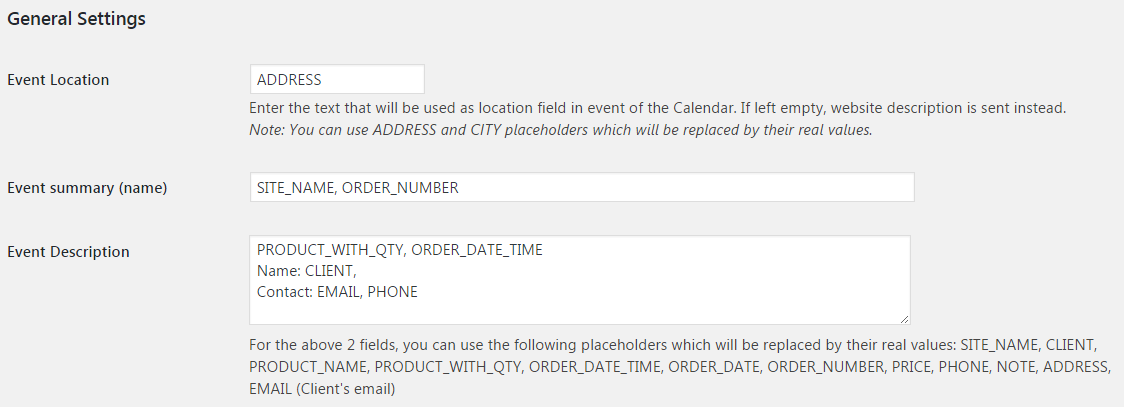
Note: After making any changes in the General Settings, click on Save Settings button.
Let us discuss how the following fields can be customized as per your requirement and where it gets reflected in the Google Calendar.
Event Location
You can enter text in Event Location field as ADDRESS and CITY placeholders which will be replaced by their real values as locations.

Real values are the values updated as Booking Details on the Checkout page by the customer while placing an order. In our example the real values are updated as shown below:
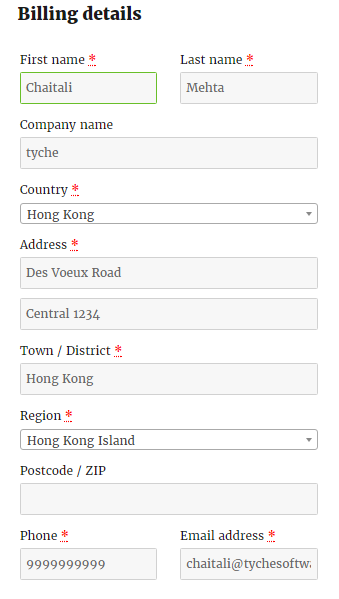
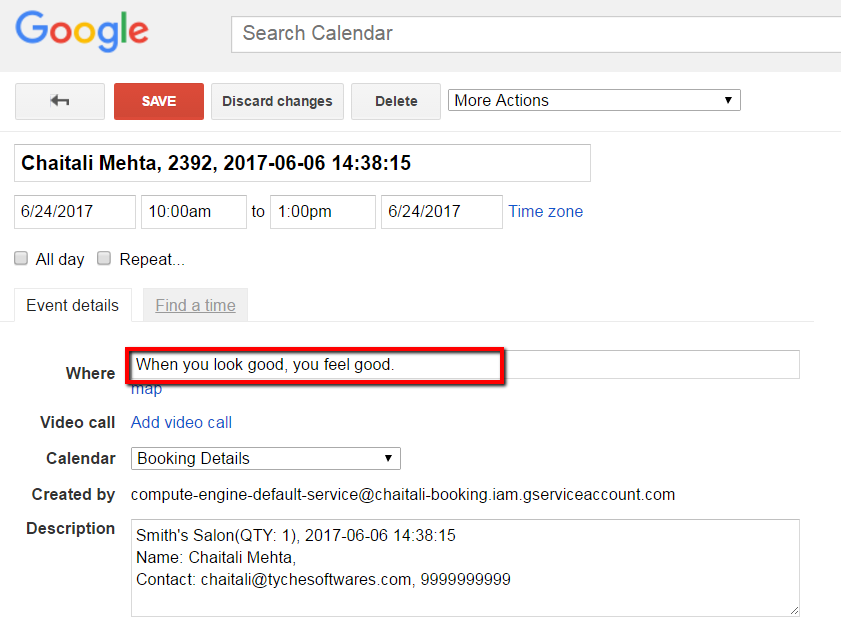
The placeholders added to the Event Location field will be reflected in your calendar as “Where” on the Event details page.
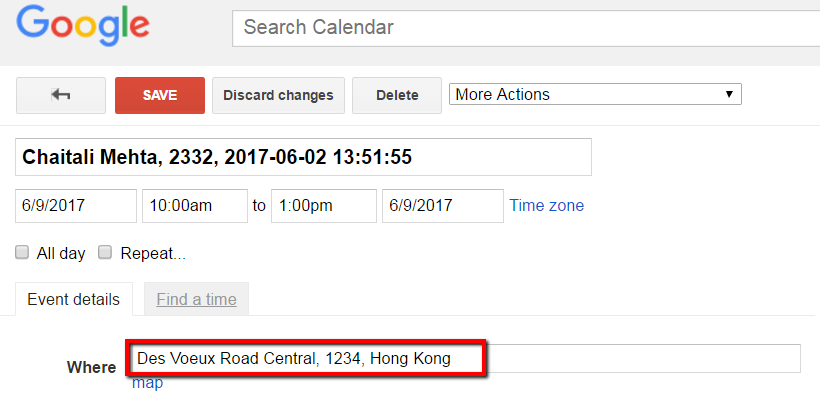
If this field is left blank then your website description will be sent to the location.

Event Summary
Next field under General Settings is Event Summary. You can update placeholders like
- SITE_NAME
- CLIENT
- PRODUCT_NAME
- PRODUCT_WITH_QTY
- ORDER_DATE_TIME
- ORDER_DATE
- ORDER_NUMBER
- PRICE
- PHONE
- NOTE
- ADDRESS
- EMAIL (Customer’s email address).
These placeholders will be replaced by its real values and provide you with the summary of your booking/event.

The placeholders added to this field will be reflected in your calendar as Event Title.
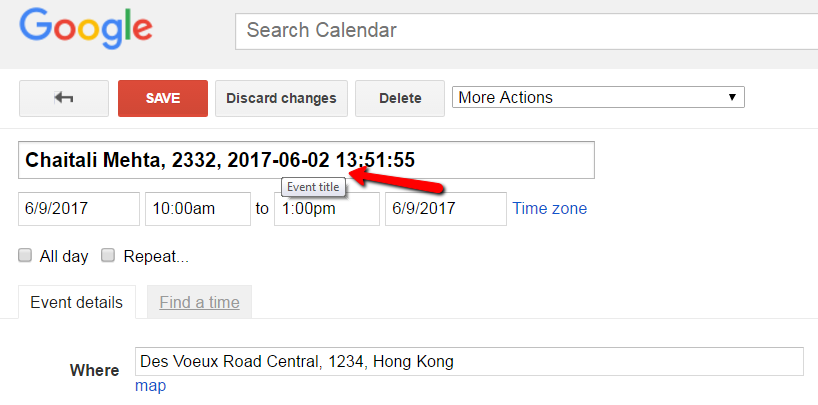
If you are a One-day tour operator operating international tours for Singapore and you have updated the placeholder as PRODUCT_NAME and ORDER_NUMBER in “Event Summary” field. Now if the customer comes to your site and adds multiple tours to his cart to book it as shown below:
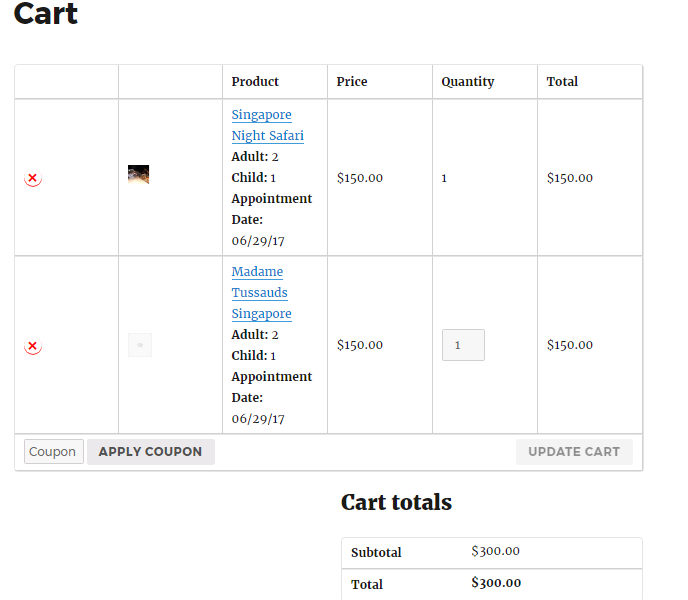
Then on the same date, 2 events with different product name will be visible on the calendar as below:

Event Description
Lastly, you will find Event Description field under General Settings. Here you can update placeholders like
- SITE_NAME
- CLIENT
- PRODUCT_NAME
- PRODUCT_WITH_QTY
- ORDER_DATE_TIME
- ORDER_DATE
- ORDER_NUMBER
- PRICE
- PHONE
- NOTE
- ADDRESS
- EMAIL (Customer’s email address).
These placeholders will be replaced by its real values and provide you with the description of your booking/event.
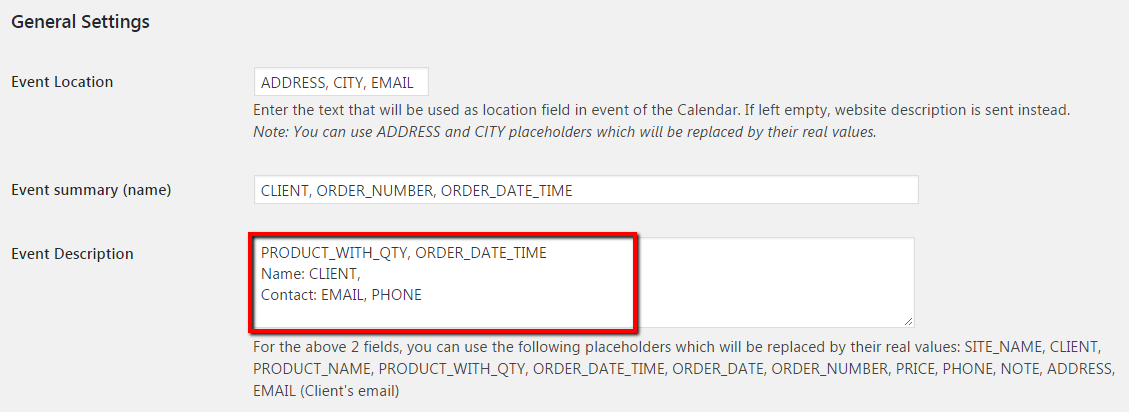
The placeholders added to this field will be reflected in your calendar as “Description” on the Event details page.

Customer Add to Calendar button Settings
After setting General Settings of Google Calendar Sync next comes Customer Add to Calendar button Settings.
By enabling this setting, you can allow your customer to add that particular event directly to their calendar by clicking on Add to Calendar button provided to them on different pages.
We have learned in our past post how to send ICS file to the customer on Order received page or as an attachment to them in the order notification email. The ICS file can be downloaded and can be imported to their calendar to create the events.
If you don’t want to download the whole ICS file, but want only a particular event to be added directly to your customer’s calendar then the setting Customer Add to Calendar button Settings can be enabled.
To enable Add to Calendar button on different pages, you need to go to Booking->Settings->Google Calendar Sync. On this page, you will find Customer Add to Calendar button Settings where you can set Add to Calendar button to be displayed in the following different pages as shown below:
- Show Add to Calendar button on Order received page
- Show Add to Calendar button in the customer notification email
- Show Add to Calendar button on My account
- Open Calendar in the Same Window
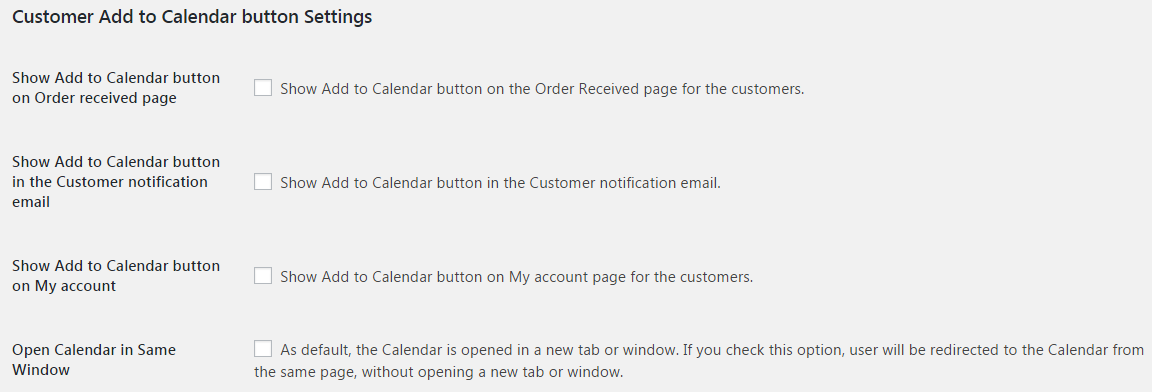
Note: After enabling/disabling the above settings, click on Save Settings button.
Let us understand it one by one and see the result in different pages after enabling it.
Show Add to Calendar button on Order received page
This setting can be enabled when you want to provide Add to Calendar button to your customer on the Order received page.

Now as the setting is enabled, if a customer books any product from your WooCommerce store he will be provided with Add to Calendar button on the Order received page as shown below.
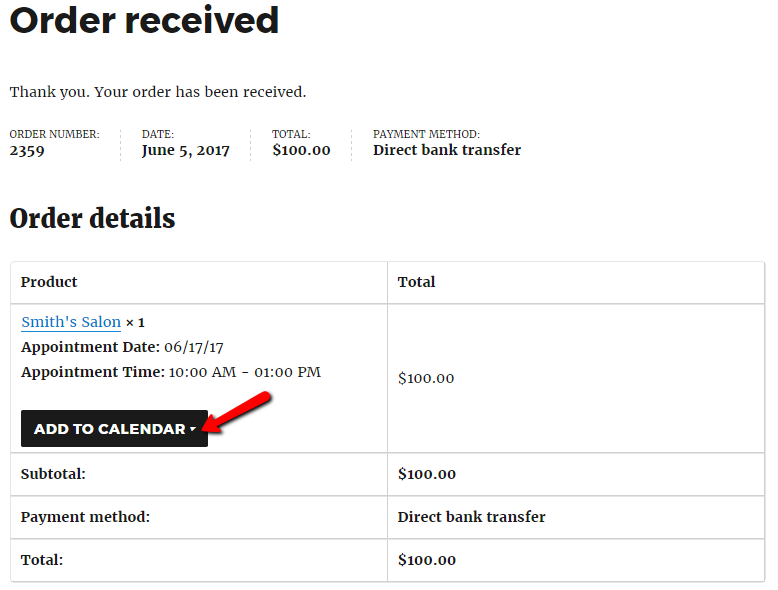
When the customer clicks on Add to Calendar button the booking gets directly added to his calendar as an event as shown in the below image.

Show Add to Calendar button in the customer notification email
This setting can be enabled when you want to provide Add to Calendar button to your customer in the Order notification email sent to them after the order is placed.

Now as the setting is enabled, if a customer books any product from your WooCommerce store he will be provided with Add To Calendar button in the Order notification email as shown below.
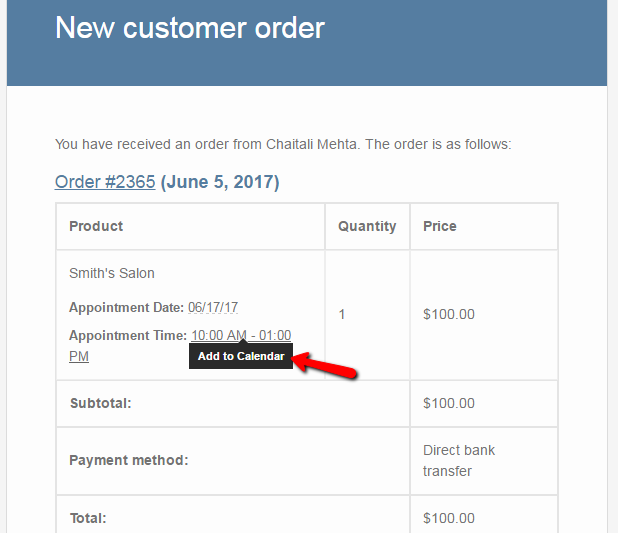
To add the booking directly to their calendar as an event the customer can click on Add to Calendar button.
Show Add to Calendar button on My account
You can also provide Add to Calendar button on the customer’s My account page by enabling this setting as shown below.
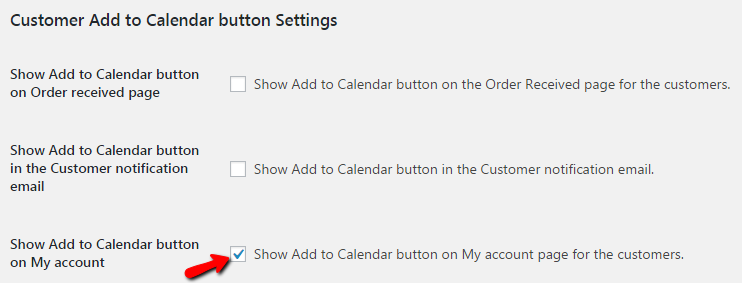
After enabling this setting, if the customer books any product from your WooCommerce store he will be provided with Add To Calendar button on his My account page as shown below.
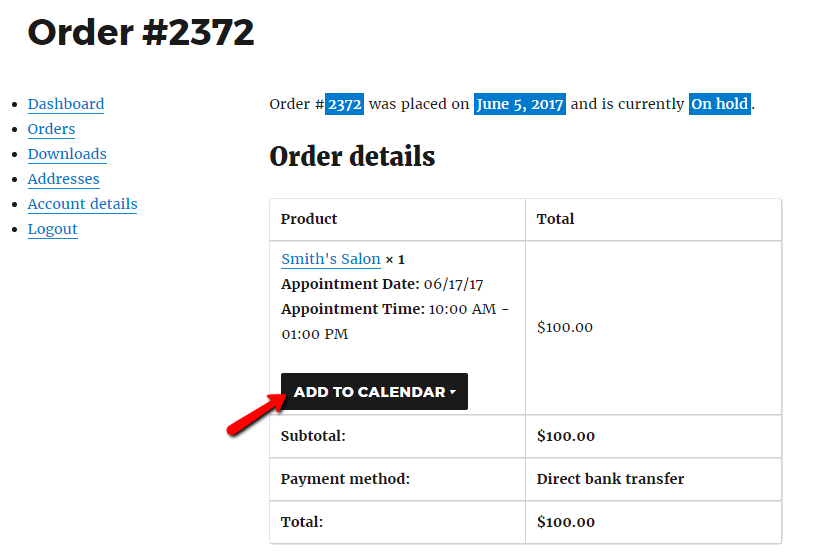
By clicking on this Add to Calendar button provided on My account page, he can add the booking details directly to his calendar.
Open Calendar in the Same Window
If you want that after clicking on Add to Calendar button, the calendar should be open on the same page, then you need to enable this setting. If this setting is disabled then the calendar will open in a new window.
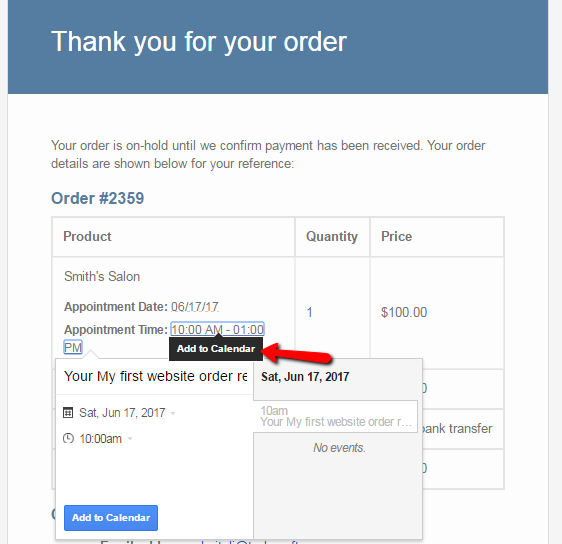
Below we have enabled “Show Add to Calendar button in the Customer notification email” along with “Open Calendar in the Same Window”.

As both the setting are enabled, if a customer books any product from your WooCommerce store he will be provided with Add To Calendar button in the Order notification email. As he clicks on that button the calendar will open on the same page as shown below.
This is how both the settings of Google Calendar Sync (General Settings and displaying Add to Calendar button after the order is placed on different pages) can be set.