In v4.15.0 of the Booking & Appointment Plugin for WooCommerce, we have released Timezone Conversion feature. If the Timezone Conversion feature is enabled then the time slots will be automatically get converted to the customer’s local time, which makes it easier and friendlier to offer services to customers in different time zones.
Let’s see how you can set up the Timezone Conversion feature of the Booking plugin on your WooCommerce Store.
We have provided an option called “Timezone Conversion” at Booking-> Settings-> Global Booking Settings page.

Enabling this option will show all your bookable product’s timeslots as per the timezone of the customer who is trying to book the slot. Let’s understand it in more detail with an example.
Let’s say you are a tutor who is based in India and providing online lectures on Personal Development every day at 12:00 pm to 02:00 pm and 04:00 pm to 06:00 pm. These slots can be booked from anywhere in the world.
So let’s create a WooCommerce product from Products->Add New link and set the product title and price of it. You can convert this product to a bookable product by enabling the “Enable Booking” option in the Booking Meta Box and create both the slots using Fixed Time booking type.
Note: Timezone Conversion option is currently working with the Fixed Time booking type only. Soon we will make this feature work with the Duration Time booking type so that you can use this feature to the fullest.
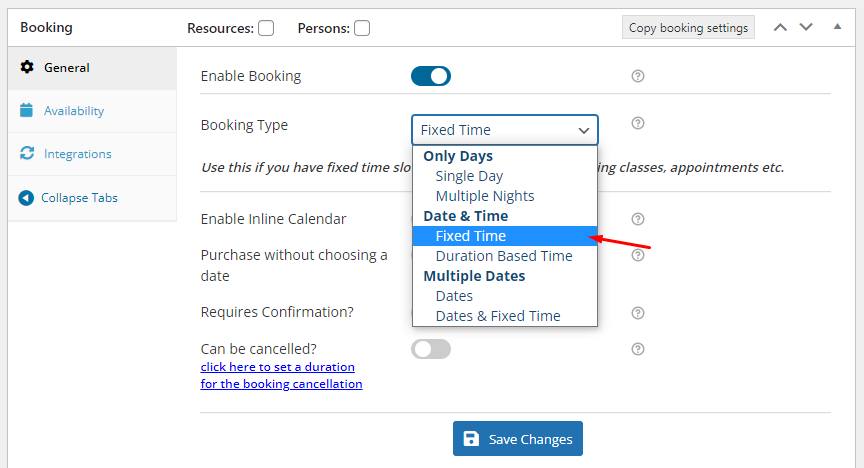
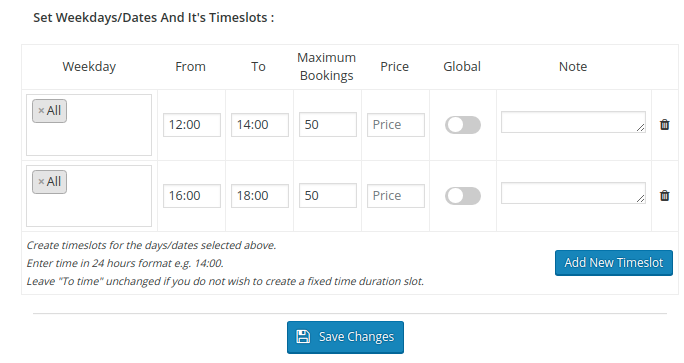
As you can see in the above screenshot that we have enabled the booking and created the time slots according to the example considered.
Front end of the website.
The WooCommerce store timezone is set to UTC+5:30 which is nothing but the IST (Indian Standard Time). Now if you will visit the front end of the product then it will appear as below screenshot.

The timezone information will be displayed at the top of the booking form. In the above screenshot “Asia/Calcutta” is being shown as my machine’s local time is Asia/Calcutta. Suppose John is from Australia/Sydney timezone and he is visiting your product page then the booking information for him will appear as shown in the below screenshot.
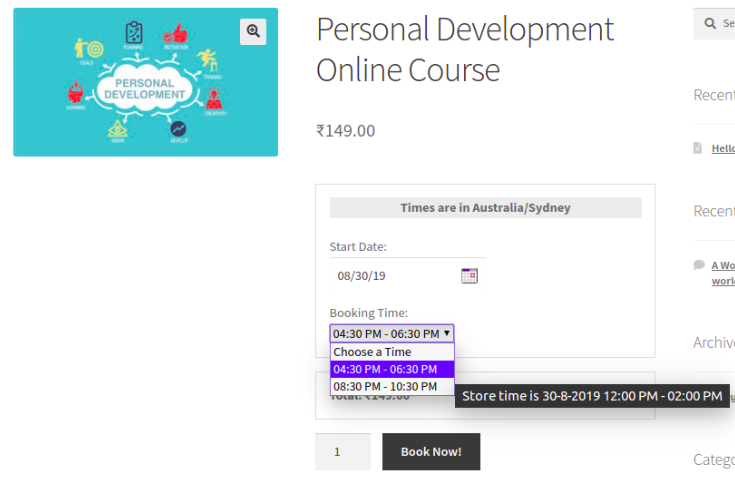
In the above screenshot, 30th Aug 2019 is selected as booking date and the timeslot 12:00 pm to 02:00 pm got converted to 04:30 pm to 06:30 pm and 04:00 pm to 06:00 pm converted to 08:30 pm to 10:30 pm. Also, if you hover on the time slot, then its respective time as per the store time zone will be displayed. So those viewers like John who are based in the Sydney timezone, for them the timeslots will appear as shown in the above screenshot.
If John selects the slot to book then price of will be calculated and they can then add the booking to cart and his cart and checkout will look like below.
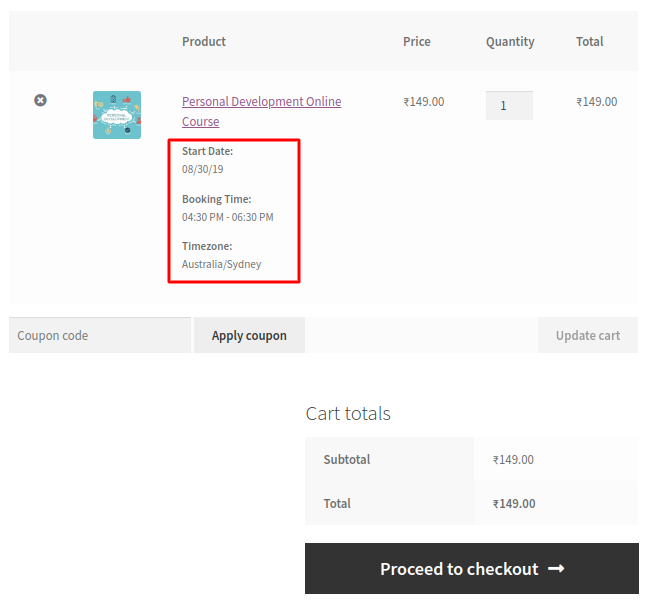
Here he can click on Proceed to checkout button to go to the Checkout page which gives a preview of the actual order and then he can click on the Place Order button. After the order is placed successfully, John will be redirected to the Order Received page as shown below.
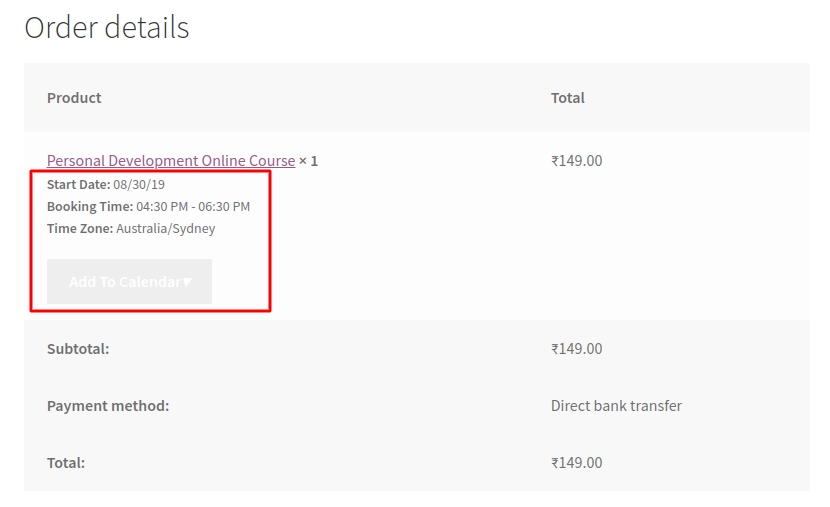
Booking details will be shown in each step of the booking process. As you can see in the above screenshot that the booking details are present in the order details table. The same information will be sent in the email notification John will receive. Using Add To Calendar button John can add the booking to his own Google Calendar or he can download ICS file of it and import that to any calendar he wants.
All this process was of the front end but what actually happens in the store’s admin end? Wondering? Let’s see that also in details.
Website Backend.
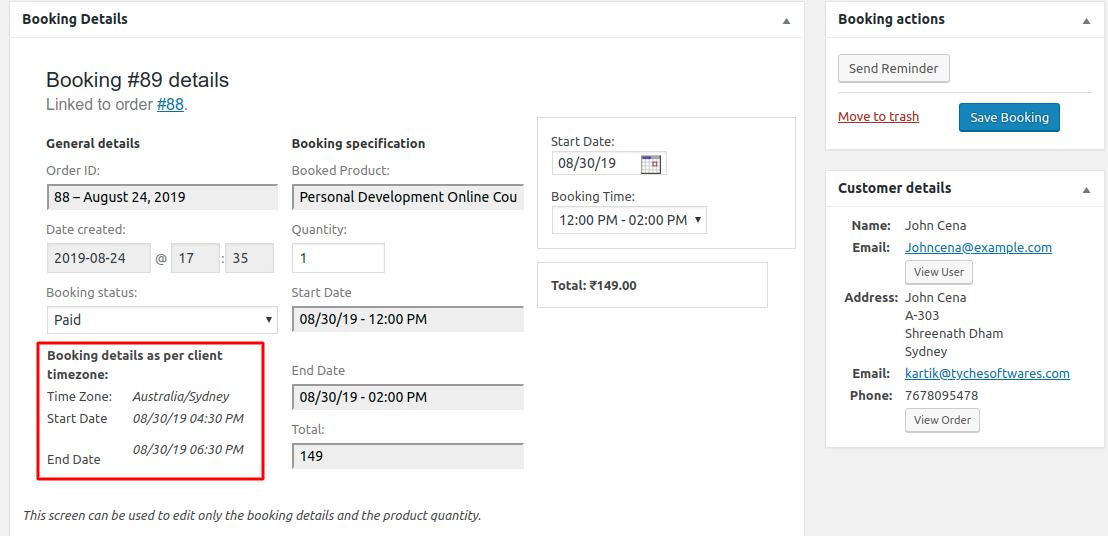
The booking which is placed by John for date 30th Aug 2019 and time 04:30 pm to 06:30 pm is now converted as per the store’s timezone & shown under Start date & End date fields below. You will be able to see the details on the All Bookings page.

As you can see in the above screenshot that the booking is created as per the store time which is 12:00 pm to 02:00 pm for 30th Aug 2019. If you click on the VIew icon under Actions then there you can see the actual booking details based on the store as well as based on the timezone of the customer in which the booking is placed. Please see the below screenshot.
Similarly, if customers based in New York timezone is visiting this product page then the booking information for them will appear as shown in the below screenshot.
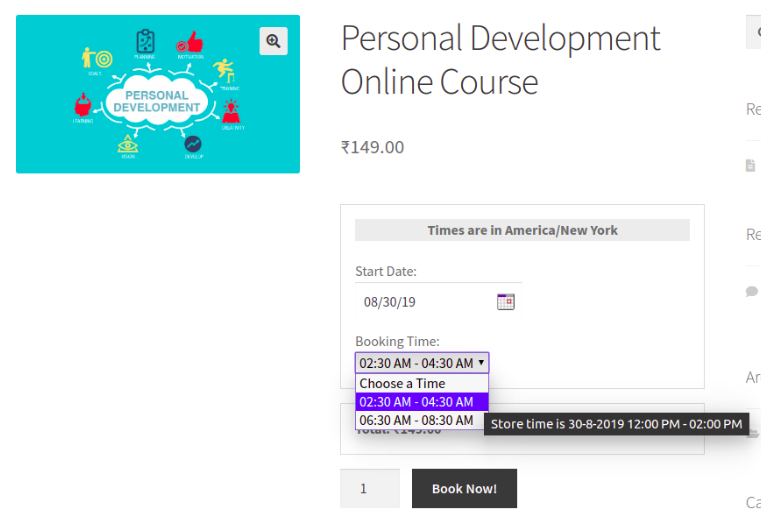
In the above screenshot, 30th Aug 2019 is selected as booking date and the timeslot 12:00 pm to 02:00 pm got converted to 02:30 am to 04:30 am and 04:00 pm to 06:00 pm converted to 06:30 am to 08:30 am. Also, if you hover on the time slot, then its respective time as per the store time zone will be displayed. The booking process will be the same as we have seen above.
So this is all about the timezone conversion feature of our Booking plugin. Also, you can edit the booking as per the requirement and also the customer can reschedule the booking from his My-Account page. The compatibility of Timezone Conversion option with the Multiple Time Slot Addon is recently released so you can use that as well if you want your customer to book multiple timeslots for a date in one shot.
Conclusion
In this post, we have seen how you can set up the bookable service which can be booked by the customer all over the globe as per their timezone with the help of Booking & Appointment Plugin for WooCommerce. So if you are running the business like Distance Learning Courses or selling Webinars sessions then it becomes very convenient for your customer to book it according to their timezone.