With the Order Delivery Date Pro for WooCommerce plugin, admins can easily synchronize the delivery dates & times to their Google Calendar and vice versa using ICAL feed URLs. If your staff needs a quick update beforehand about the orders that need to be delivered, then this sync will help them out immediately!
It will also allows your customers to add the delivery dates & times in their own Google Calendar. They’ll even be able to download the .ics files for adding it to any other calendar! Let’s get started:
Go to Order Delivery Date -> Settings -> Integrations -> Google Sync. Here’s how the page will appear:

You’ll find several dropdowns. Let’s have a look at them:
1. General Settings
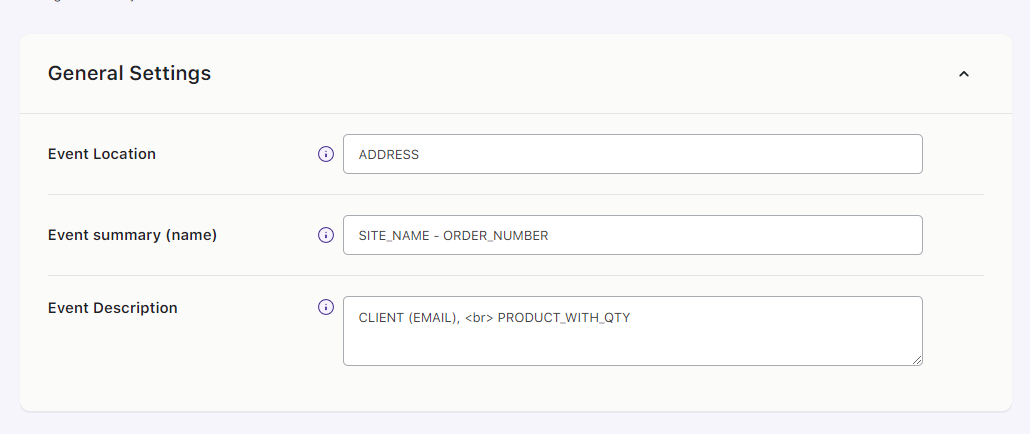
Event Location: This is where the location of the event will mentioned. For instance, if your client’s location is Texas, U.S.A, then in the Calendar event, this location will be mentioned. You can replace it with any other placeholders such as PICKUP_LOCATION, ADDRESS, FULL_ADDRESS, etc
Event Summary (name): This will briefly tell you about your order. By default, we’ve added the site name and order number as placeholders.
Event Description: This will give additional details about the order in your Google event. By default, we’ve added client’s email and product quantity.
Placeholders that can be used: SITE_NAME, CLIENT, PRODUCTS, PRODUCT_WITH_QTY, ORDER_DATE_TIME, ORDER_DATE, ORDER_NUMBER, PRICE, PHONE, NOTE, ADDRESS, FULL_ADDRESS, EMAIL (Client’s email).
For instance, let’s say that a customer has placed an order for Designer Scarf from your site called Tyche Clothing. Their order number is #644 and they’ve added their phone number.
You have added the placeholders SITE_NAME, ORDER_NUMBER, PRODUCTS, PHONE under Event Description.
Thus, on the Google Calendar, the date for which this delivery is due will have details of the order as such:
Tyche Clothing – 644
Products: Designer Scarf
Phone: 8956231245
2. Customer Add to Calendar Button Settings
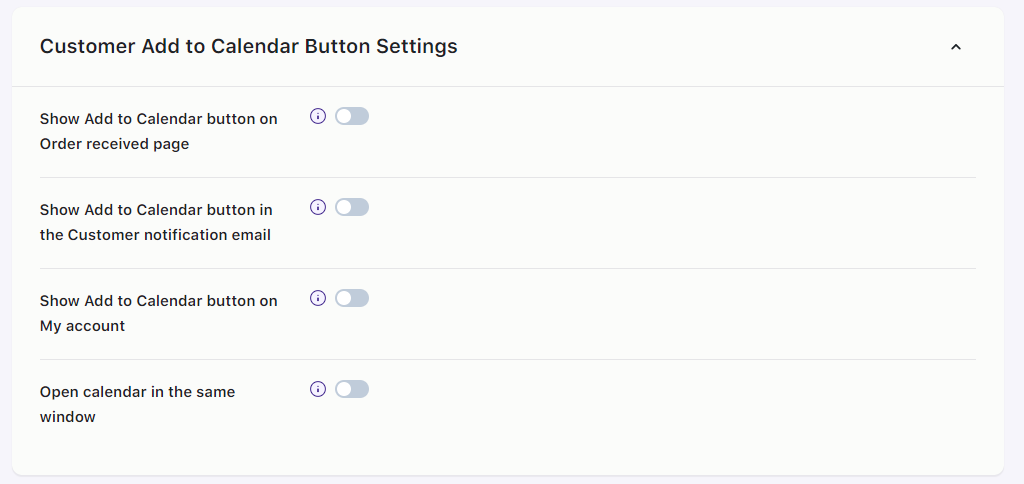
Here you will find different settings that can be enabled so that your customers can add the event to their Google Calendars.
You can allow customers to add the delivery dates & times to their Google Calendar or any other calendar by providing the buttons on Order Received page, Customer notification email, and My account page.
Simply switch the toggle to enable the respective settings. By default, all the settings will be disabled.
Let’s look at an example. Let’s say that you have enabled ‘Show Add to Calendar button on Order Received page’. When a customer places an order, on the order received page, they’ll see this:
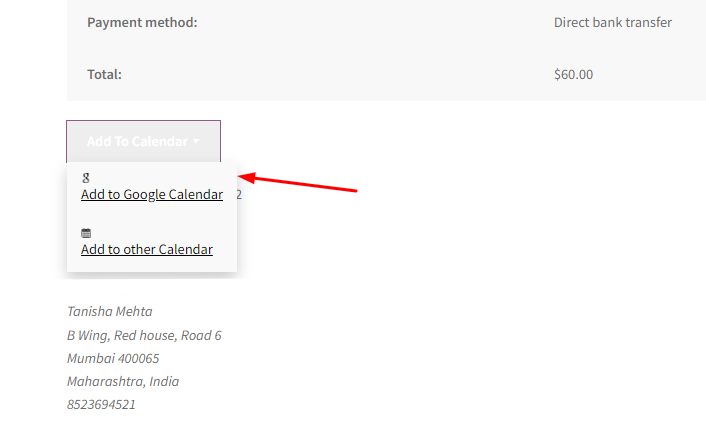
The customer can easily set the order reminder in their Google Calendar. When they click on ‘Add to Google Calendar’, this is what will appear:
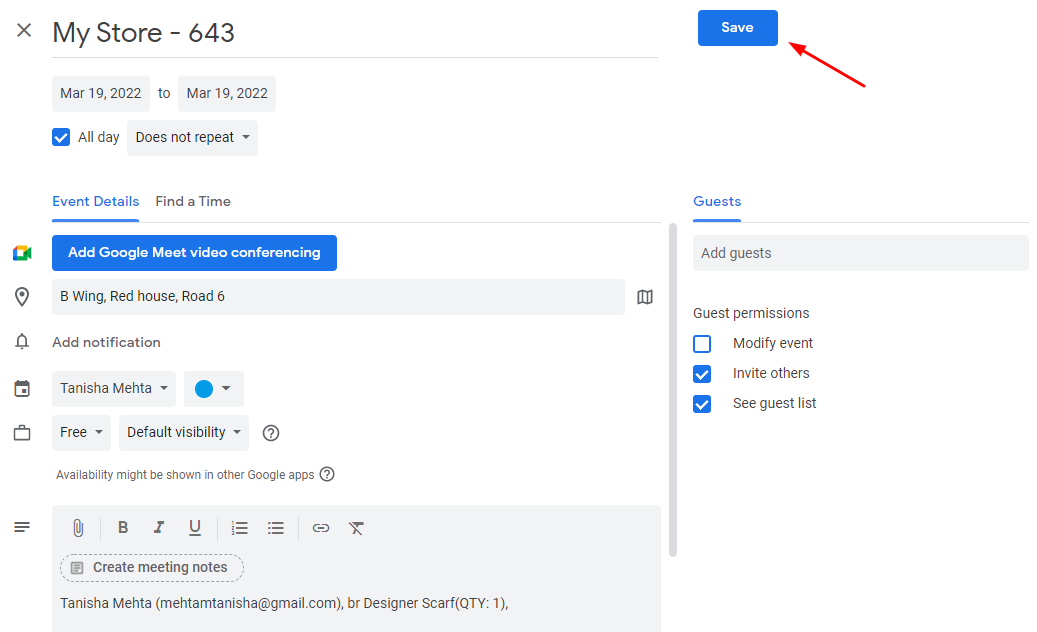
The customer can make notification changes to this reminder and add it to their calendar by clicking the ‘Save’ button. All the different settings under this section will work in a similar way.
3. Admin Calendar Sync Settings
In order to synchronize the plugin with Google Calendar, you will have to go to this dropdown and enable an integration mode. By default, the integration mode would be disabled. Your delivery dates & times can be exported automatically or manually to the admin’s Google Calendar.
A. OAuth Sync(Recommended)
Once you select “OAuth Sync(Recommended)”, the following options would be displayed to you:
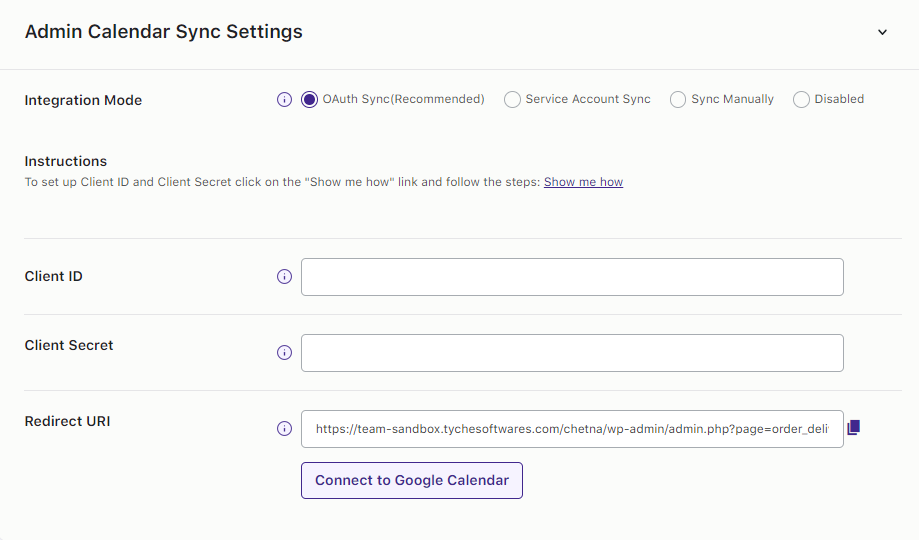
Google Calendar OAuth Sync requires will require PHP V7.4+. To setup the Google calendar sync, we’ll follow the instructions provided in the Admin Calendar Sync Settings section. Let’s get started:
Go to the Google Developers Console and select a project, or create a new one. Login to your Google account if you are not already logged in.

If creating a new project, give the Project name. eg ‘My Deliveries’ and click on the Create button.

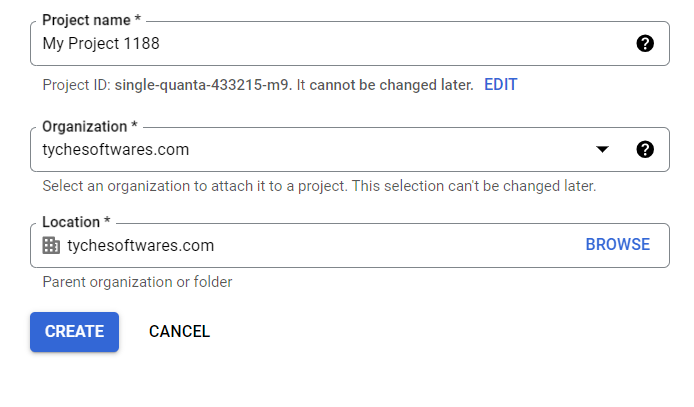
Once the project is created/selected, the Calendar API needs to be enabled. To do so, click on ENABLE API AND SERVICES link.
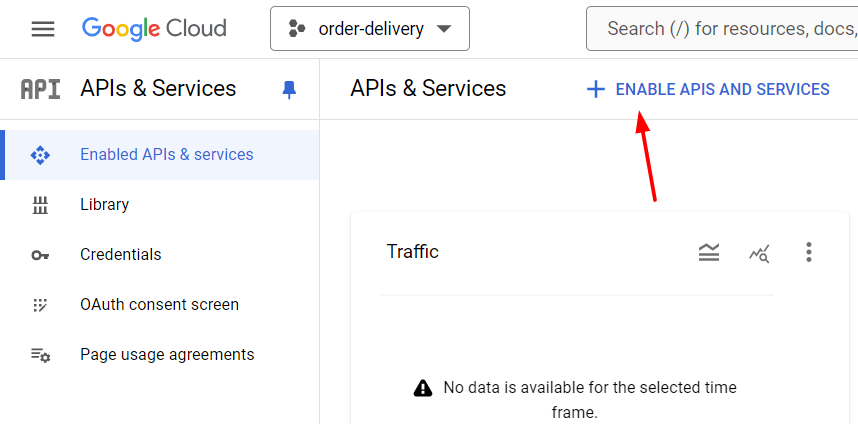
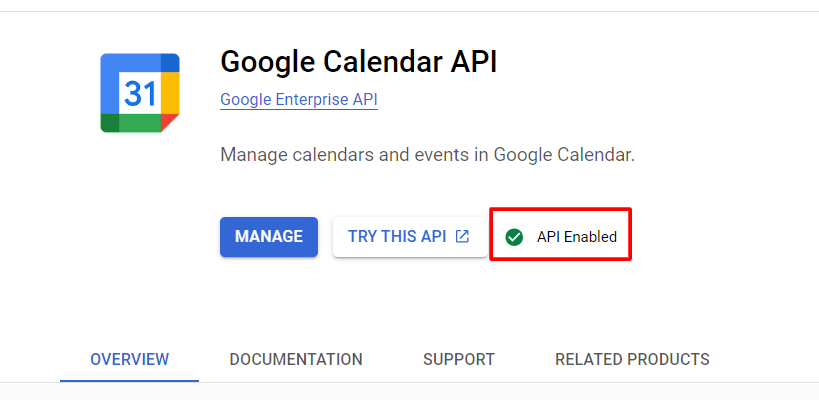
Search for Google Calendar API.

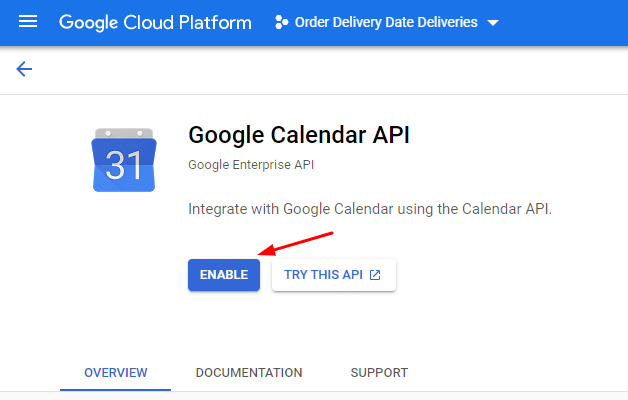
And enable it by clicking the ENABLE button.
On the left, click Credentials. If this is your first time creating a client ID, you’ll be prompted to configure the consent screen. Click on Configure Consent Screen
Go to the OAuth consent screen. Select User Type as Internal and click on the CREATE button. After that, set the Application name and click on the Create button.
Go back to the Credentials tab, click Create credentials.

Select OAuth client ID.
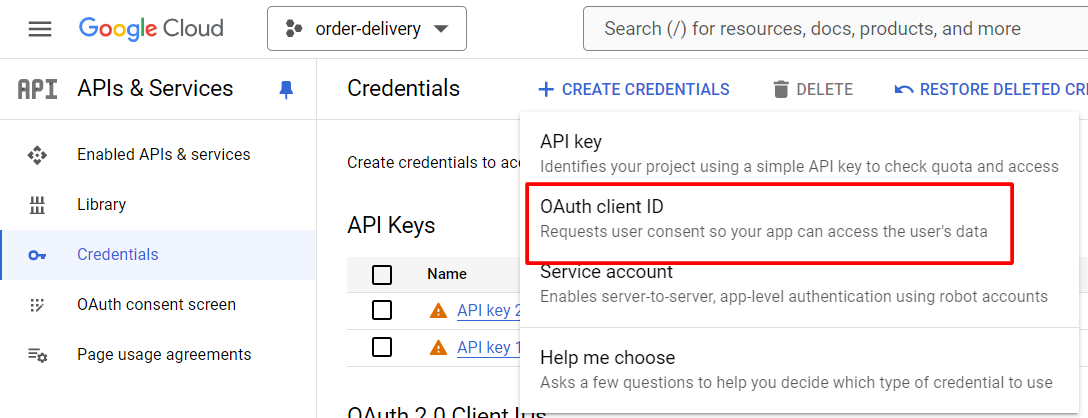
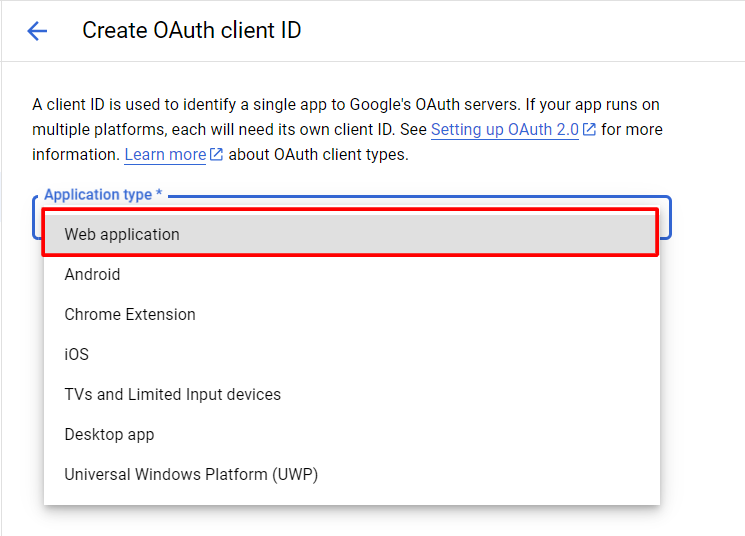
Select Web application under Application type and provide the necessary information to create your project’s credentials.
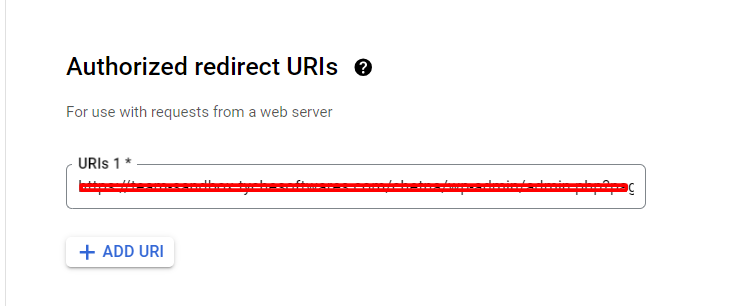
For Authorized redirect URIs enter the Redirect URI (Can be found in Order Delivery Date > Settings > Integrations > Google Sync ). Copy the URL:

Past it on “Authorized redirect URIs” section by clicking on “Add URL” button
Then click Create button.
On the dialog that appears, you’ll see your Client ID and Client Secret.
Fill the details in fields on Order Delivery Date > Settings > Integrations > Google Sync page and click on Save Settings.
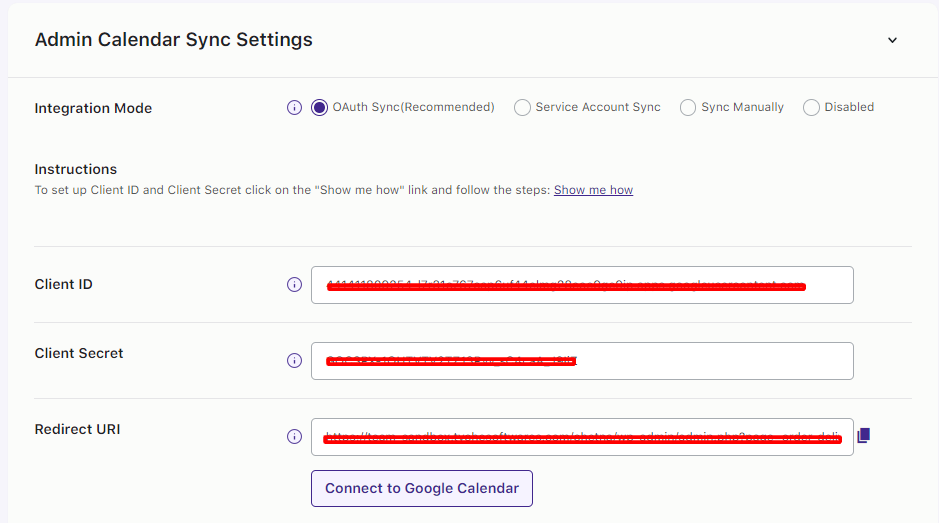
Once the Successful Connection to Google by clicking “Connect to Google Calendar”, Calendar to be used option will appear. Here select the calendar to which the event should get created for the delivery. Save your settings to complete the setup.

Once you have successfully integrated Google Calendar with your application using OAuth Sync. Delivery events will now be automatically added to your chosen Google Calendar, ensuring that you stay organized and on top of your deliveries.
B. Service Account Sync
When you select the ‘Service Account Sync’ option, the following would be displayed to you:

For this integration, Google Calendar API will require PHP V5.3+ and some PHP extensions. To setup the Google calendar sync, we’ll follow the instructions provided in the Admin Calendar Sync Settings section. Let’s get started:
Go to Google APIs console by clicking https://code.google.com/apis/console/ and login to your Google account.
Click on ‘Create Project’ and name the project to your chosen name. Press the ‘Create’ button.

Select the project that you just created and go to APIs & Services -> Dashboard from the left side panel.

Click on the ‘Enable APIs and Services’.

Search for ‘Google Calendar API’.

Enable this API.
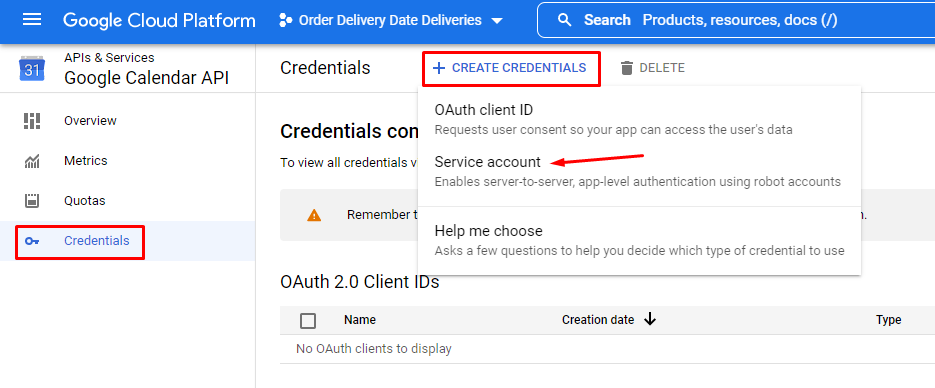
Next, go to Credentials -> Create Credentials -> Service Account.
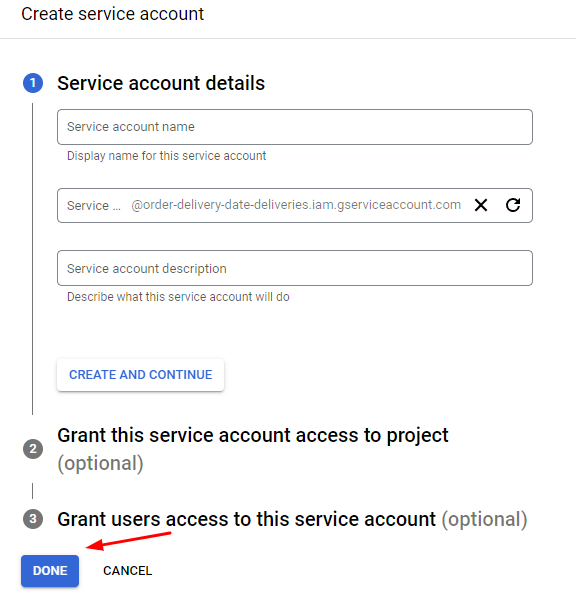
Enter Service account name, id, and description, create the account. Assign Owner role under Service account permissions, keep options in the third optional step empty & click on ‘Done’.
Now you can click on the pencil icon and edit this newly created Service account.

Go to the ‘Keys’ section, followed by Add Key-> Create New Key.
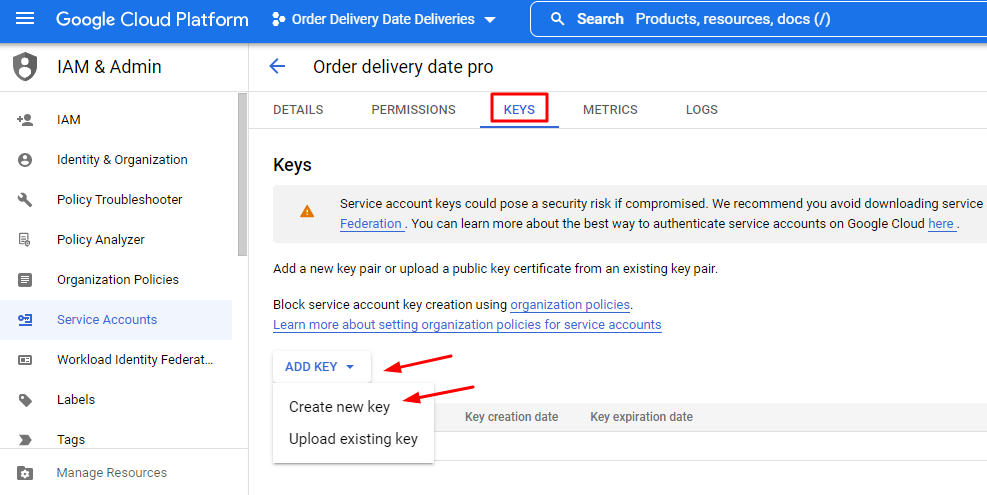
Select ‘JSON’ option in the popup that opens. Click on the ‘Create’ button. A file with extension .json will be downloaded.
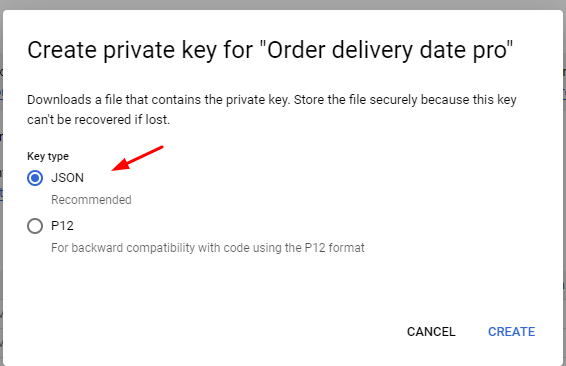
Now, upload this JSON file in the ‘Upload Key File’ field of Order Delivery Date.
Once you’re done with this, you can go back to the Google Console. Go to APIs & Services -> Credentials -> Service Accounts and copy the email address under it.
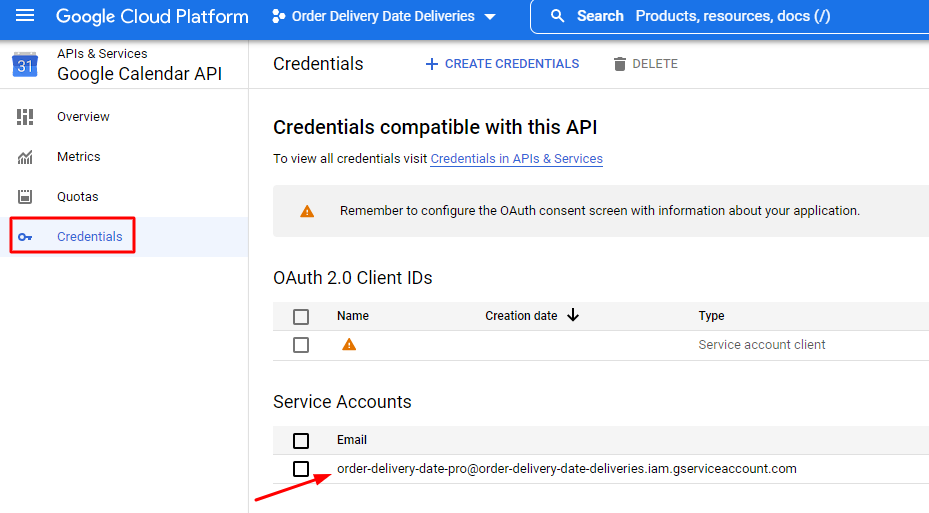
Next, open your Google Calendar by going to: https://www.google.com/calendar/render. Here we’ll have to create a new calendar.
Click on ‘+’ sign next to ‘Other Calendars’ section on left side pane. Try NOT to use your primary calendar.

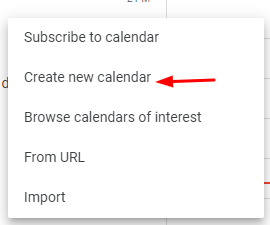
Click on ‘Create a new calendar’ option:
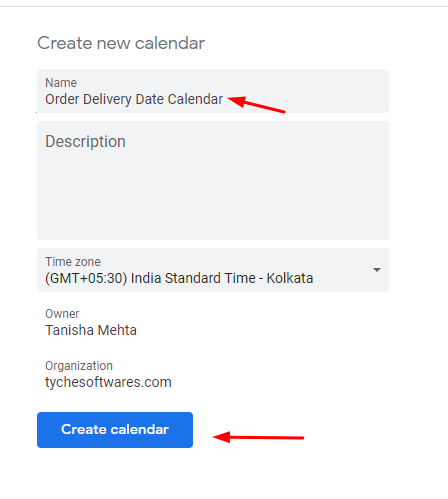
Give a name to the new calendar. For instance, you can go with the name Order Delivery Date Calendar. Ensure that the Calendar Time Zone setting matches with time zone setting of your WordPress website. If it does not, there will be a time shift. Finally, press on ‘Create calendar’.
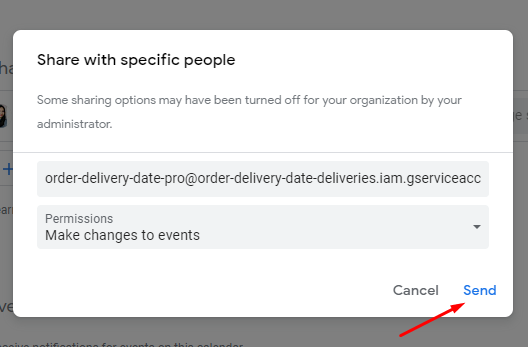
Now, scroll down and find ‘Share with specific people’. Click the ‘Add People’ button. Here, paste the ‘Service Account ID’ from Manage service account of Google APIs console. Under permissions, choose the ‘Make changes to events’ and then press ‘Send’.
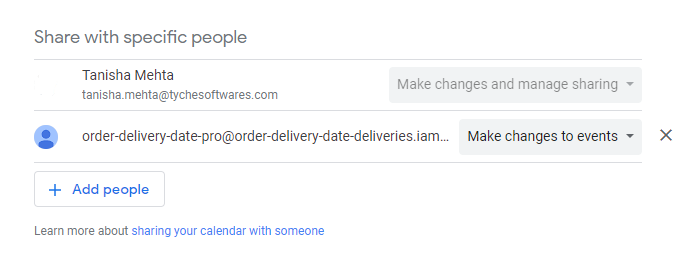
Thus, this newly created calendar is shared with our service account as shown below:
Now, copy ‘Calendar ID’ value from ‘Integrate Calendar’ section.

Paste the value to ‘Calendar to be used’ field of Order Delivery Date settings. Once you’ve added all the important details you can test the connection by pressing ‘Test Connection’.
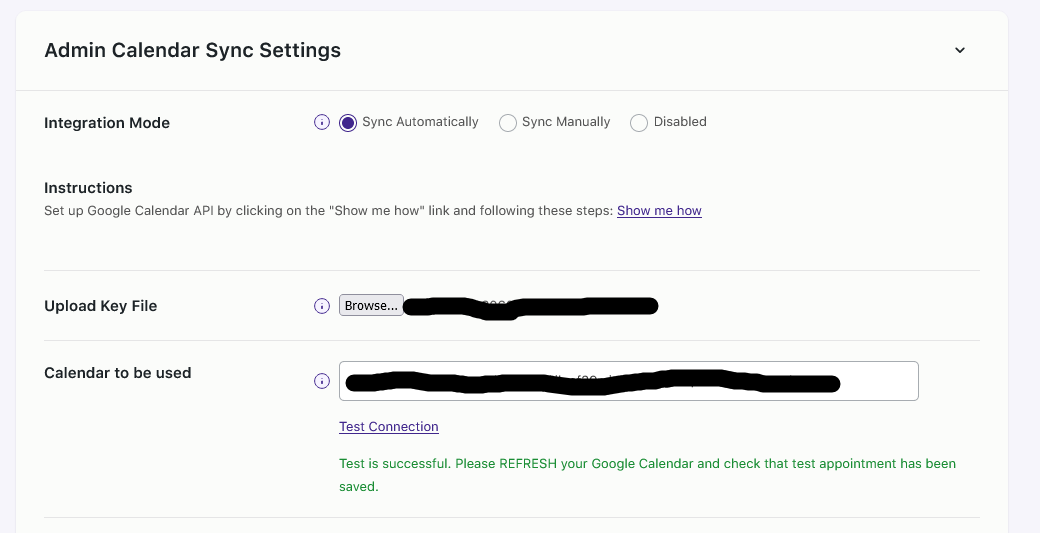
Since the connection is successful, you can now add the Event Location, Event Summary, and Event Description as discussed above in the General Settings section.
The events will be exported automatically to the Google Calendar now. Once the customer places an order, the Calendar ID will be added without notifying the admin.
Please Note: All the orders that have the status of either ‘Processing’ or ‘Completed’ will be synced and displayed in your Google calendar.
Here’s how the synced orders will appear:
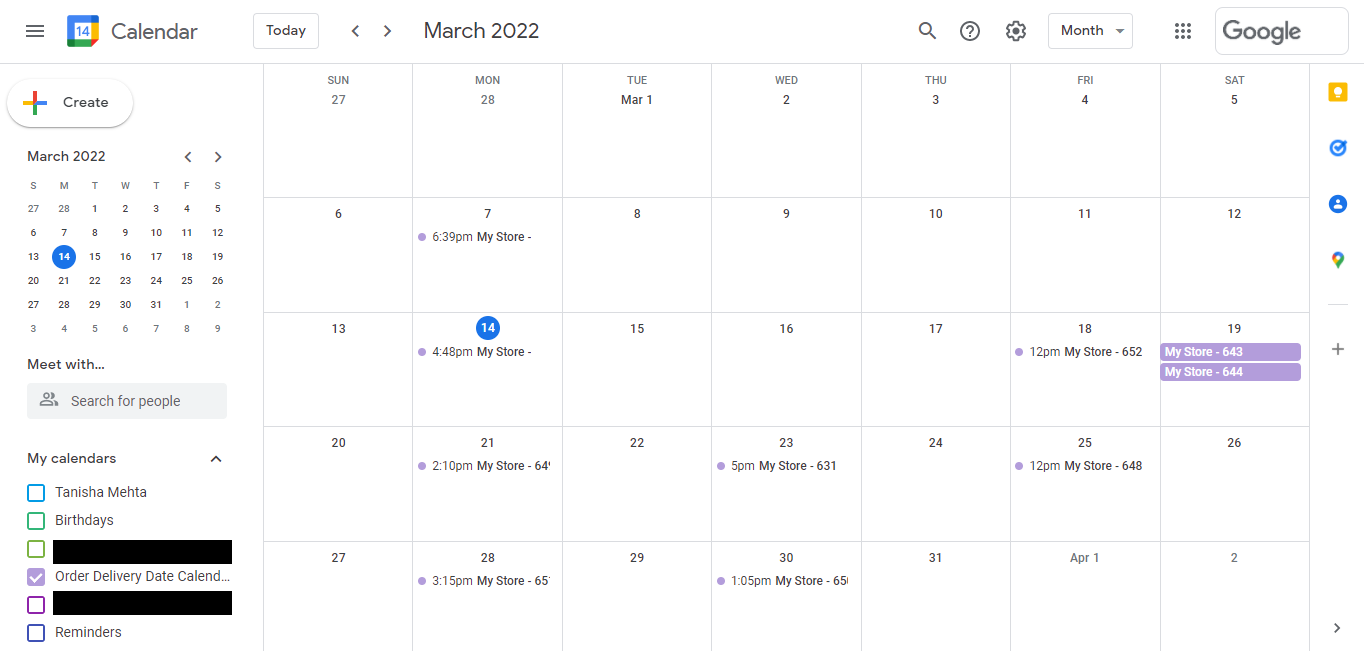
You will also find a setting called Show “Export to Google Calendar” button on Delivery Calendar page. When this setting will be enabled, you will be able to see the ‘Export to Google Calendar’ button in the Delivery Calendar page. This button will help you export already placed orders with future deliveries from the current date to the calendar used above. Here’s how it will appear on the Delivery Calendar:
 On the Delivery Calendar you will see two buttons: “Export to Google Calendar” and “Re-export to Google Calendar”.
Export Google Calendar: This button is used to export all orders to your Google calendar.
Re-export to Google Calendar: Clicking on the “Re-export to Google Calendar” button on the Delivery Calendar page will re-export all previously exported orders with their delivery dates.
C. SYNC MANUALLY

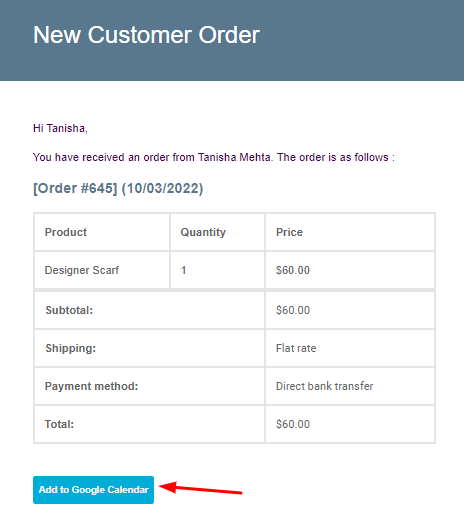
If you go with ‘Sync Manually’ Integration Mode, then it will insert ‘Add to Google Calendar button’ in emails received by admin and new customer order. To do this, Select the ‘Sync Manually’ option.
Next, enable the toggle for ‘Show Add to Calendar button in New Order email notification’.
Admin will now be able to sync the delivery dates & times by clicking on the Add to Calendar button from the email received in New customer email notification!
4. Import Events
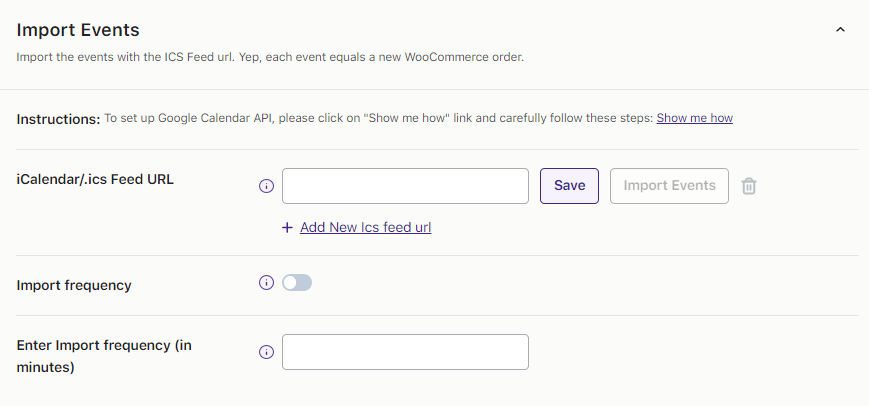
If you wish to import Calendar Events, you can easily do so using the ICAL Feed URLs of the Google Calendar or any other calendar. Let’s learn about it:
Go to the Google Calendar by clicking this link: https://www.google.com/calendar/render
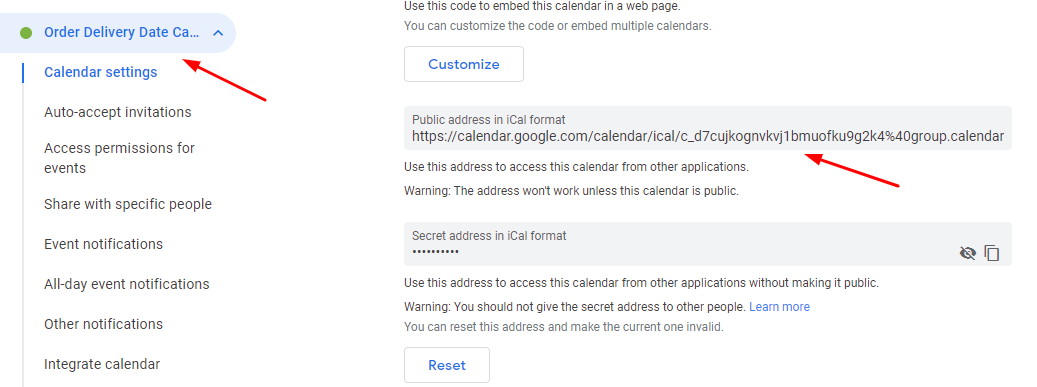
Find the calendar you wish to import and click on Calendar settings. Scroll down to find ‘Public address in iCal format’. Copy it.
We’ll go back to our admin section of Order Delivery Date Pro plugin. Under Integrations -> Google Sync -> Import Events -> iCalendar/.ics Feed URL enter it. Save it and then click on Import Events. Once the events are imported, you’ll be displayed with ‘Events Imported’ message.
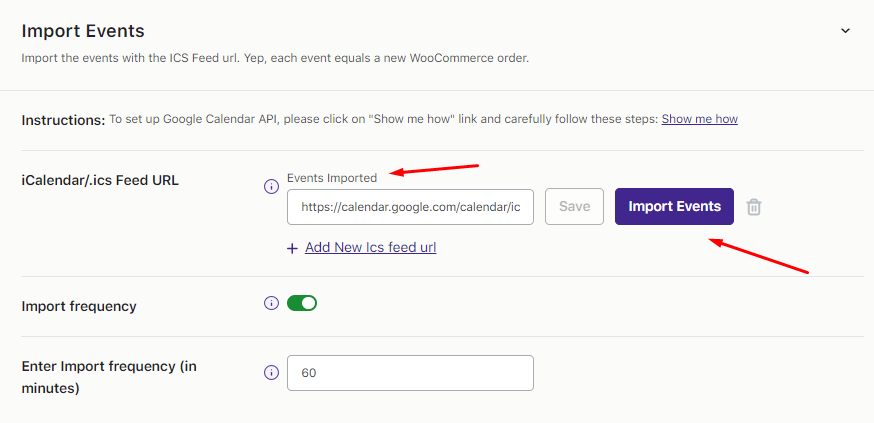
In this way, you’ll be able to import multiple calendars by using ics feeds. by clicking the ‘Add New Ics feed url’ option.
After Importing the events, new orders will be created for guest users in the WooCommerce -> Orders page. The event date and/or time will be considered as the Delivery Date and/or Time for the orders.
The availability of the date and time will also be updated after importing the events.
Please note that the admin needs to add the products manually in the order once all the events are imported.
Along with this, you can decide how frequently you can import these events. Simply enable the ‘Import frequency’ toggle as shown in the image above and then under ‘Enter Import frequency (in minutes)’ you can add in the time. For instance, we’ve added 60 minutes, which means that the import would take place after every 60 minutes.
Make your job easier, try out Google Calendar Sync with our plugin today!