In our earlier post, we learnt how to modify the appearance of your store using different settings as per your business requirements. Today we will see how to modify delivery field labels on Product page using Product Delivery Date Pro for WooCommerce plugin.
This feature plays a vital role in providing accurate labeling of fields for your store to assist the customers in selecting their appropriate delivery details. For instance, you can have Pick-Up Date and Pick-Up Time for Delivery Date and Delivery Time labels if you allow pickup for your products. Hence providing suitable field labels for selecting the delivery details is necessary and this is possible using the features under Field Labels tab.
To add and modify delivery field labels, go to Product Delivery Date -> Settings -> Appearance -> Field Labels tab. The labels that are set on this page are applied to all the products listed on your store.
There are various fields mentioned on this page which are editable. These are divided into four sections:
1. Labels on Product Page
This section contains 4 fields as shown in the below image.
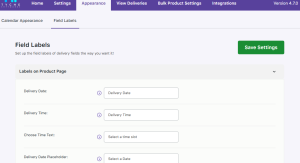
Filed labels on product page
a. Delivery Date: It lets you set the label for the date when delivery of the product will take place. This will appear on the delivery date calendar field on the Product page.
b. Delivery Time: Similarly this lets you set the label for time when delivery of the product will take place. It will appear on the delivery time field on the Product page.
c. Choose Time Text: This text instructs the customer to select appropriate time slot from the Time Slot dropdown list on the Product page.
d. Delivery Date Placeholder: This field will let you set the placeholder for the delivery date field.
Example:
For better understanding, let us take an instance of Cake Delivery where the date and time need to be selected. The values added for these fields are shown in the above screenshot.
Let us select Valentines Cake product for delivery on 26th July, 2018.
The Delivery Date label is displayed on the Product page as shown below:
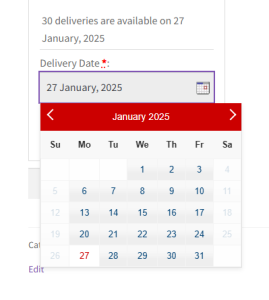
Delivery Date field label on Products page
Once the date is selected, you will be asked to select the delivery time for the product. Hence Delivery Time label and Time text appears as shown below:
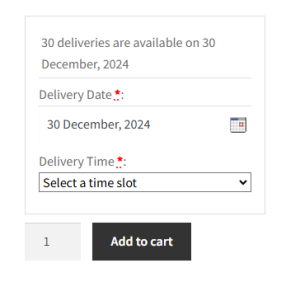
Time text displayed
2. Labels on order received page and in an email notification
This section deals with labels that appear on the page after an order is placed and in an email confirmation is received.
There are 4 fields under this section as shown in the below image.
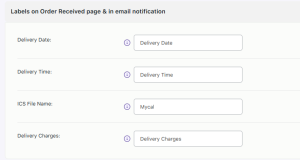
Field labels on order received page and in email notification
a. Delivery Date: It lets you set the label for delivery date which will appear on the order received page and email notification.
b. Delivery Time: Similarly this lets you set the label for delivery time which will appear on the order received page and email notification.
c. ICS File Name: The value set in the ICS File Name field is the name of the ICS file of the product delivery event and is sent as an attachment in the email.
d. Delivery Charges: It lets you set the label for the charges that would incur for delivery of the selected product. This Delivery Charges label will appear on the order received page and email notification.
Example:
Considering the same instance of Valentine’s Cake, let us see how the delivery charges label is displayed on the frontend.
After selecting the delivery date and time, you will see a message for Delivery Charges as shown below:
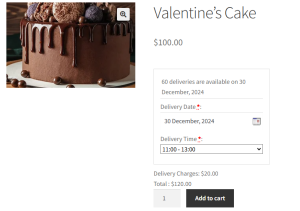
Delivery Charges label displayed
Once the order is placed, these details will appear on the Order Received page as shown below:
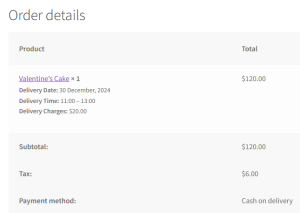
Delivery labels shown on Order Received page
These details are sent to the customer as an email confirmation where you will find the delivery date, time and charges labels as shown below:
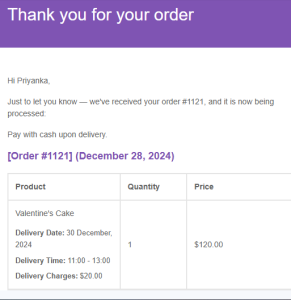
Email confirmation with all delivery details
3. Labels on Cart and Check-out Page
This section deals with labels that appear on the Cart page and Checkout page.
There are 3 fields under this section which are the same as those of Labels on Order Received page and in an email notification section, as shown in the below image:
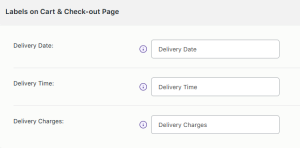
Labels on Cart & Check-out Page
a. Delivery Date: It lets you set the label for date when delivery of the product will take place. This Delivery Date label will appear on the cart and checkout page.
b. Delivery Time: Similarly this lets you set the label for time when delivery of the product will take place. This Delivery Time label will appear on the cart and checkout page.
c. Delivery Charges: It lets you set the label for the charges that would incur for delivery of the selected product. This Delivery Charges label will appear on the cart and checkout page.
Example:
Considering the same instance of Valentine’s Cake product, the labels for Delivery Date, Time and Charges will appear on the Cart and Checkout pages as shown below:
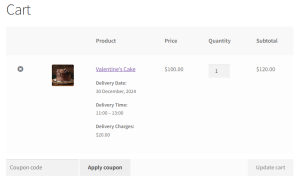
Delivery labels shown on Cart page
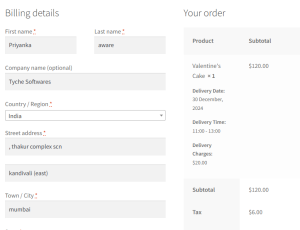
Delivery labels shown on Checkout page
4. Labels for Estimate Delivery Option
This section deals with labels that appear under the Estimate Delivery section. The labels that are set on this page are applied to all the products listed on your store.
There are 3 fields under the Estimate Delivery option as shown in the below image:
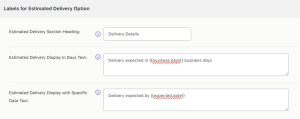
Labels on Estimate Delivery Option
a. Estimate Delivery section heading: It lets you set the label for the Estimate Delivery option and will appear on the frontend product page.
b. Estimate Delivery display in days text: It lets you set the label for displaying estimated delivery details in business days. It will appear on the frontend product page and you can use shortcode {{business.days}} to replace it with the number of business days required for delivery of the product.
c. Estimate Delivery display with specific date text: It lets you set the label for displaying estimated delivery details with a specific date. It will appear on the frontend product page and you can use shortcode {{expected.date}} to replace it with the expected date of delivery for the product.
Example:
Now let us see an instance for the Estimate Delivery Option considering the same product Winter Boots using the above labels for the fields.
When you select the Delivery Option as a Text block and select the Display Delivery details as Business Days in the backend, then the field labels on the Product page will be displayed as shown below:
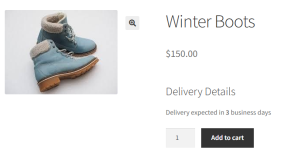
Estimate Delivery display in days text
Similarly, when you select the Delivery Option as Text block and select the Display Delivery details as Specific Date, then the field labels on Product page will be displayed as shown below:
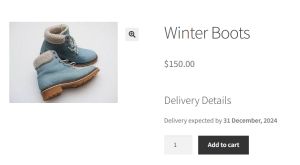
Estimate Delivery display with specific dates text
Conclusion
The change label options help the customers to easily identify and choose the appropriate delivery date and time for delivering products.
Changing labels is a small, but important part of setting the delivery date calendar and details for the frontend. All the label changes are immediately reflected on the respective pages.
It is very important to change your labels appropriately because that is how the customer gets cues about the product fields. It allows you to set the right messaging tone for your product.