Using the Product Delivery Date Pro for WooCommerce plugin, you can now export deliveries to Google Calendar automatically or manually.
Admins can choose to export product deliveries to their Google calendar automatically once a customer places an order. They can even add delivery details to Google Calendar or any other calendar from the Admin notification email.
Customers can export the product delivery details from the Order received page, Customer notification email, or My Account page.
How does this work?
For setting up the Google Calendar sync, go to Product Delivery Date > Settings > Integrations > Google Sync. The default view of this tab is as shown below:
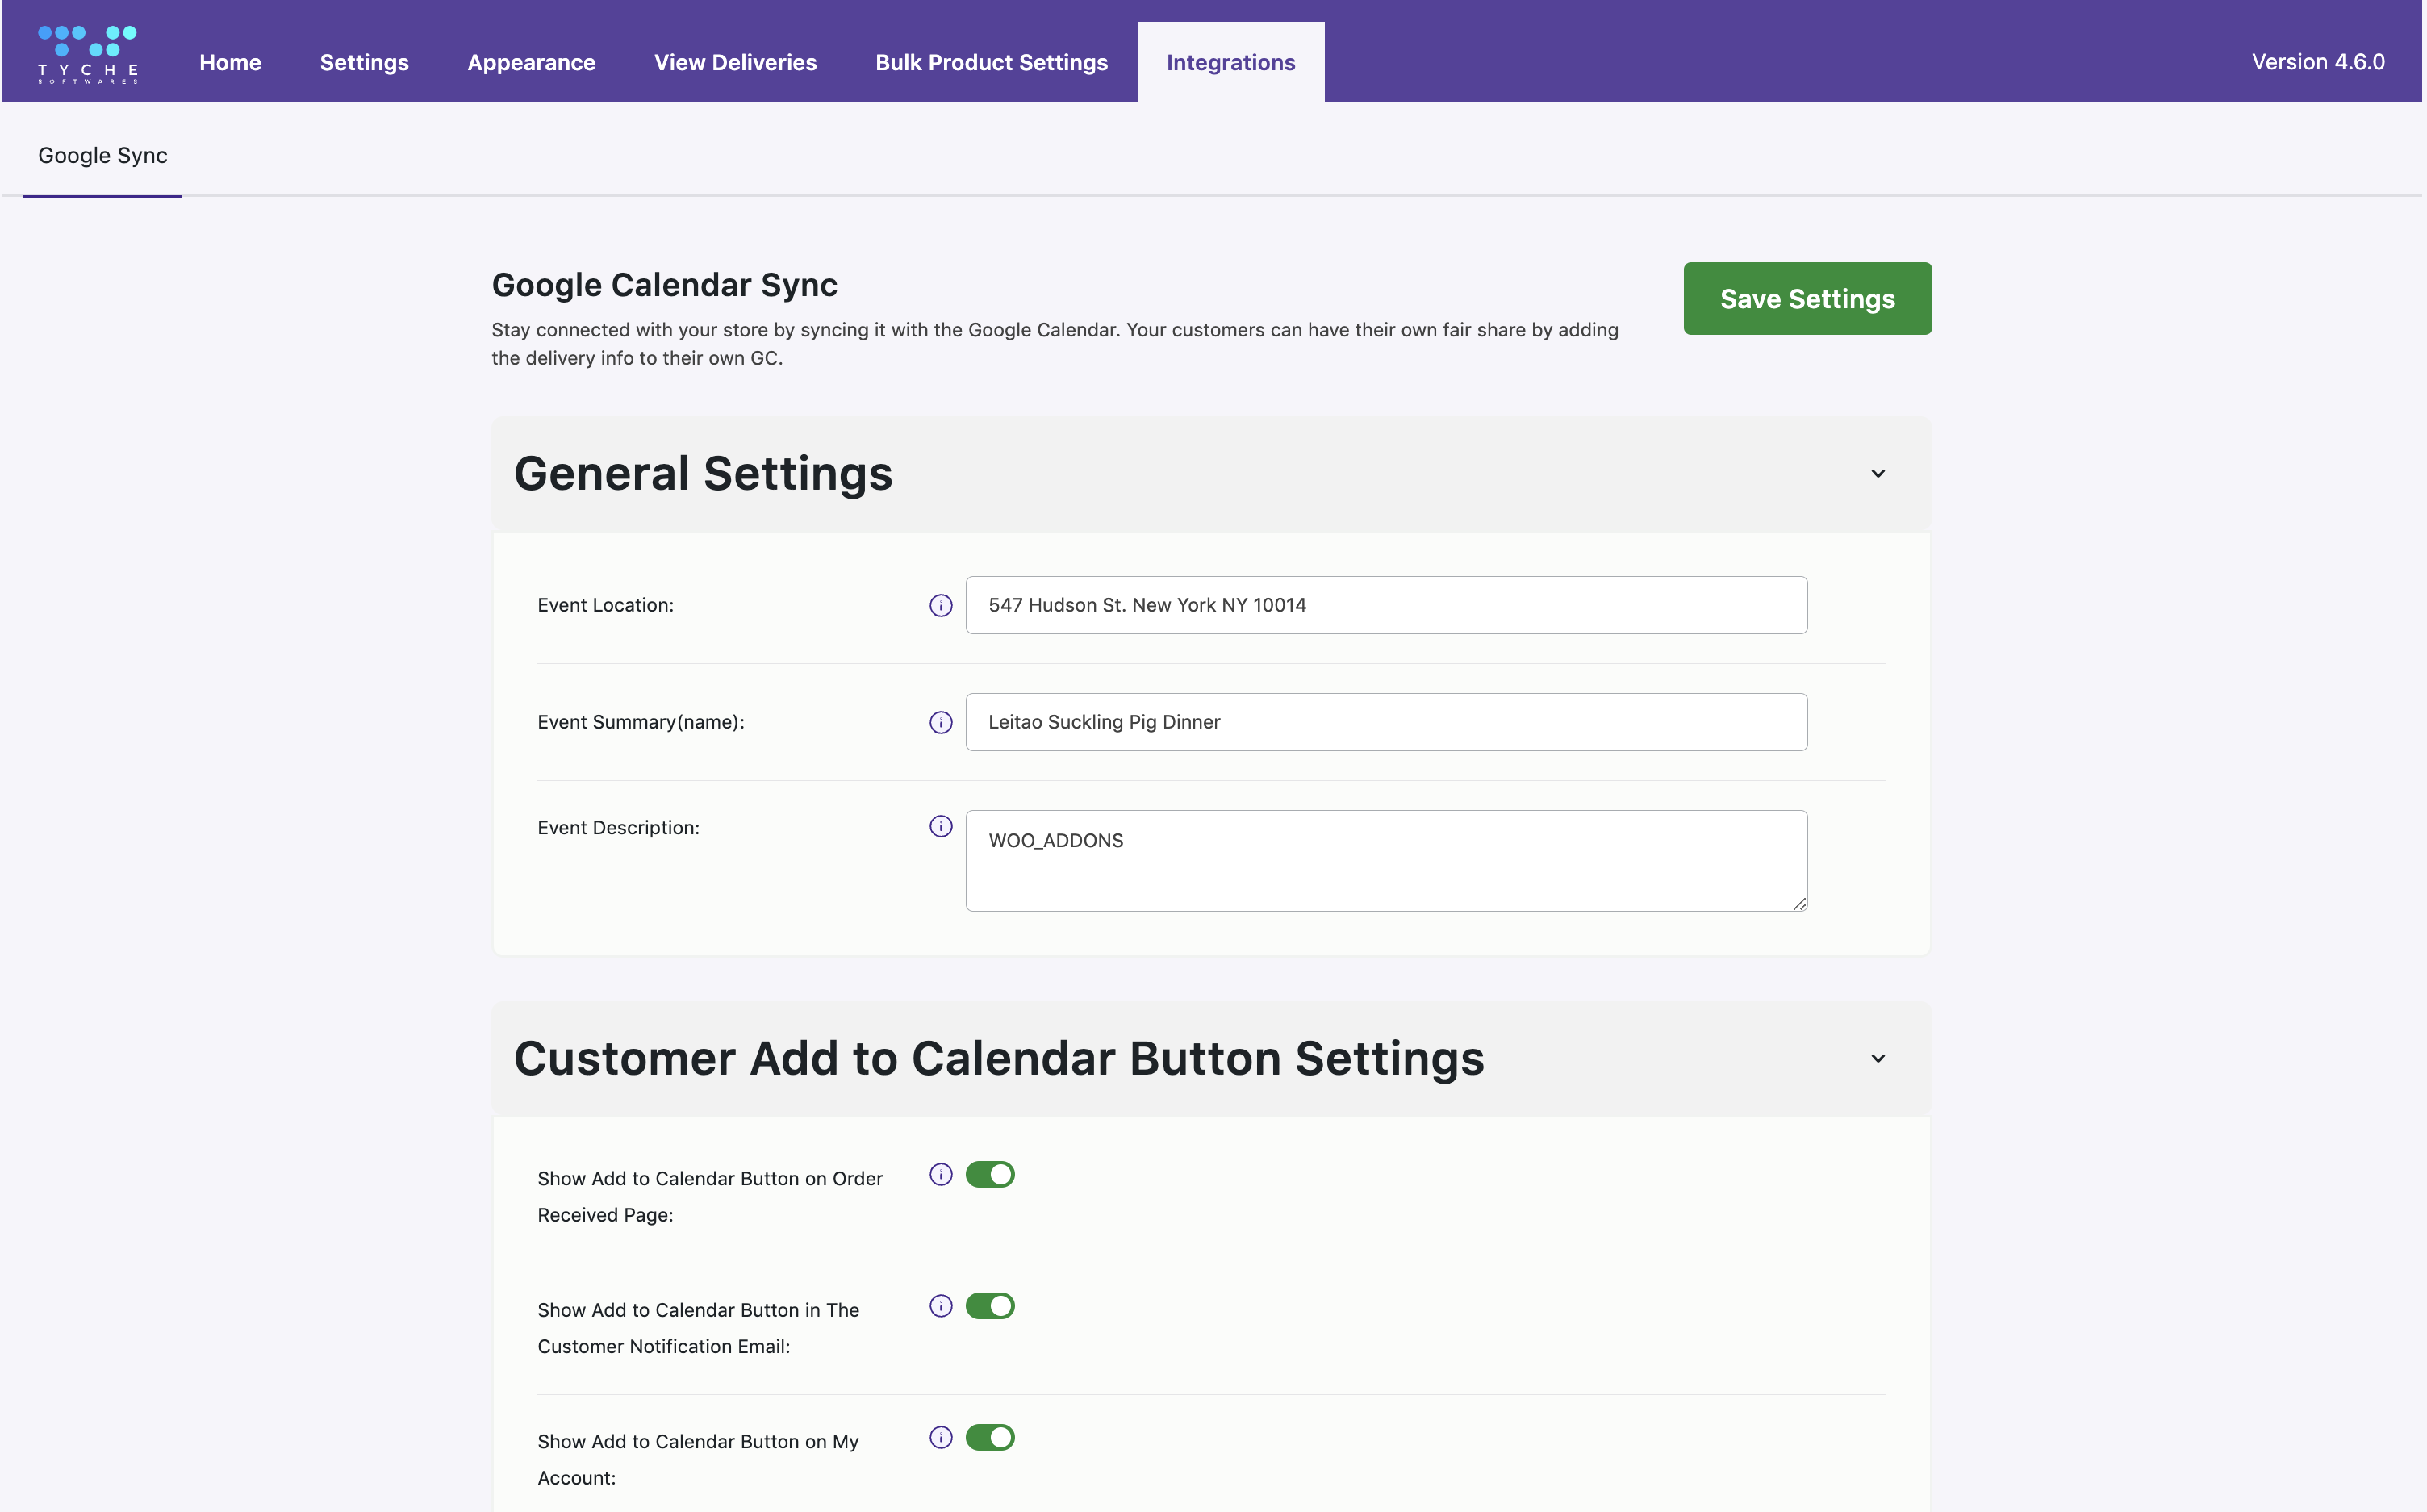
Default view of Google Calendar Sync tab
Here, you will see the page is divided into three sections, as mentioned below:
1. General Settings
2. Customer Add to Calendar button Settings
3. Admin Calendar Sync Settings
Before we get to understand these three sections separately, let us first integrate your WooCommerce shop with Google Calendar:
Integrating into Google Calendar
Important: *Google Calendar API requires PHP V5.3+ and some PHP extensions.
Go to the Google APIs console by clicking https://code.google.com/apis/console/.
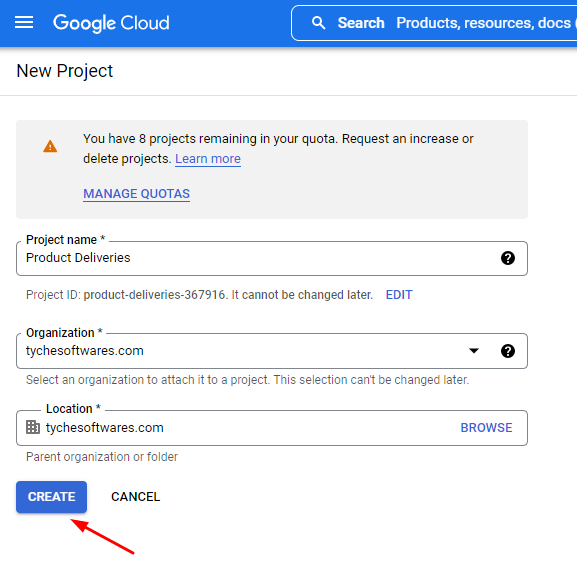
Login to your Google account if you are not already logged in. Start by creating a new project using the left side panel. Click on the ‘Home’ option. Name the project ‘Product Deliveries’ (or use another name that fits your needs instead). Click on the ‘Create’ button:
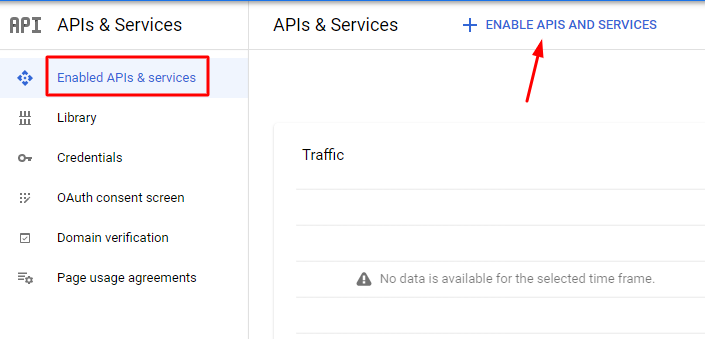
Go to ‘Enabled APIs & services’ from the left side panel. Click on ‘Enable APIs and Services.’
In the search box, find the Google Calendar API and click on it:

Click the ‘Enable’ button:
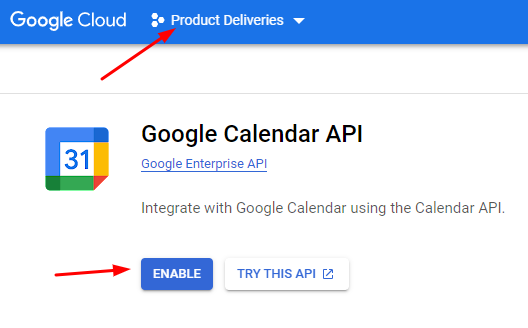
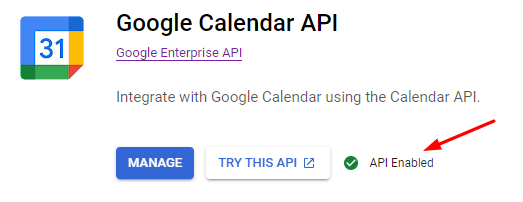
Once enabled, it will show you an ‘API Enabled’ message:
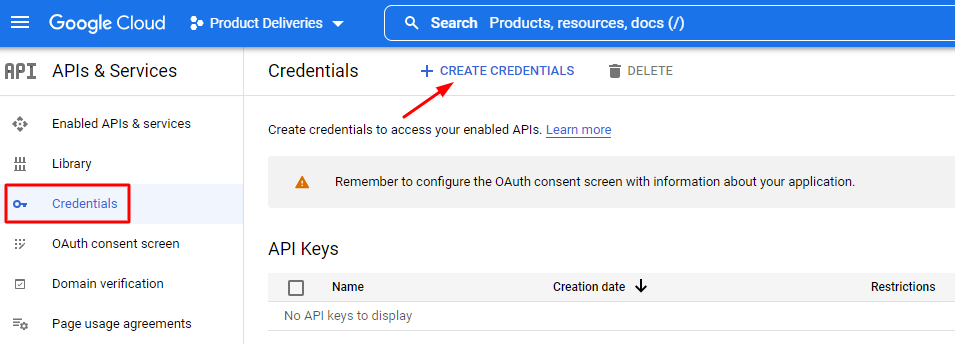
Now, go to Credentials and click on ‘Create Credentials’.
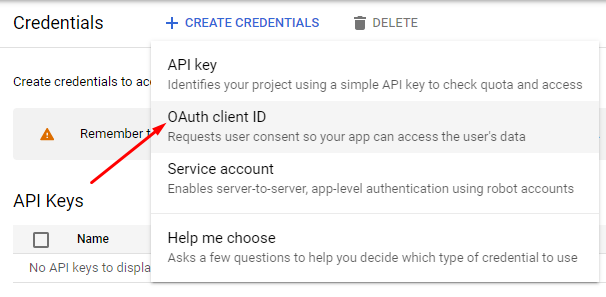
Choose ‘OAuth client ID’ from the dropdown:
The new page will ask you to create this new ID. Click on ‘Configure Consent Screen’ as shown below:

Choose the User Type based on your needs. You can go with ‘Internal’ as shown here:
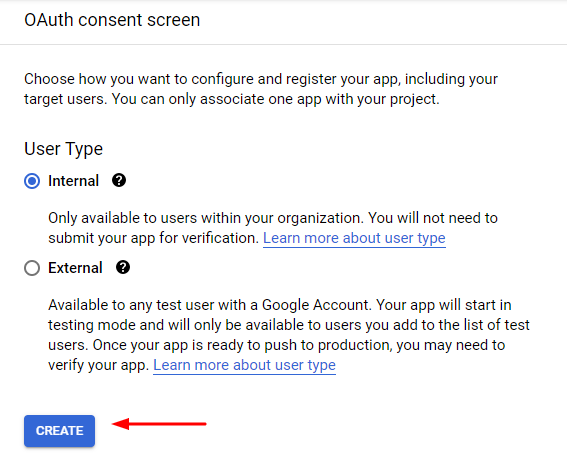
Click on the ‘Create’ button. Since the OAuth consent screen is now in the process of being published, on the left hand side panel you will find it’s tab. Continue by naming the App. You can name it to ‘Product Delivery Date’ or a name of your preference. Enter the email ID:
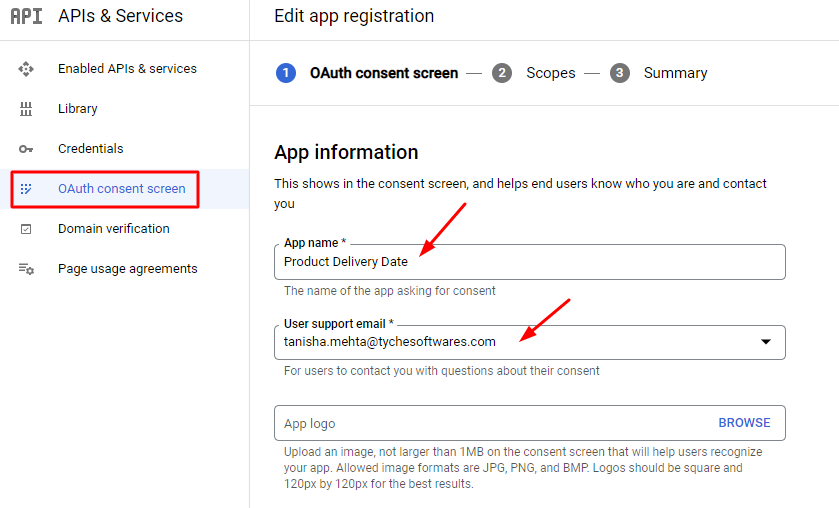
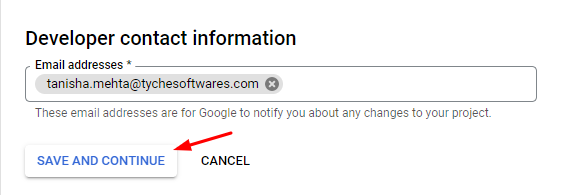
Continue filling the details for ‘Scope’ and ‘Summary’. Under Developer contact information, enter the email address where you would like to receive information about your project if any changes are made. Click on ‘Save and Continue’ as shown here:
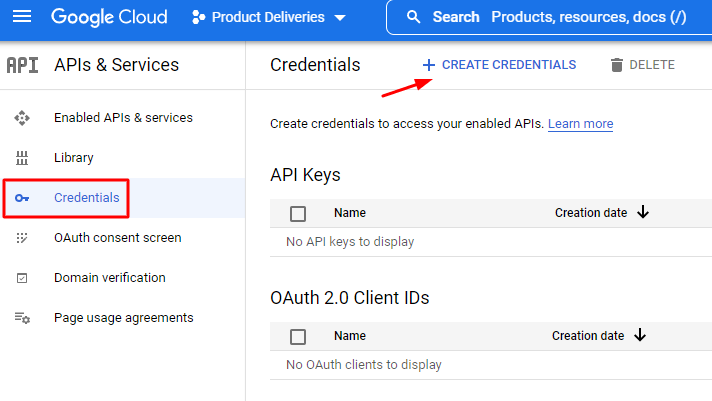
Now go to the ‘Credentials’ from the left panel. Find the ‘Create Credentials’ as shown here:
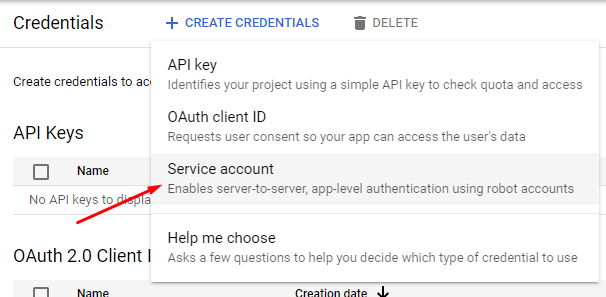
Now choose to create a ‘Service account’ from the dropdown as shown here:
A Service Accounts tab will be created. Give it a name and click on ‘Create and Continue’ as shown here:
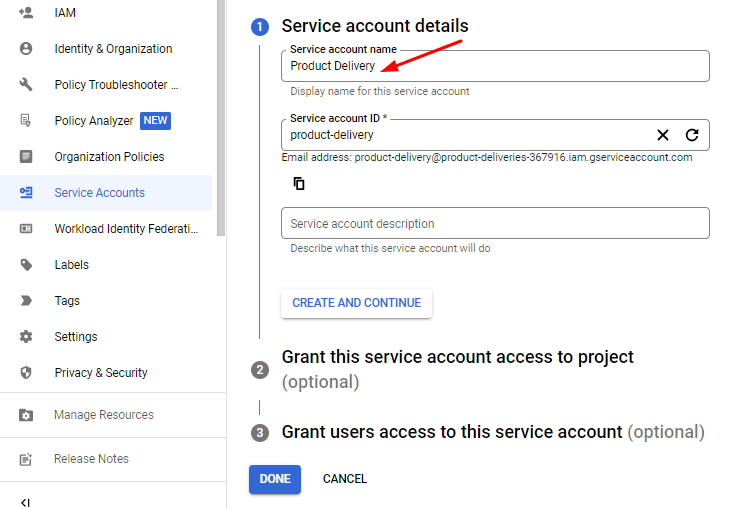
Under the ‘Grant this service account’ settings, add the Role of who will receive access to this account. For instance, since you have created the project your role should be of the ‘Owner’. Press Continue to move forward:
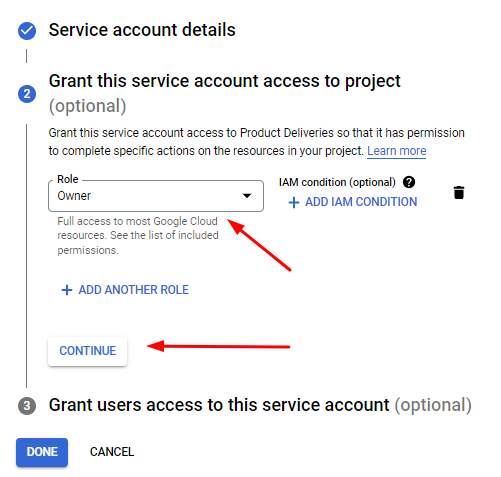
After granting the user access, click the ‘Done’ button:

You will find that the service account has been created under the ‘Credentials’ tab. Go to the Actions section, where you will find the pencil icon indicating editing:

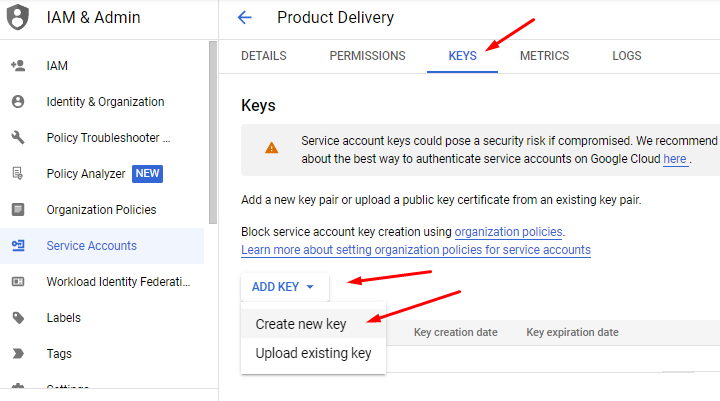
Find the ‘Keys’ tab and click on ‘Add Key’. From the dropdown, choose ‘Create new key’.
Select P12 and click on the ‘Create’ option:
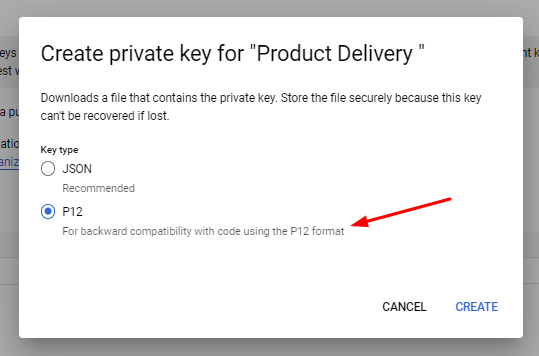
A P12 file will be downloaded to your device. Note down the password of this key by copying it. Close the popup once done.
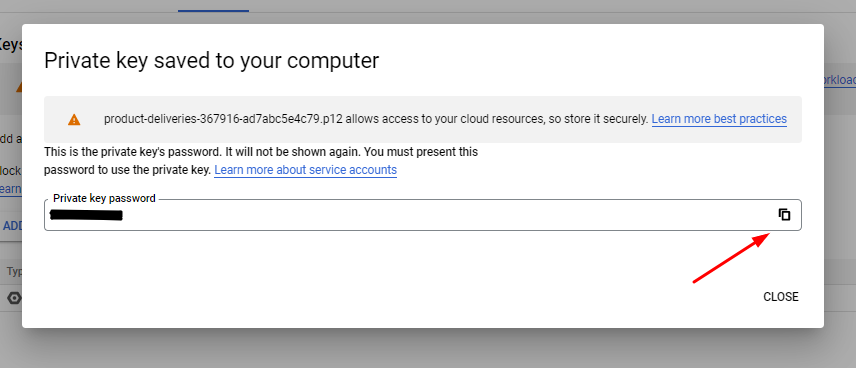
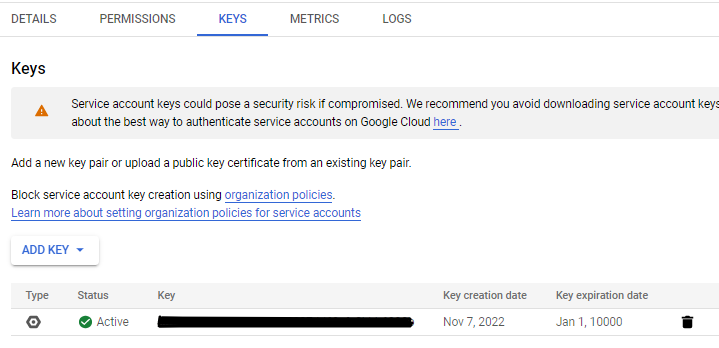
You will see the status of the Key as ‘Active’ shown here:
Now, using your FTP client program, copy this key file to a folder that was mentioned in the instructions of your Product Delivery Date Google Calendar setting page. Find this by going to Product Delivery Date > Settings > Google Calendar Sync and scrolling down to Admin Calendar Sync Settings > Instructions.
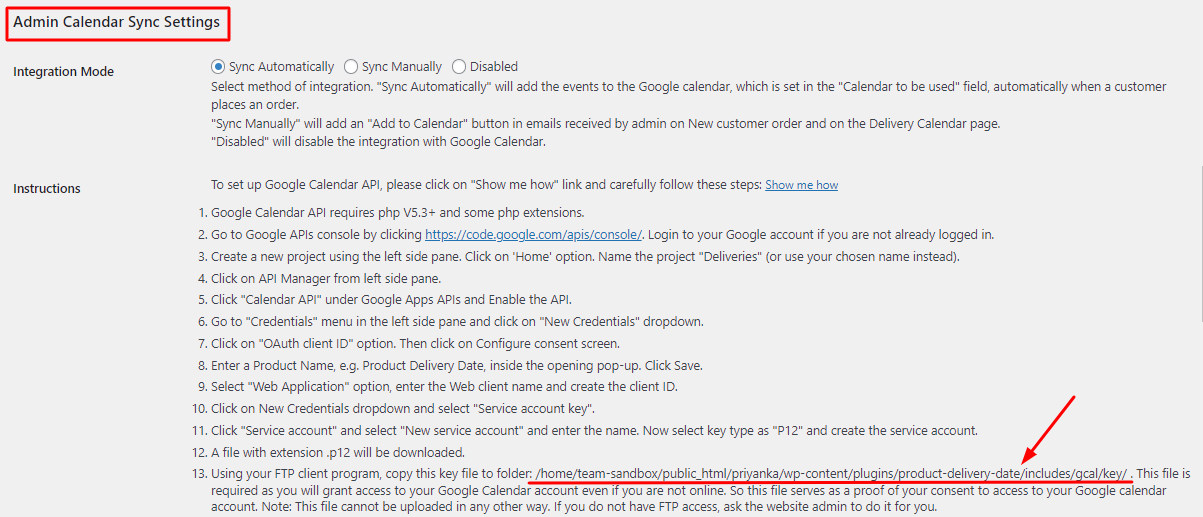
For instance, it may show a pathway similar to this: /home/team-sandbox/public_html/priyanka/wp-content/plugins/product-delivery-date/includes/gcal/key/.
After uploading, it will look like this in your FTP server:
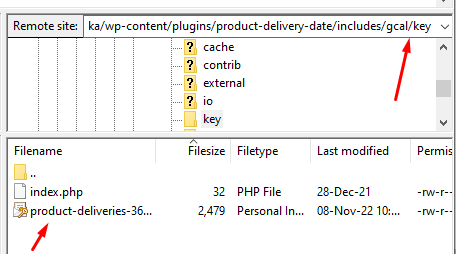
This file is required as you will grant access to your Google Calendar account even if you are not online. So this file serves as a proof of your consent to access to your Google calendar account.
Note: This file cannot be uploaded in any other way. If you do not have FTP access, ask the website admin to do it for you.
Now that you have uploaded this file, copy the file name without the .p12 in it. Paste it ‘Key file name’ in the Google Calendar Sync Page of your shop as shown here:

Now, go back to your Google Calendar Cloud page and go to Service Accounts and find the Email Id as shown here:
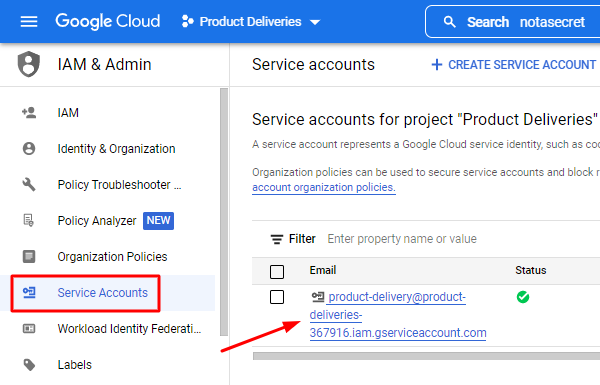
Copy it and paste it in your ‘Service account email address’ section in the Google Calendar Sync Page of your shop as shown here:

Now you make some change in your Google Calendar. Open your Google Calendar by clicking this link: https://www.google.com/calendar/render
Create a new Calendar by selecting Other Calendars:

Click on ‘Create new calendar’.
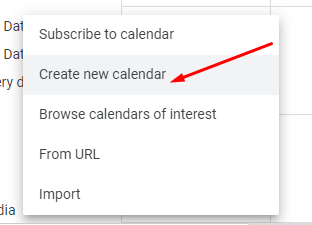
Try NOT to use your primary calendar.
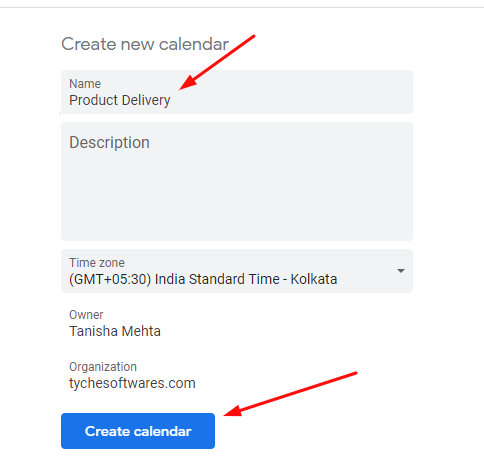
Give a name to the new calendar, e.g. Product Delivery. Check that Calendar Time Zone setting matches with time zone setting of your WordPress website. Otherwise, there will be a time shift. Click on ‘Create Calendar’ as shown here:
Once the calendar is created, go to the ‘Share with specific people’ tab. This will let you share your calendar with your WooCommerce shop. Click on ‘Add people’:
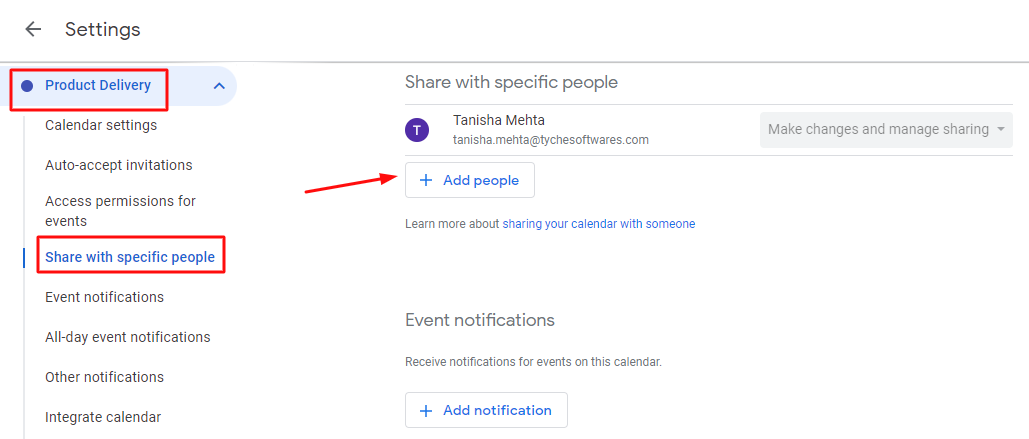
Paste the already copied ‘Email address’ setting from the Service account of the Google APIs console you had created earlier. Click on Send.
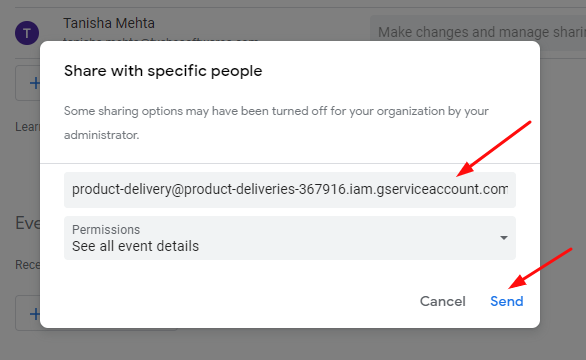
Ensure to change the permissions from ‘See all event details’ to ‘Make changes to events’ as shown here:
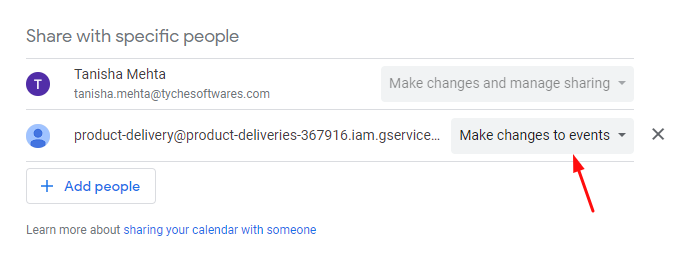
This would mean that your WooCommerce store will be able to make changes to your Google Calendar if new orders are placed instead of simply being able to see the events that have been created in the calendar.
Moving on, go to Calendar Settings and find Integrate calendar. Here you will get the Calendar ID. Copy it:

Paste it in ‘Calendar to be used’ section in the Google Calendar Sync Page of your shop and click on ‘Test Connection’:

Ensure to avoid keeping the Integration Mode as Disabled. Depending on your needs, choose the mode. For instance, you can go with Sync Automatically.
If all the steps have been followed correctly, you will be displayed a message indicating the success of your test connection as shown below:
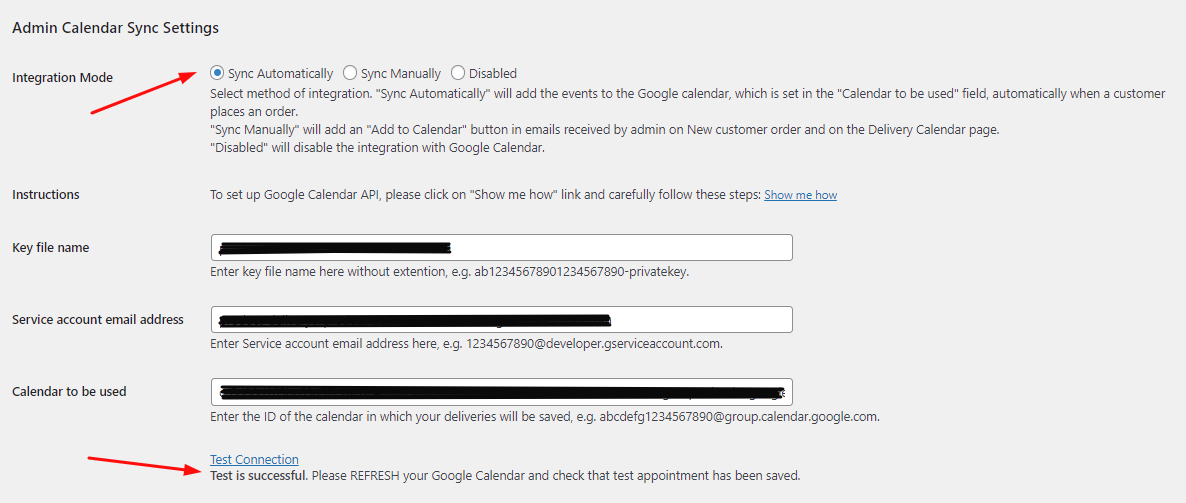
Since your connection has been established, your product deliveries will be imported to your Google Calendar.
Now let’s understand the 3 different sections present on the Google Calendar Sync page of your WooCommerce Page.
1. General Settings
Here you can add settings like add Event name, location and description of the event as shown below:
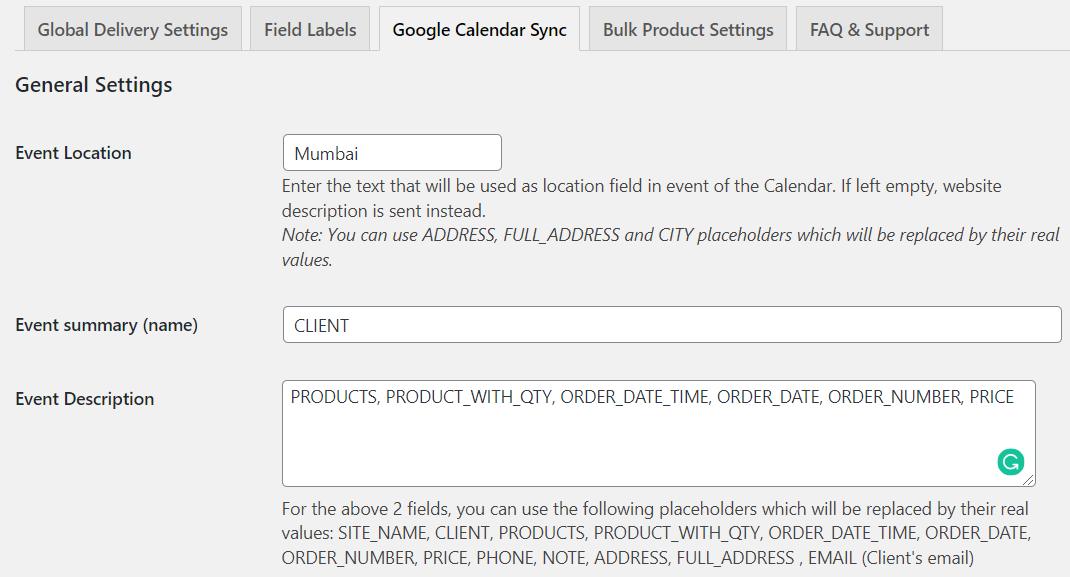
General settings added
As you can see above, the location is set to Mumbai. This text will be used as location of the event in the Calendar.
You can use the placeholders like ADDRESS, FULL_ADDRESS and CITY instead of the text and these placeholders will be replaced by their actual values.
Event summary or name refers to the event’s name on the calendar, whereas Event Description refers to the event’s details.
Here you can add the order details like products, quantity, Delivery date and time, price, address, etc. For both these fields, you can use the placeholders which will then be replaced by their real values.
2. Customer Add to Calendar button settings
Moving to the next section which is the Add to Calendar button settings, which works mainly for the customers. You can enable the options under this section depending on the requirements, which will display the Add to Calendar button on Order received page, Customer notification email and My account page. You can also opt out to have the events calendar opened in a new tab by enabling the Open Calendar in Same Window option.
Thus customers can add the delivery dates & times to their Google Calendar or any other calendar using these settings.
Enable the check boxes for the respective pages under the Customer Add to Calendar button Settings section in Product Delivery Date -> Settings -> Google Calendar Sync tab, for enabling the Add to Calendar button on these pages.

Customer Add to Calendar button settings
Once this is done, the Add to Calendar button will be displayed on Order received page, Customer notification email and My account page as shown below:
Order received page:

Add To Calendar button on Order received page
Customer notification email:

Add To Calendar button in Customer Notification email
My Account page:

Add To Calendar button on My Account page
On clicking the Add to Calendar button, you will be redirected to the Event Details page as shown below:

Event Details page
Once you have checked all the details, click on the Save button, and this event will be added to the Google Calendar. Now click on the event to see the details as shown below:

Event details displayed on Google Calendar
On clicking the Add to other Calendar button, a .ics file gets downloaded on your device. The .ics file contains complete details of the event, which you can upload to any other calendar.

.ics file gets downloaded
3. Admin Calendar Sync Settings
This setting works for the admin; he/she can export delivery dates & times automatically or manually to his google calendar by selecting the appropriate integration mode. When the integration mode is set to Disabled, the google calendar sync will be disabled. Admin can choose this option when he doesn’t want to export delivery details.
Let us understand the other 2 modes of integration: Automatic and Manual.
3.A.Sync Automatically
Follow the below steps to automatically export delivery dates and times to your (admin) Google calendar:
- Select the Sync Automatically Integration Mode.
- Setup the Google calendar sync with the help of the instructions provided by clicking the Show me how link.
- Test the Connection using the Test connection link.

Sync Automatically Integration mode enabled
The events will now be exported automatically to the Google calendar for which Calendar ID is added, once the customer places an order. This is how it will appear on the calendar:

Delivery of Blueberry Cheese cake exported to the calendar
3.B. Sync Manually
Follow the below steps to manually export delivery dates and times to your (admin) Google calendar:
- Select the Sync Manually Integration Mode.
- Enable the check box Show Add to Calendar button in New Order email notification, for adding the Add to Calendar button in New Order email notification.
- Admin can sync the delivery dates & times by clicking on either the Add to Google Calendar button or Add to other Calendar button.

Sync Manually Integration mode enabled
As the Show Add to Calendar button in New Order email notification is enabled, the buttons will be displayed on New order email notification as shown below:

Add to Google Calendar button in Admin notification email
So when a customer clicks on Add to Google Calendar button, he will be redirected to Edit Details page, where the details of the placed order will be added as shown below:

Edit Details page of the event
Once the details are checked, click on Save button to save this event to the Google Calendar as shown below:

Event saved in Google Calendar
Thus the event gets saved for the selected delivery date as shown above. To check the details, click on the event, and its details will appear as shown below:

Details of the saved event
When you click on the Add to other Calendar button, a .ics file gets downloaded on your device which contains complete details of the event and you can then upload that to any other calendar.

.ics file gets downloaded
Conclusion
This post explains how the Google Calendar Sync works for exporting product deliveries to the Google calendar once customer places an order. We also saw how the manual and automatic integration works. This is a highly essential feature that proves fruitful in keeping your calendar up to date with the product deliveries.
We saw basic guidelines on how this feature works but more detailed instructions for setting up the export process is also available under the Google Calendar Sync tab of Product Delivery Date Pro for WooCommerce plugin.