Table of Contents
When it comes to integrating with 3rd party services, there are a variety of plugins available in the WooCommerce ecosystem that allow you to transfer information to & from all sorts of systems right from Zapier to ConstantContact to helpdesk systems like Help Scout.
At Tyche, we have integrated some of our plugins with Google Calendar in the past, since a couple of our plugins involve bookings or handling order delivery dates. It was along these lines that I thought to explore the idea of integrating WooCommerce orders with Google sheets. It would mean that any WooCommerce order that comes in, also gets added to a Google sheet in real-time.
Before starting to write on this, I was looking at what’s available for directly adding WooCommerce order information to a Google sheet. There were a couple of articles & plugins.
The first article talks about saving new WooCommerce orders into Google sheets via the WooCommerce Zapier extension. As you would know, Zapier provides integration with over 1500+ cloud services. This isn’t what I was looking for as I am trying to achieve this integration without using a plugin.
And while Woocommerce provides many functionalities out of the box, Woocommerce orders can’t be exported to Google sheet by default in WooCommerce.
Therefore, in the next few steps, we will look at how to export WooCommerce orders to a Google sheet in real-time using WooCommerce Webhooks & Apps Script provided by Google.
Step-by-step Guide on How to Export Woocommerce Orders to Google Sheet
Step 1: Creating the Google Sheet
You first need to create a new Google Sheet where all your WooCommerce orders shall be exported. Once it’s created, you can add the fields that you want to export to the Google Sheet.
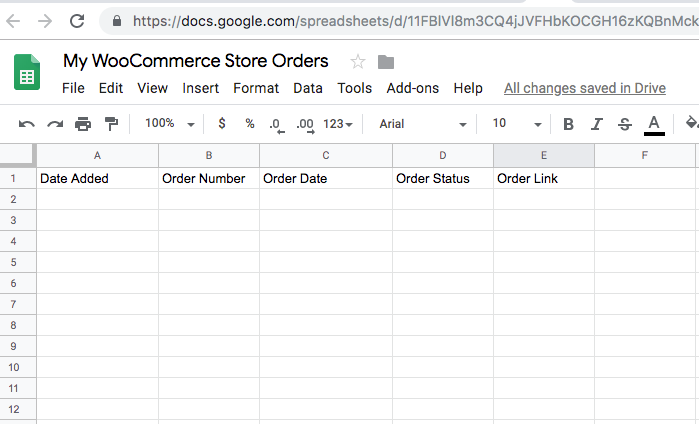
I have added 5 fields to my sheet:
- Date Added – Date when this record was added in the Google Sheet
- Order Number – This is the WooCommerce order number
- Order Date – Date when the order was placed
- Order Status – Order status after it was placed
- Order Link – Link to the WooCommerce Edit Order page
Step 2: Writing the Google Apps Script
Once we’ve created the sheet, we need to create the Google Apps Script that will be responsible for adding data to the sheet. The script will get data from the WooCommerce Webhooks (which we will see in a later step) and that data will be parsed & added to the sheet.
You can go to the Tools menu & click on Script Editor.
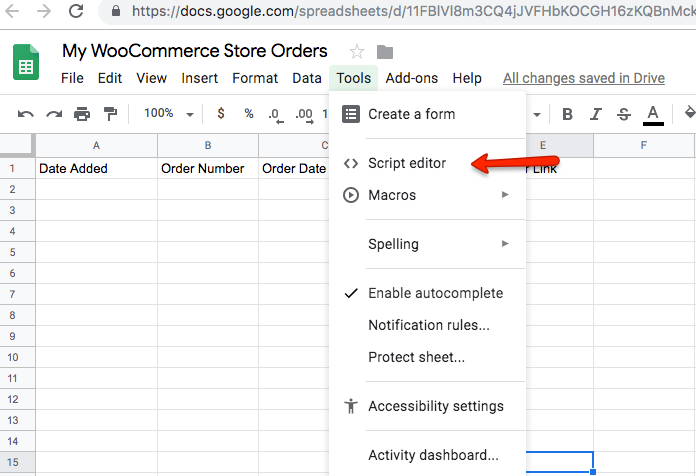
You will see the below screen once you open the Script Editor.
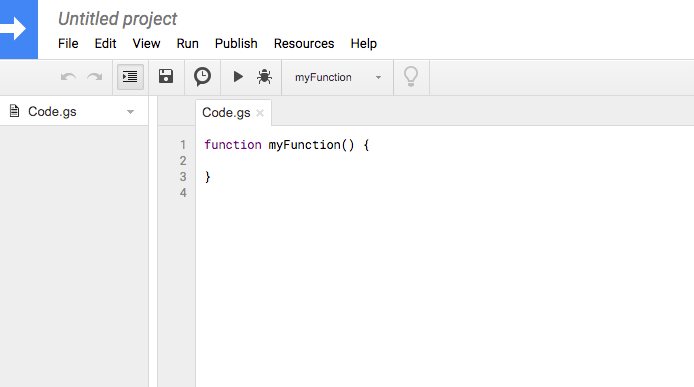
Google has this feature where it allows a script to be published as a web app if it meets certain conditions. The requirements are:
- It contains a
doGet(e)ordoPost(e)function. - The function returns an HTML service
HtmlOutputobject or a Content serviceTextOutputobject.
When an external application sends an HTTP GET request, Apps Script invokes the doGet(e) function, whereas when an external application sends an HTTP POST request, Apps Script would invoke the doPost(e) function. A detailed explanation of the Google Scripts web apps & the above functions can be found here.
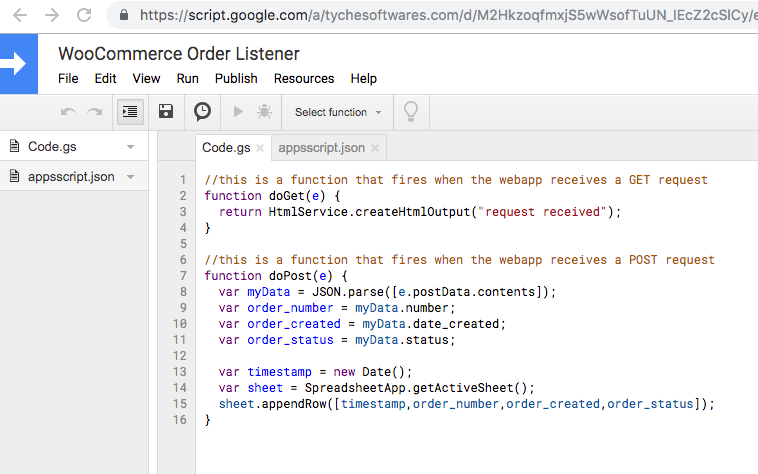
Below are the 2 functions that I created in my script:
//this is a function that fires when the webapp receives a GET request
function doGet(e) {
  return HtmlService.createHtmlOutput("request received");
}

//this is a function that fires when the webapp receives a POST request
function doPost(e) {
  var myData = JSON.parse([e.postData.contents]);
  var order_number = myData.number;
  var order_created = myData.date_created;
  var order_status = myData.status;

  var timestamp = new Date();
  var sheet = SpreadsheetApp.getActiveSheet();
  sheet.appendRow([timestamp,order_number,order_created,order_status]);
}
After adding the above code, my Google script now looks as shown below:
Step 3: Deploying the script as a web app
Once the above code is written, we have fulfilled the requirements for it to be deployed as a web app; meaning the script to export our Woocommerce orders in real-time is now ready.
Note: Deploying this script as a web app is necessary for it to be able to listen to external GET & POST requests.
To deploy the script as a web app, you need to select the Publish -> Deploy as web app option.
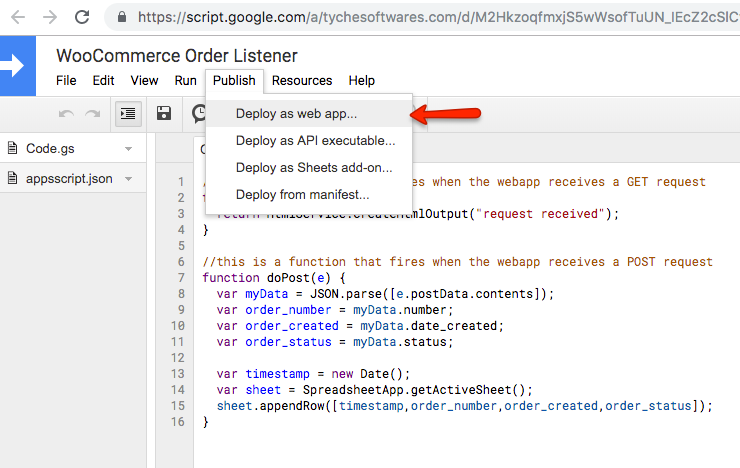
Clicking “Deploy as web app” will show the below popup:
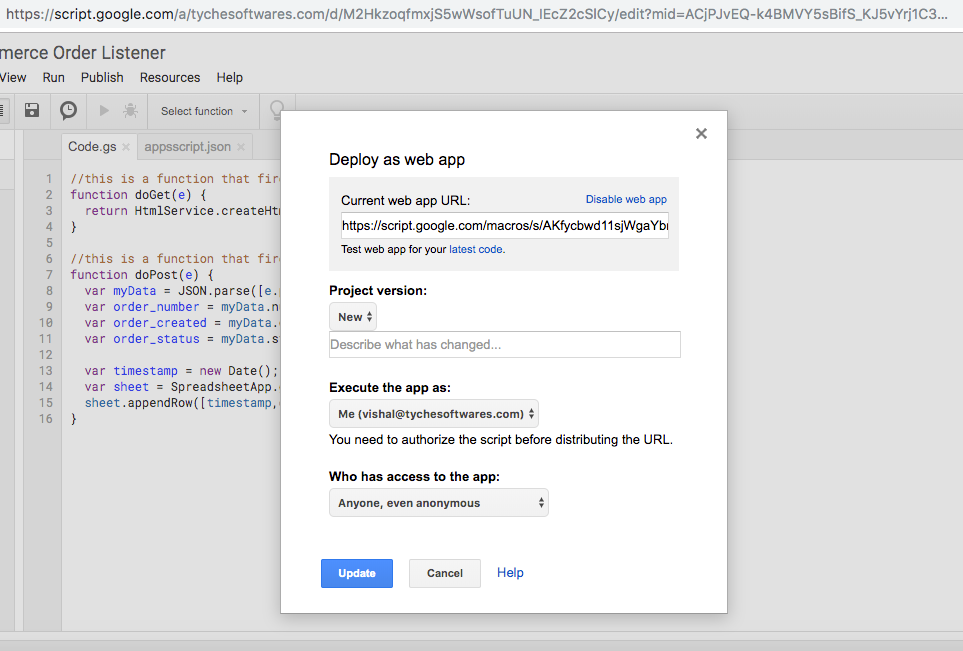
When deploying as a web app, it’s important that each time you deploy, you select “New” in the Project version option. Only when you select “New”, do any changes done in that iteration take effect.
You need to select “Me” in the “Execute the app as” option. And “Who has access to the app” should be set to “Anyone, even anonymous”.
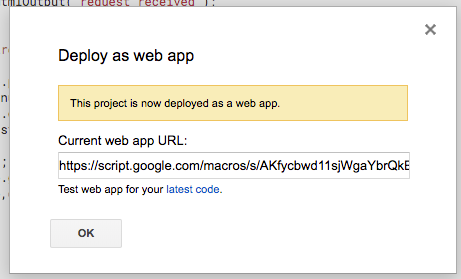
Once you click on “Update”, the below message will appear indicating that the project is now successfully deployed as a web app. Along with it, it will also show a URL in the “Current web app URL” field. You need to copy this URL as this is the URL that will be used as we proceed in the Woocommerce orders export settings with WooCommerce webhook in the next step.
Step 4: Creating the WooCommerce webhook
Now that the Google Apps script is set up & deployed as a web app, we need to add a WooCommerce webhook that will be fired whenever an order is created.
You can add a webhook from WooCommerce -> Settings -> Advanced -> Webhooks menu. When you click on the “Add webhook” button, you need to fill in the fields as shown below:
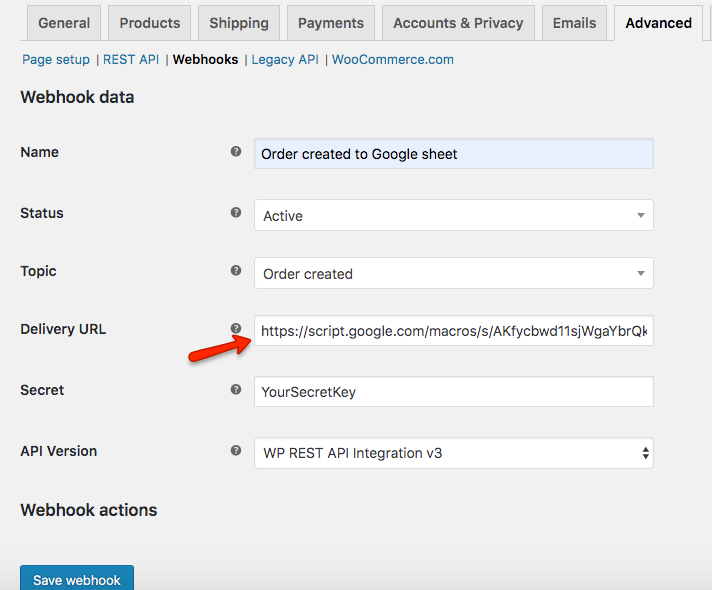
The URL copied in the previous step from the “Current web app URL” field needs to be put in the “Delivery URL” field of the webhook. What this will do is whenever an order is created, it will send the order information to the delivery URL, where our Google Apps script is set up to listen to any incoming GET or POST requests. In the current case, all the order information is passed via HTTP POST.
Related Article: How to Allow Third Party WordPress Plugins to Communicate With Your Google Calendar
Once the webhook is created, it will appear in the list of webhooks with Active status:
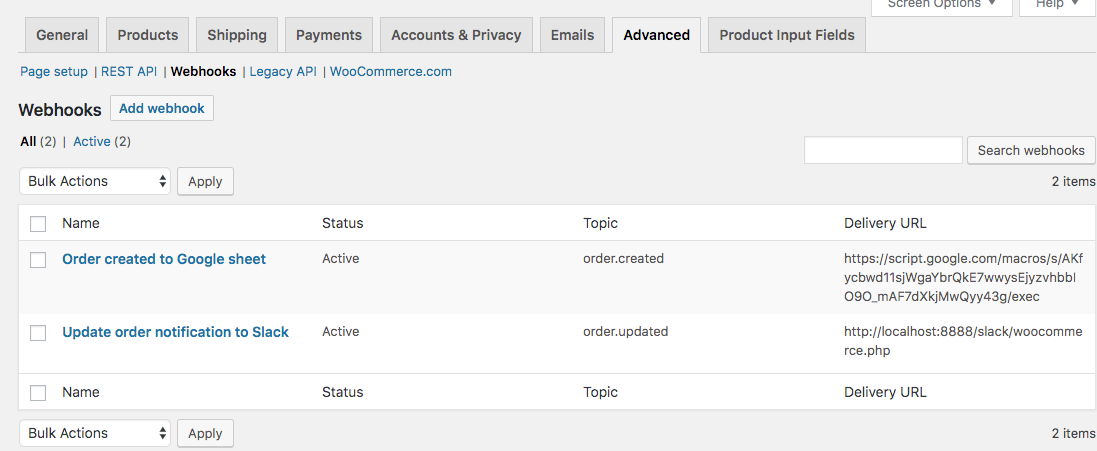
You may or may not have additional webhooks in your setup. I have another webhook set up that sends a notification on Slack when an order is updated.
Step 5: Time for some action
Once an order is placed on your WooCommerce store, in the next 1 or 2 minutes, that order’s information would appear in the Google sheet in the last row.
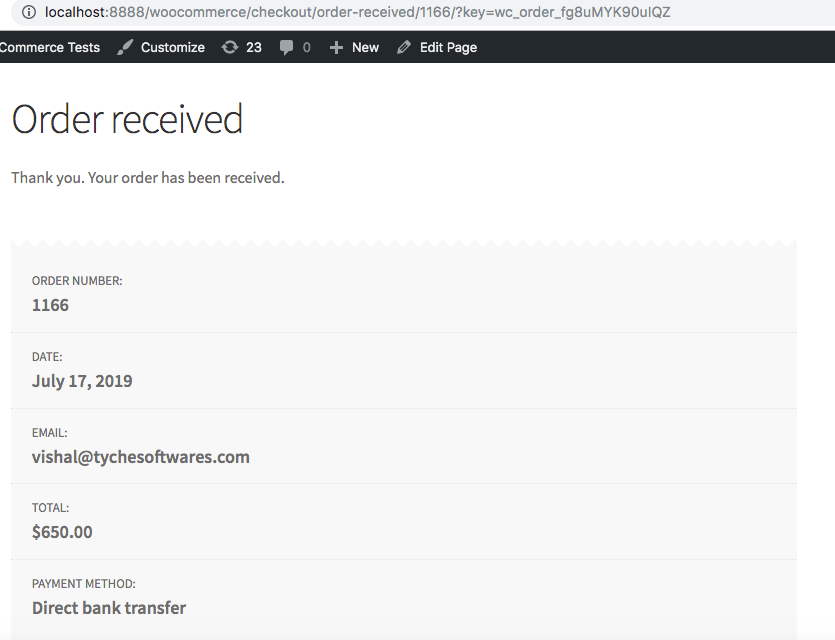
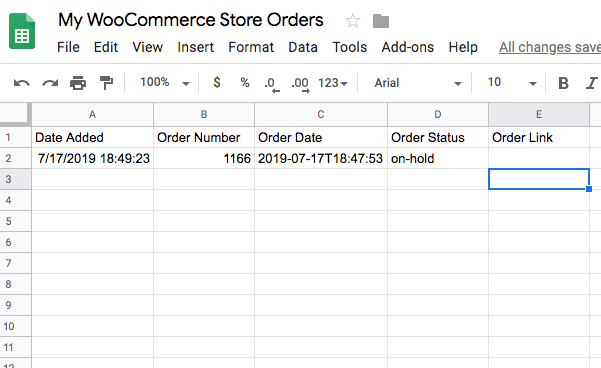
After the above order is placed, it took about 2 minutes for the corresponding information to appear in the Google sheet:
As you keep on receiving orders on your WooCommerce store, the Google sheet will automatically append the order information below the last populated row. I placed 4 orders after the above Order number 1166:
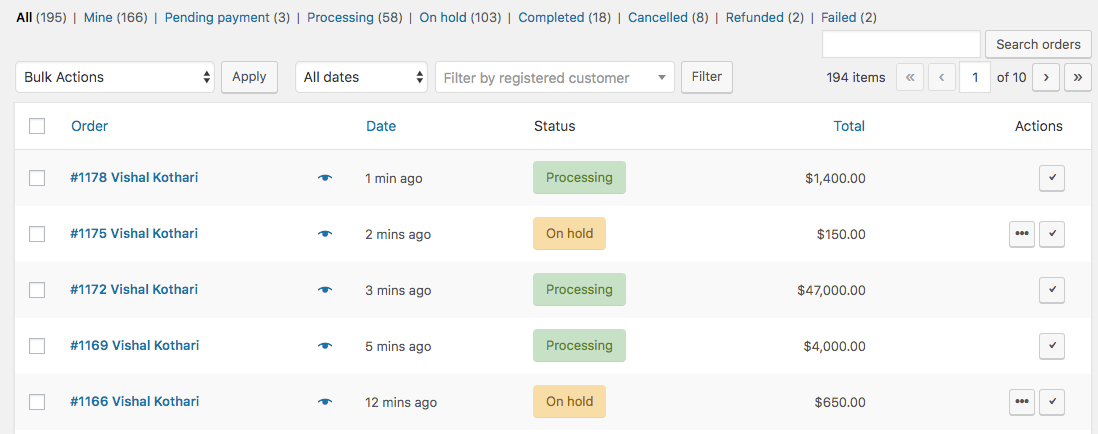
And after every order was placed, the Google sheet was populated with the order information within 10 seconds to 1 minute time:
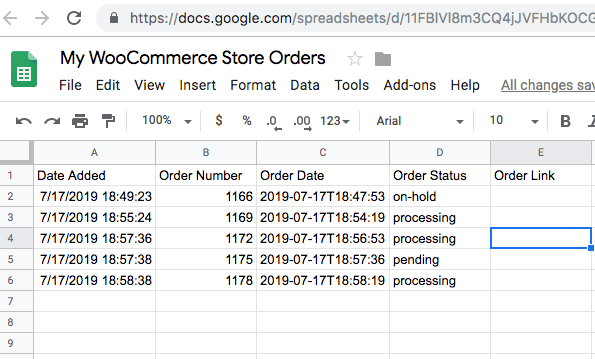
The Order Link column is currently blank as I haven’t put any data in it. However, you can parse the order information as you like & populate any information from the orders like order total, payment method, products, etc.
Order metadata
When the order.created action is fired by WooCommerce, it sends a bunch of meta-information about the order. You can find all the information below, which is taken from one of my sample orders. This meta also includes the Delivery Date & Delivery charges field, which are added from our Order Delivery Date plugin to automate the store deliveries. The order has 2 products in it, one simple product & a variable product:
Fetching Full WooCommerce Order Information
As you can see, the above information that I have fetched is very limited. The below example demonstrates how to fetch detailed order information that includes the following fields:
Order Number
Order Date
Order Status
Product Name
Product Quantity
Product Total
Order Total
Billing Email
Billing First name
Billing Last name
Payment Method
Shipping Method
Shipping charges
My Google sheet looks like this now:
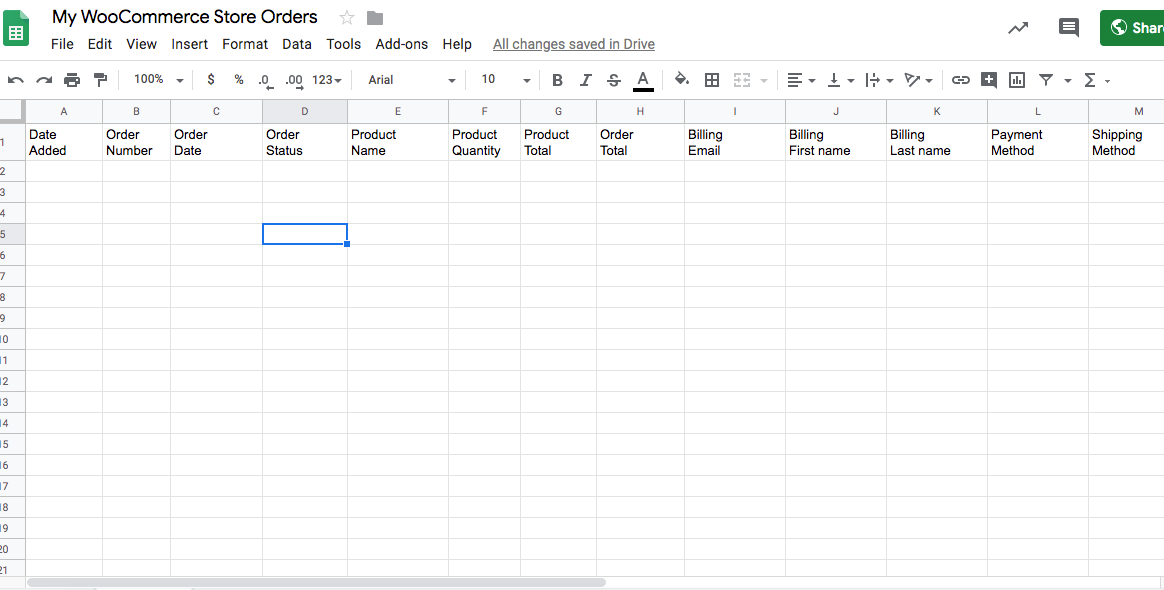
My Google Apps script to fetch all the above information is now modified as shown below. Here is the modified script given below that adds the additional details about the order. (please remember to Deploy as a new web app every time you make changes to the Google Apps script).
//this is a function that fires when the webapp receives a GET request
function doGet(e) {
  return HtmlService.createHtmlOutput("request received");
}


//this is a function that fires when the webapp receives a POST request
function doPost(e) {

    var myData = JSON.parse(e.postData.contents);

    var order_number = myData.number;
    var order_created = myData.date_created;
    var order_status = myData.status;


    var product_name = myData.line_items[0].name; // Assuming there's at least one line item
    var product_quantity = myData.line_items[0].quantity;
    var order_total = myData.total;
    var billing_email = myData.billing.email;
    var billing_first_name = myData.billing.first_name;
    var billing_last_name = myData.billing.last_name;
    var payment_method = myData.payment_method_title;
    var shipping_method = myData.shipping_lines[0].method_title; // Assuming there's at least one shipping method


    var timestamp = new Date();
    var sheet = SpreadsheetApp.getActiveSheet();
    sheet.appendRow([timestamp, order_number, order_created, order_status, product_name, product_quantity, order_total, billing_email, billing_first_name, billing_last_name, payment_method, shipping_method]);


  }
Once you place an order, the sheet will start populating as shown below:
Here are the orders that I placed:

Based on the above order #1214, 1217 & 1220, you can see all those orders getting created below with additional information.
Thus, with the help of some simple modifications, we have managed to get full order information in the Google sheet.
This is the easiest and most straightforward method you can use to export your Woocommerce orders in WordPress. The orders are exported in real-time and there is no additional effort on your side whenever a new order is placed.
Also, you can easily automate your store orders with the WPSyncSheets WooCommerce plugin, which helps you to seamlessly update your sheets, saving you valuable time and effort. Besides exporting order data, it offers functionalities like importing customer, product, and order data, customizing table columns, multi-account access, performance graphs, detailed tracking with filters and formulas, and translation-ready settings.


Hello gentlemen, in my case the script worked correctly but my site did not have cron configured and in this case I had errors related to this due to the lack of action firing.
Hi Mod,
Yes, WooCommerce sends webhooks in the background, so if cron isn’t running on your server, those jobs just stay in “pending” and never actually fire, even if the script itself is working fine.
You can fix this by enabling WP-Cron again in your wp-config.php file by adding this line of code: define( ‘DISABLE_WP_CRON’, false );
Thanks vishal for this post, you made my day, as i was searching this since morning and it works seamlessly, one small issue we are having we want to fire this hook when the customer has made the payment,
bcoz when order is palased and the payment is not done then we are having issue managing our inventory. so one solution is that the webhook is only fired when the payment is done so everything is fine. thanks once again
Hi Vikram,
Could you please let me know if it’s alright for the webhook to get triggered only when the order status is ‘completed’?
Hi Vishal
Thanks for sharing the script, when you fill more of the column in towards the end you say
“My Google Apps script to fetch all the above information is now modified as shown below”
there is no script showing on the page. Can you post it please as I’ve been trying to work at more data but some just won’t work
Thanks in advanced.
Hi Shane,
The post has been updated with the script based on your requirement. Please refer to the script below the heading ‘Fetching Full WooCommerce Order Information’.
Hey Vishal, Kudos for the script and for sharing this!
I was wondering where can I find the additional field IDs to be added to the script in order to also retrieve the shipping information such as customer Address, zip code, country etc to have the full order information.
Many thanks!
M
Hi,
What code allows me to access custom checkout fields? The rest all works but I cant see the values of the custom fields
hi!! Somebody can help me exporting bookings to google sheets ? Thanks!
Hi Marto, Which plugin are you using for bookings? You would need to get some custom development done for achieving this. You can get in touch with the plugin owner for that.