Many online businesses need WooCommerce custom checkout fields on their checkout page for some important functions related to their eCommerce stores. Like a cake shop might need extra checkout fields like a delivery date or a custom message, and similarly for any other kind of business.
A huge advantage in WordPress is that we can add WooCommerce extra custom fields very easily on the checkout page like after Billing & Shipping fields, or before the Place Order button & so on. In this post, we will check how to add custom fields on the WooCommerce Checkout page.
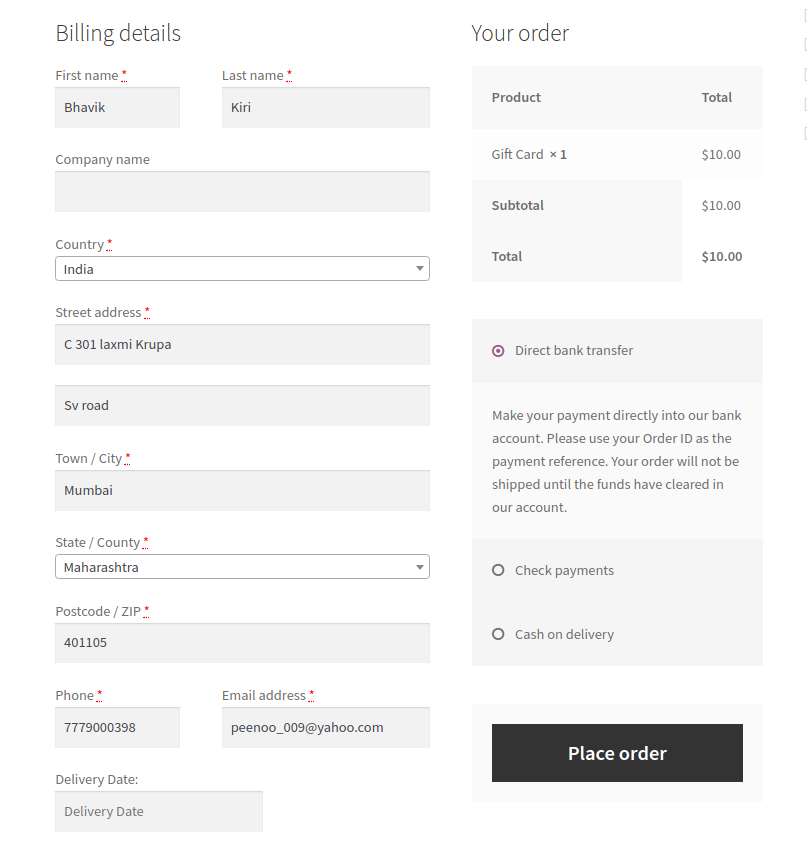
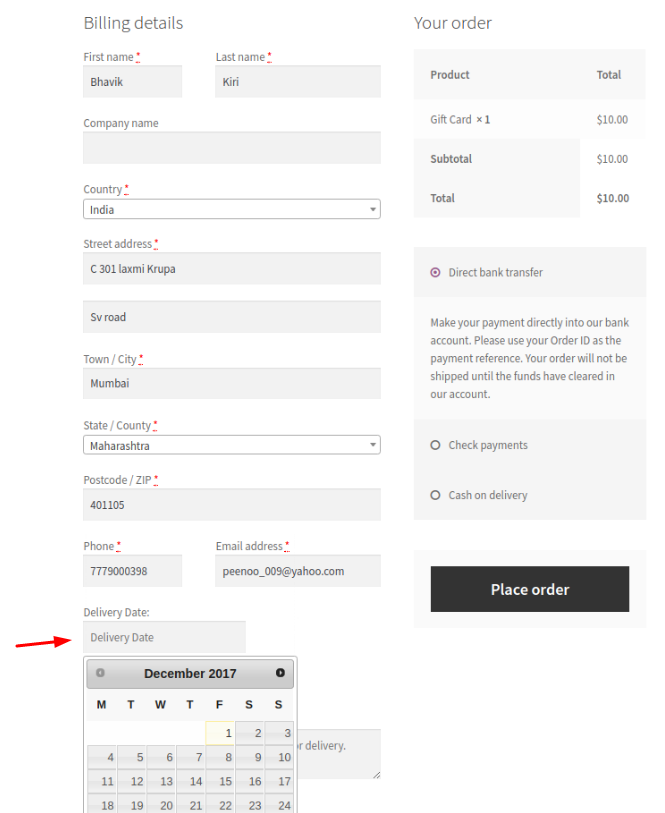
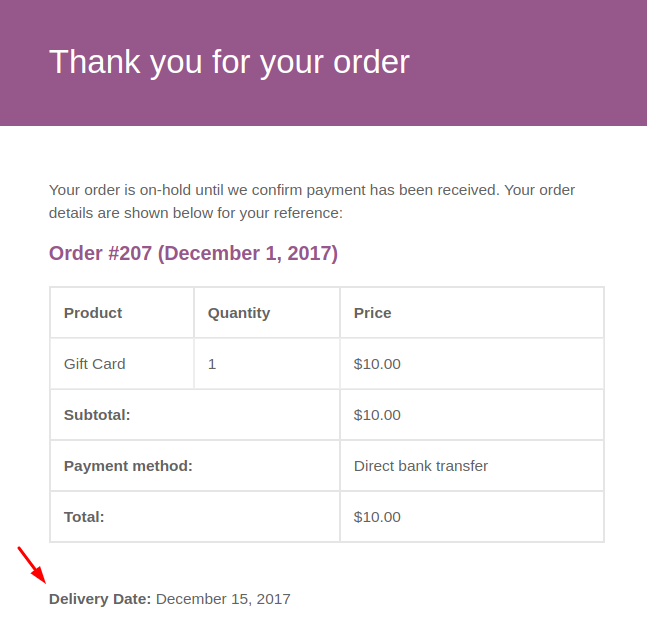
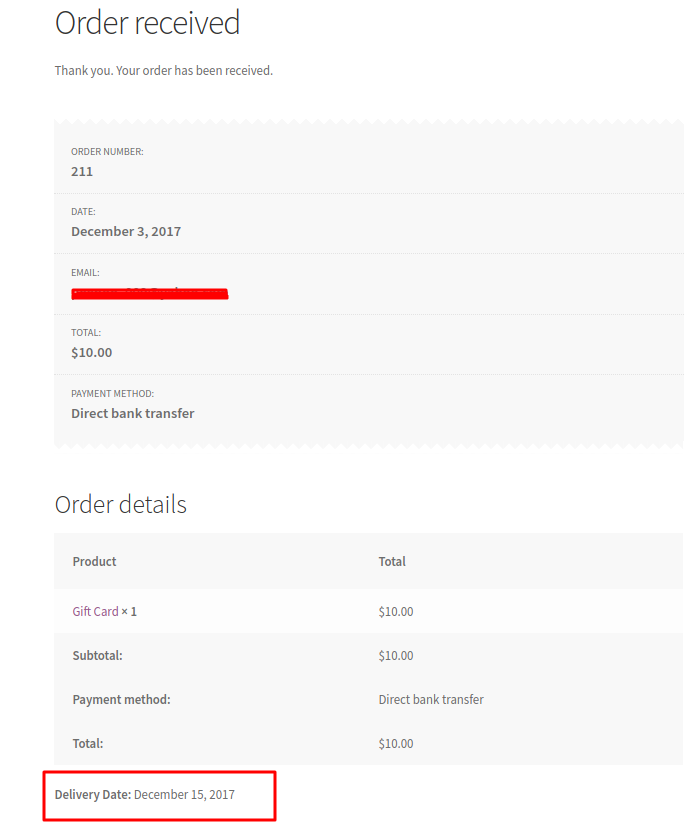
We will demonstrate by adding one extra field named “Delivery Date” on the WooCommerce checkout page after billing fields. This custom field allows customers to select the delivery date for their order. We will also display the custom field (delivery date) in Email notifications & on the Order Received page (Thank you page).
You can also add the custom field by following the post, you need to add all the code snippets in the active theme’s functions.php file.
Let’s divide it into 3 sections.
- Adding the new custom field on the WooCommerce checkout page
- Displaying the custom field in Email notifications
- Displaying the custom field on WooCommerce Thank you page
1. Adding custom field on the WooCommerce checkout page
You can add the new custom field in various places on the WooCommerce Checkout page. WooCommerce has defined many actions for the checkout page, making checkout form customization very easy. Ideally, I would like my fields after the billing or shipping address fields.
We will add a custom field below the billing address fields. To add that field below billing address we will use action woocommerce_after_checkout_billing_form.
add_action( 'woocommerce_after_checkout_billing_form', 'display_extra_fields_after_billing_address' , 10, 1 );

function display_extra_fields_after_billing_address () {
    ?>
    <p>
        <?php _e( "Delivery Date: ", "add_extra_fields"); ?>
        <br>
        <input type="text" name="add_delivery_date" class="add_delivery_date" placeholder="<?php _e('Delivery Date', 'add_extra_fields'); ?>">
    </p>
    <?php
}

As we are allowing customers to select the delivery date for the order, we will need a calendar as well for our field. You can also try this with a simple text field to keep it simple.
We will add the calendar using jQuery datepicker. To do that, we will need to include it’s necessary Javascript & CSS files. We will use WordPress action wp_enqueue_scripts to add those files.
You can skip the below part if you are adding any other type of field like text field, or radio button, checkbox, etc.
add_action( 'woocommerce_after_checkout_billing_form', 'display_extra_fields_after_billing_address', 10, 1 );

function display_extra_fields_after_billing_address() {
    _e( "Delivery Date: ", "add_extra_fields" );
    ?>
    <br>
    <input type="text" name="add_delivery_date" class="add_delivery_date" placeholder="Delivery Date">
    <script>
        jQuery(document).ready(function($) {
            $(".add_delivery_date").datepicker({
                minDate: 0,
            });
        });
    </script>
    <?php
}

add_action( 'wp_enqueue_scripts', 'enqueue_datepicker' );

function enqueue_datepicker() {
    if ( is_checkout() ) {
        // Load the datepicker script (pre-registered in WordPress).
        wp_enqueue_script( 'jquery-ui-datepicker' );

        // You need styling for the datepicker. For simplicity I've linked to Google's hosted jQuery UI CSS.
        wp_register_style( 'jquery-ui', '//code.jquery.com/ui/1.11.2/themes/smoothness/jquery-ui.css' );
        wp_enqueue_style( 'jquery-ui' );
    }
}
In my case, I have attached function display_extra_fields_after_billing_address() to the WooCommerce action. First, we print the label “Delivery Date” and add one input text type field for the datepicker, for which we can use the jquery datepicker() function.
We have taken the class name of the field: add_delivery_date & configured it to be a datepicker. If this is not added, then it will only work as a text field & not display a calendar when you click on it
Then we have attached enqueue_datepicker() function with WordPress action. In this function, we add the jQuery datepicker and its style using the wp_enqueue_script().
Once we have added the above code snippet, it will display our custom field below the billing address fields.

Some other places where you can add your custom field:
| Position on checkout page | Hook name |
|---|---|
| Before Billing fields | woocommerce_before_checkout_billing_form |
| After Shipping fields | woocommerce_after_checkout_shipping_form |
| Before Shipping fields | woocommerce_before_checkout_shipping_form |
| Before Customer Details | woocommerce_checkout_before_customer_details |
| After Customer Details | woocommerce_checkout_after_customer_details |
There are many other hooks available on the checkout page which give you total control & freedom to place the field where you want. Above 5 are just a handful of them.
2. Displaying the custom field in Email notifications
We have added the new custom field on the WooCommerce checkout page. Now we need that field to appear in the customer email too. So let’s take a look how to add the custom field in the email.
To display the custom field in the email, we will first need to store the custom field data in the database. We will store it in WordPress wp_postmeta table.
We will use WooCommerce action woocommerce_checkout_update_order_meta for it. It will be called when we click on the Place order button on the checkout page.
add_action( 'woocommerce_checkout_create_order', 'add_order_delivery_date_to_order' );

function add_order_delivery_date_to_order( $order ) {
    $delivery_date = isset( $_POST['add_delivery_date'] ) ? sanitize_text_field( $_POST['add_delivery_date'] ) : '';
    if ( $delivery_date ) {
        $order->update_meta_data( '_delivery_date', $delivery_date );
    }
}
We have attached add_order_delivery_date_to_order() function to WooCommerce action. It will add the delivery date to the post meta table. We verify that the customer has selected the date before adding it to the database.
If a customer has selected the delivery date then we store it in the wp_postmeta table using WordPress function add_post_meta(). This function requires post_id, meta key & meta value. Here, in our case we have used Order id as our post_id, meta key will be _delivery_date & meta value will be the Delivery date selected the customer.
add_post_meta( $order_id, '_delivery_date', sanitize_text_field( $_POST ['add_delivery_date'] ) );
It’s recommended that you sanitize your $_POST variable data, we have used sanitize_text_field() function for it. It removes line breaks, tabs, and extra whitespace from the string.
After storing the Delivery date in the database we will display in the customer email. We will use WooCommerce action woocommerce_email_order_meta_fields. This filter allows adding custom fields to the email. Here, in our case custom field is a Delivery date.
add_filter( 'woocommerce_email_order_meta_fields', 'add_delivery_date_to_emails', 10, 3 );

function add_delivery_date_to_emails( $fields, $sent_to_admin, $order ) {
    $delivery_date = $order->get_meta( '_delivery_date', true );
    if ( $delivery_date ) {
        $fields['Delivery Date'] = array(
            'label' => __( 'Delivery Date', 'add_extra_fields' ),
            'value' => $delivery_date,
        );
    }
    return $fields;
}
We have attached add_delivery_date_to_emails() function to the WooCommerce filter. In this function we have 3 parameters $fields, $sent_to_admin & $order.
The $order variable is the object of the order, we will use it for fetching the Order Id. We will fetch the Order id depending on the WooCommerce version. If the WooCommerce version is greater than 3.0.0 then we will use the get_id() method. If it is less than it, then we will directly fetch the id key from the order object.
Once we have the order id we need to fetch the delivery date from the wp_postmeta table. To do that we will use WordPress function get_post_meta(). In this function, we need to pass the post_id, meta key, single value.
$delivery_date = get_post_meta( $order_id, '_delivery_date', true );
Here, in our case order id is our post_id, meta key is _delivery_date and single is true. If single is true it will return the single value of the meta key.
Initially, $fields variable will be an empty array. We will add the custom field in the $fields array, we will have Delivery Date as the key of the array. In this array, we have to pass 2 parameters label & value.
- label: Name of the field
- value: Value that needs to be displayed
$fields[ 'Delivery Date' ] = array(

'label' => __( 'Delivery Date', 'add_extra_fields' ),

'value' => $delivery_date,

);
If we want that email should be sent to the store Admin also, then we will set the $sent_to_admin variable to true. The default value of this variable is false, so email will not be sent to the admin.
After adding the above code snippet, the custom WooCommerce field will be displayed in the customer email.

3. Displaying the custom field on WooCommerce Thank you page
Now, to display the custom field on the WooCommerce Order Received page, we will use WooCommerce filter woocommerce_order_details_after_order_table. This filter will add the custom data after the order details table.
add_action( 'woocommerce_thankyou', 'add_delivery_date_to_order_received_page' );

function add_delivery_date_to_order_received_page( $order_id ) {
    $order = wc_get_order( $order_id );
    $delivery_date = $order->get_meta( '_delivery_date', true );
    if ( $delivery_date ) {
        echo '<p><strong>' . __( 'Delivery Date', 'add_extra_fields' ) . ':</strong> ' . $delivery_date . '</p>';
    }
}
We have attached add_delivery_date_to_order_received_page() to the WooCommerce filter. The parameter of this function is Order object, using it we will fetch the order id. We need the order id to fetch the selected delivery date from the wp_postmeta table.
I have already explained how do we fetch the order id & delivery date from database in above section.
For displaying the delivery date we will first check if it is not blank. Then we will display our label Delivery Date and selected delivery date of the customer.
if ( '' != $delivery_date ) {

echo '<p><strong>' . __( 'Delivery Date', 'add_extra_fields' ) . ':</strong> ' . $delivery_date;

}
Once we have added above code snippet Order received page will display the custom field as follow:

That’s it.
Here is the full code snippet.
add_action( 'woocommerce_after_checkout_billing_form', 'display_extra_fields_after_billing_address', 10, 1 );

function display_extra_fields_after_billing_address() {
    _e( "Delivery Date: ", "add_extra_fields" );
    ?>
    <br>
    <input type="text" name="add_delivery_date" class="add_delivery_date" placeholder="Delivery Date">
    <script>
        jQuery(document).ready(function($) {
            $(".add_delivery_date").datepicker({
                minDate: 0,
            });
        });
    </script>
    <?php
}

add_action( 'wp_enqueue_scripts', 'enqueue_datepicker' );

function enqueue_datepicker() {
    if ( is_checkout() ) {
        // Load the datepicker script (pre-registered in WordPress).
        wp_enqueue_script( 'jquery-ui-datepicker' );

        // You need styling for the datepicker. For simplicity I've linked to Google's hosted jQuery UI CSS.
        wp_register_style( 'jquery-ui', '//code.jquery.com/ui/1.11.2/themes/smoothness/jquery-ui.css' );
        wp_enqueue_style( 'jquery-ui' );
    }
}

add_action( 'woocommerce_checkout_create_order', 'add_order_delivery_date_to_order' );

function add_order_delivery_date_to_order( $order ) {
    $delivery_date = isset( $_POST['add_delivery_date'] ) ? sanitize_text_field( $_POST['add_delivery_date'] ) : '';
    if ( $delivery_date ) {
        $order->update_meta_data( '_delivery_date', $delivery_date );
    }
}

add_filter( 'woocommerce_email_order_meta_fields', 'add_delivery_date_to_emails', 10, 3 );

function add_delivery_date_to_emails( $fields, $sent_to_admin, $order ) {
    $delivery_date = $order->get_meta( '_delivery_date', true );
    if ( $delivery_date ) {
        $fields['Delivery Date'] = array(
            'label' => __( 'Delivery Date', 'add_extra_fields' ),
            'value' => $delivery_date,
        );
    }
    return $fields;
}

add_action( 'woocommerce_thankyou', 'add_delivery_date_to_order_received_page' );

function add_delivery_date_to_order_received_page( $order_id ) {
    $order = wc_get_order( $order_id );
    $delivery_date = $order->get_meta( '_delivery_date', true );
    if ( $delivery_date ) {
        echo '<p><strong>' . __( 'Delivery Date', 'add_extra_fields' ) . ':</strong> ' . $delivery_date . '</p>';
    }
}
It’s very easy to customize the WooCommerce checkout page. There are a number of plugins available as well to do the same. But if you are looking for something simple like a text field or a single new field, then you could probably custom code it instead of installing a plugin.
Some of the free plugins are:
I took the above example considering our Order Delivery Date plugin for WooCommerce. Here we have added a Delivery Date field & also Delivery Time field. The plugin provides a lot of controls to the site admin ranging from same-day & next-day delivery charges, creating custom delivery schedules for optimizing local deliveries, real-time sync of your deliveries with Google Calendar & much more. Check out the plugin to solve your delivery needs.


Thank you for this tutorial on how to add custom fields on woocommerce checkout page. Lots of people always ask this, you can do this by either code manually or you can use checkout plugin.
Hi, This code is working fine.
But I want to display the date field in woo-commerce order page in back-end.
Thanks Vishal! This is very helpful.
I managed to add a Date picker. How do we show error if customer didn’t select a date and click “Place order” button? In short, how can we make the Date picker mandatory?
Thank you very much! You did solving my problem and save my money. I wanr read this blog and add to bockmarks!
Is there a way I can have this date appear on the back-end Order page as well?
Tim