We all are well aware of the fact, that setting appointments can involve a lot of manual efforts if these are not taken care of properly. Sometimes a website and your secretary cannot be enough to get this job done. The Booking & Appointment Plugin for WooCommerce offers a very simple, yet effective solution that will take care of all your appointment scheduling needs with WordPress.
Today we shall learn how to set up Appointments with WooCommerce where we will deal with appointments on a recurring weekday basis. This implies that your appointment schedule is based on the same weekdays every week: like every Monday or Friday.
Please note, this plugin can only be used for websites built on the WordPress platform with WooCommerce.
These settings work differently for Admin and Customers, so let us look at these two sections separately.
Admin Section
Appointments can be for various scenarios ranging from a simple hair spa to an appointment with the doctor.
For better understanding, let us take an instance of booking an appointment with a doctor where he is available from Monday to Thursday and his time slots would be 10 AM to 2 PM and in the evening between 4 PM to 7 PM on these weekdays. Let us create this product that will book appointments for visiting the doctor.
The first step will be creating a product from the Products -> Add Product link.
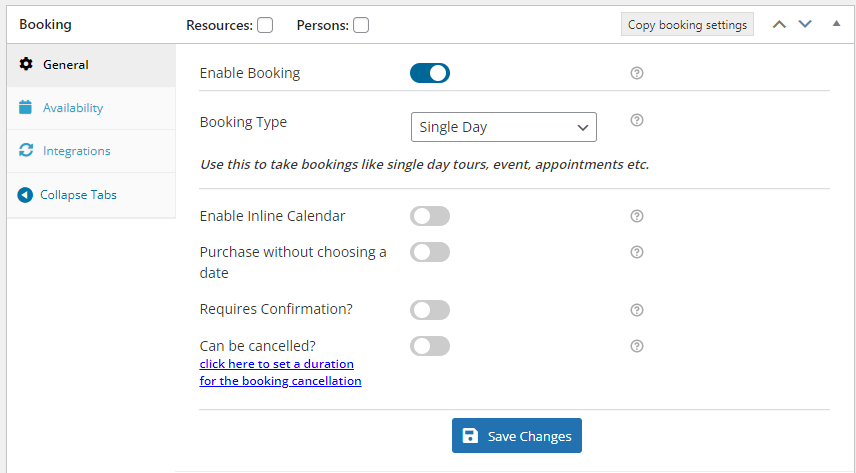
On the same page, you will also find the Booking Meta Box that allows you to set up your bookable product. Enable settings in the Booking Meta box by clicking the Enable Booking option as shown below:

Enable booking option
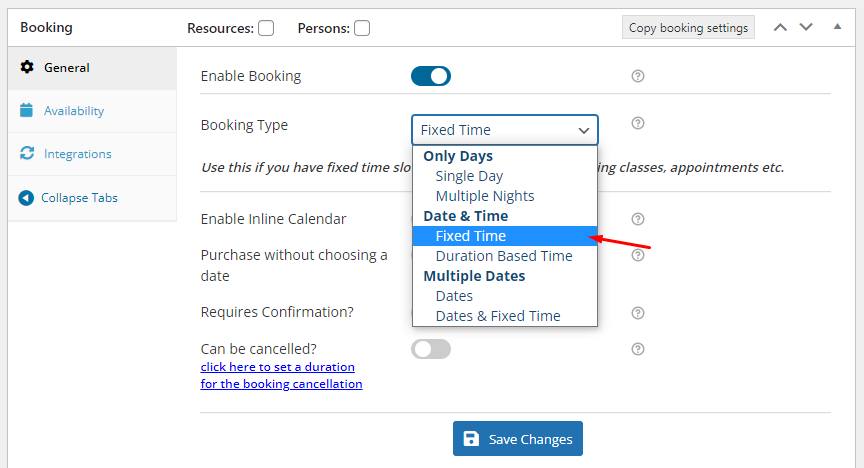
Now click on the Booking type drop-down and select the booking type as Date & Time -> Fixed Time as shown below and click on the Save Changes button.

Moving forward, add weekdays when the doctor will be available along with the time slots for booking appointments which can be done from the Availability tab.
First, select the days from the Weekdays table and also add the maximum number of appointments that can be taken on that day as shown below:

Select Weekdays for booking appointments
Thus these settings will ensure that the selected weekdays will be available every week for booking an appointment and will be repeated for the number of dates you have selected in the Number of dates to choose a field as shown in the above screenshot.
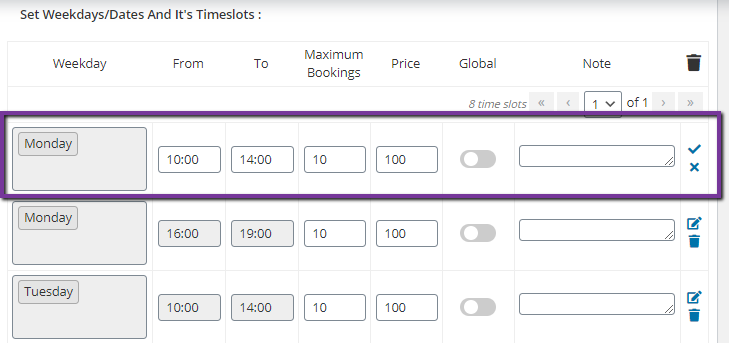
Now add the timeslots for booking appointments from Set Weekdays/Dates & It’s Timeslot table. The selected weekdays will appear and you can add different timeslots for each weekday as shown below. Click on the Save Changes button to save these settings.

Add Timeslots for booking appointments
The maximum Bookings field allows you to set maximum appointments for that particular timeslot. Once the threshold is reached, the timeslot is locked for taking further bookings.
The Price for the time slot field will let you add different prices for each time slot. In the above instance, the $100 price is already set to the Regular price ($) option in the Product data meta box and hence you can leave that field blank and just add the From time & To time for each time slot.
Note – It is mandatory to add Regular Price for the product on the Product Page irrespective of adding price in the Availability tab. This ensures that the product is available on the Shop page for selling and you can move that to the cart.
You can delete a timeslot by clicking on the Delete icon next to each timeslot as shown in the above screenshot. Also, now you can edit a timeslot by clicking on the Edit icon present there. In the case of editing a timeslot, you can change the timings and then click on the checkbox icon to update the time slot. There is also the close icon if you don’t want to edit the time slot.

Edit & Delete timeslots
Now moving further to the other features of this plugin. It is imperative for an appointment system to allow you to specify how much time in advance, the appointment can be booked. This ensures that customers avoid booking a slot for an appointment just a few minutes before the actual timing.
Hence by using this plugin you can specify the number of hours before which the bookings will be taken. This can be added in the Advance Booking Period field which is present under the Availability tab and has been set to 24 hours for the above-mentioned instance.

Adding Advance Booking Period & Number of dates to choose
This implies that an online appointment booking can be done only 24 hours prior to the appointment date. Thus booking for the same day slot will not be possible and only next day bookings will be enabled.
The Number of Dates to choose field lets you determine the maximum number of days for booking appointments from the present day. It could be set to a month (30 days) or even a year (365 days). Again for this instance, we have set it to 365 days, which means the calendar will show dates for a year for booking an appointment.
Once you have completed all the above steps, the product is now ready to take bookings for doctor’s appointments.
Let us now look at how these settings would reflect on the front end for customers to make bookings.
Customer Section
The newly created product to take bookings for Dr. Phil’s Clinic will appear on the front end of the website like shown in the below screenshot.

Product displayed on the front end
Select the date of appointment from the calendar by clicking the Start Date field. Only the selected weekdays which were set in the admin section will be enabled as shown below:

Select Date for appointment
Now add the appointment timeslot by clicking on the Booking Time field. The available timeslots for the selected date will be displayed and you can book your preferred appointment time.

Selecting timeslot from drop-down
Once you select the start date and time slot, the Add to Cart button will be enabled as shown below:

Add to Cart button is enabled
When you click the Add to Cart button, the order is added to your cart, and clicking the View Cart button will redirect you to the Cart page which will show the appointment details as shown below:

Details on the Cart page
Here you can click on Proceed to checkout button to go to the Checkout page which gives you a preview of the actual order. Please ensure you check everything and then click on the Place Order button.

Booking details on Checkout page
Your order is now placed and you will receive an order confirmation as shown below:

Order Confirmation page showing all booking details
An email notification is sent to the customer and administrator with these appointment details.
Conclusion
The above instance described the setup for booking an appointment with a doctor using Recurring Weekdays. Similarly, you can set up appointments for Massage Centers, Hair Salons, Therapists, etc with this plugin.
We focussed on Simple Products in this post but it is also possible to use this setup with WooCommerce Variations.
Since there is a need to create time slots, the setup took quite some time. If you are doing it for the first time it will approximately take 20 to 30 minutes to complete.
It is actually a boon to have Booking & Appointment Plugin for WooCommerce for booking appointments as it serves multiple purposes. It ensures that you are never over-booked for any day and your customers can only view the available timeslots, thus hampering any booking issues.
This is achieved through an internal mechanism where once the booking reaches the maximum threshold that was set for that time slot, it will automatically become unavailable for further selection for customers.
Thus providing the accurate and robust solution. So why wait? Grab it now!