We have been discussing on sending abandoned cart reminder emails to lost customers to induce them to complete their potential purchases. So understanding the default email templates of Abandoned Cart Pro for WooCommerce plugin is very important as it has paid utmost attention to direct the lost customers back to the store.
Default Email Templates
The following are the three default email templates which are provided by the plugin:
- Initial
- Interim
- Final
These appear under the Templates tab as shown below:
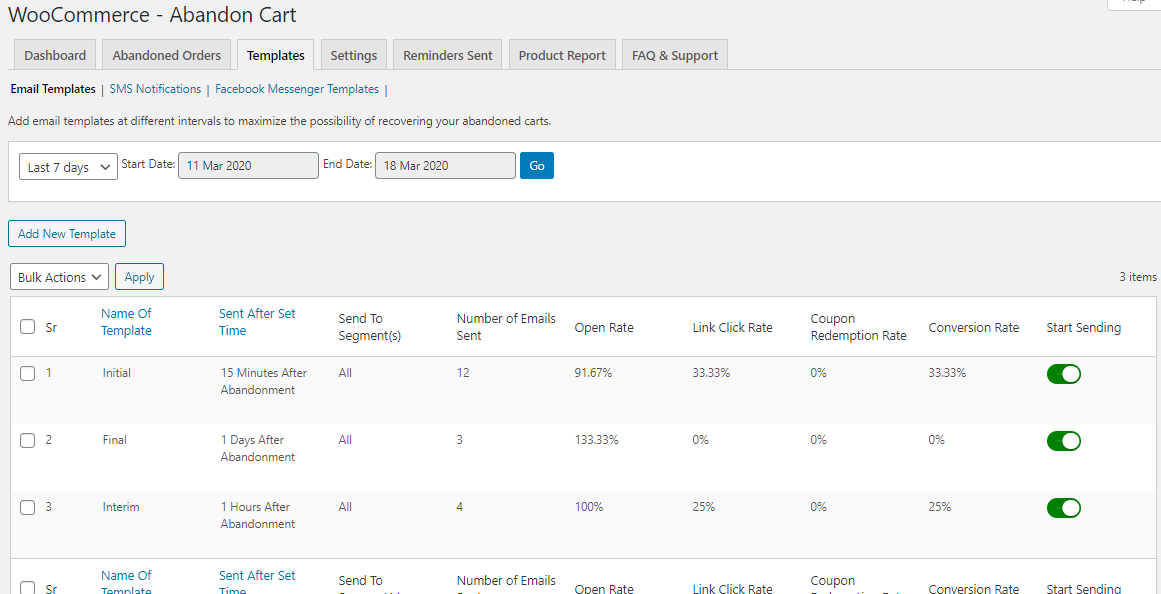
The main difference between the three is the Time set after which an abandoned cart email will be sent to the customer.
Initial – Reminder email will be sent 15 Minutes After Abandonment
Interim – Reminder email will be sent 1 Hour After Abandonment
Final – Reminder email will be sent 24 Hours After Abandonment
Also, there is a discount code associated with the Final template that gives a 10% discount on the Cart total.
Here there is a provision to activate or deactivate the email templates as per the requirement by enabling the Start Sending option which turns into green color. In the above example, all the templates are active which means the reminder emails will start sending to the customer after 15 minutes of cart abandonment.
Contents of an Email Template
The above image displays the Email Templates with the following items:
Name of the template – This displays the name of the template.
Sent After Set Time – It is the time set after which the abandoned cart reminder email will be sent to the customer after the cart is abandoned.
Send To Segment(s) – This section displays the specific customer or group of customers to whom the reminder email will be sent on cart abandonment.
Number of Emails Sent – The total number of reminder emails are sent to the customer is displayed.
Percent Recovery – This shows the percentage recovery of abandoned carts after sending reminder emails to the customers from each type of email templates.
Start Sending – This shows if the template is currently active for sending reminder emails.
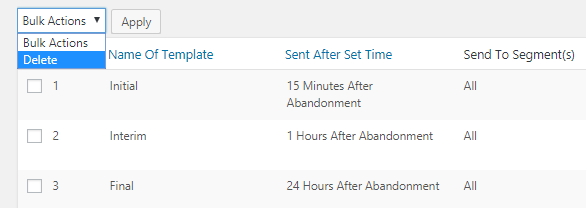
There is a provision to delete multiple templates in just one click using the Bulk Actions option. In order to perform this, you need to select the specific templates and select ‘Delete‘ from the dropdown and click on the ‘Apply’ button as shown below:
You can also make changes to individual templates by simply mouse hover on the name of the template. This will provide you option for Editing the template, Deleting it, or Duplicating the template as shown below:

Let us understand in-depth what all an email template comprises of. We will divide the Edit Template page into 3 different parts for a better explanation.
The first part of the Initial template is as follows:
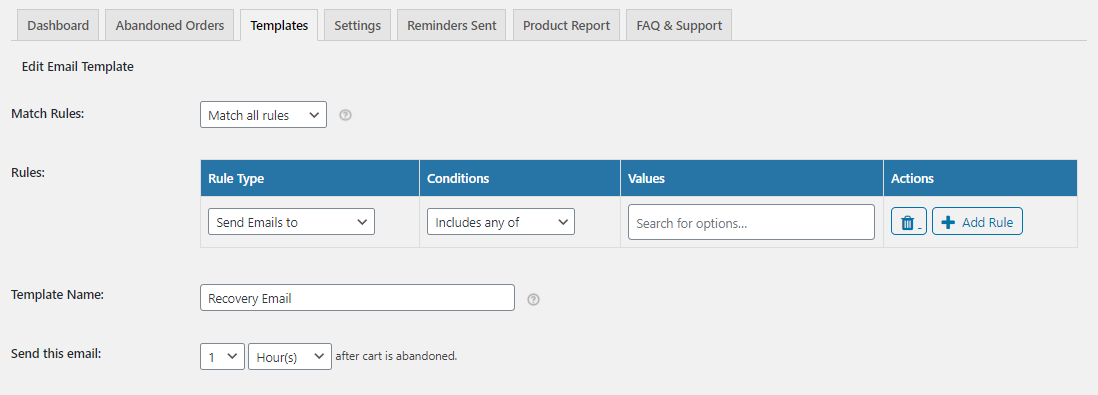
Match Rules – Here you need to select whether to “Match all rules” OR “Match any rules” which will be added below in the Rules section. It allows choosing whether the email template should be sent when all the rules added under the Rules section match OR any one rule matches.
Rules – We have newly introduced this feature in our plugin that allows adding the different rules based on the different conditions in the email templates. You can use this feature to trigger the email templates to target abandoned carts that meet different criteria. There are 9 rules provided by this feature as shown below. You can add single or multiple rules using this option as per your requirements.
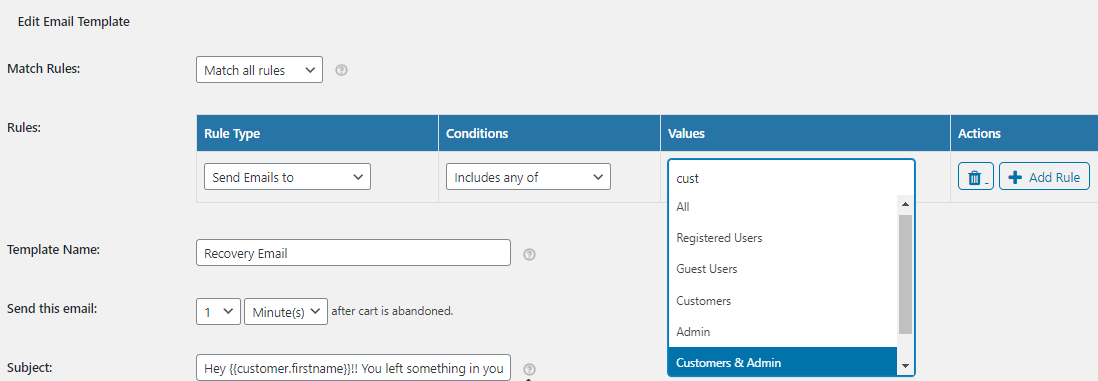
This Rules feature has three main columns – Rule Type, Conditions, and Values as shown in the above image. We will see two rules here to understand this feature better:
Send Emails to –This rule type will allow sending the email template to All, Customers, Registered Users, Guests, Admin, Customers & Admin, and to one or more specific email address when the cart is abandoned. You can select any of them as per your requirement. If you select only registered users here then the email template will be sent only when a registered user’s cart is abandoned. This will send the email reminders to the selected option here when the cart is abandoned.
Cart Items – This rule will be applied and send the email template when the selected products might or might not be present in the customer’s cart.

We will see this feature in-depth in our next blog here.
Template Name – You need to give a name to this template which is written in this field. This name will be displayed on the Email templates listing page to identify the templates by the name.
Send this email – You have to select the time in minutes, hours or days from the drop-down for this template. This means after the cart is abandoned, the reminder email will be sent to the selected segments after the time that is specified in this field. Hence in the above example, the email will be sent 15 minutes after the cart is abandoned.
The second part of the template is as follows:
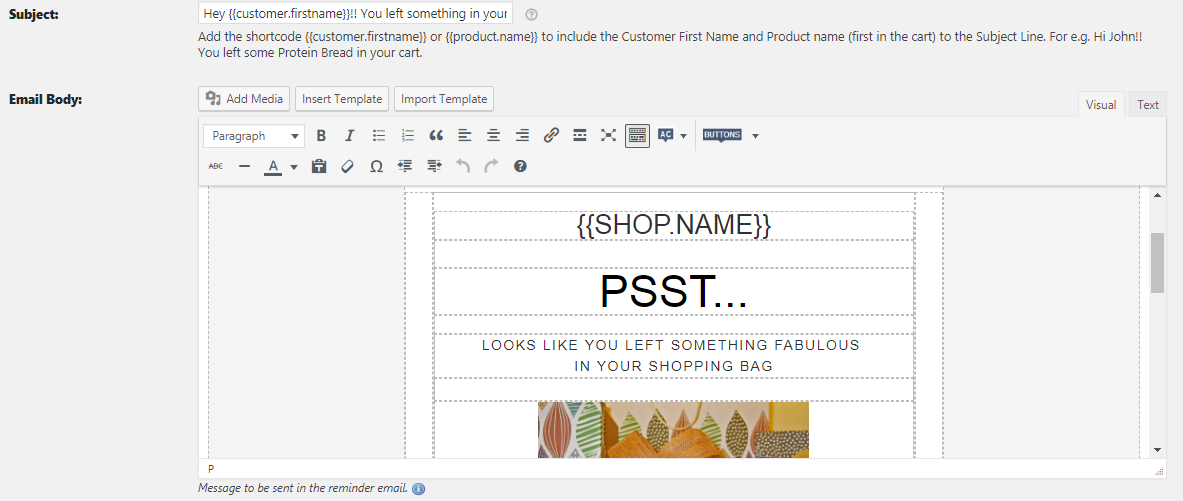
Subject – Here this is the subject of the reminder email which is by default ‘Hey {{customer.firstname}}!! You left something in your cart.’ Here the first name of the customer will be replaced with merge code {{customer.firstname}} and will read as ‘Hey John!! You left something in your cart’ in the Subject Line.
You can change this subject as required. It is important to have a good subject line that induces the lost customer to feel like opening the email in the first place so as to make them proceed towards making the transaction.
Email Body – Now here you can write the email contents which give details of the abandoned cart. It first addresses the Shop Name using a merge code with some responsive sentence as shown in the above image. Then will display the cart details like the name of the product, product price, checkout link, contact number, etc.
You can customize the email body depending on what you wish to highlight in the mail that will force the customer to come back to the store to complete the purchase. For this, the different items which are provided for the email content can be used as follows:

Add Media – This will help you to add an image to the email body which is saved on the computer or device you are using.
The product image can also be resized by admin using the Product Image setting which is located under Abandoned Carts -> Settings -> General tab. The contents are as shown below:

Remember, the default image size is 150 x 150.
Text editor – Basic text editor options for bold, italics, numbering, indentation, underline, strike through, placement of text or paragraph, justifying the paragraph, etc are given. But the 2 most important items introduced in this plugin are ‘AC‘ and ‘Buttons‘ dropdown as shown above on the right side of the image.
AC dropdown gives a list of merge codes that can be used in the email body whereas Buttons show a list of different types of buttons that can be explored.
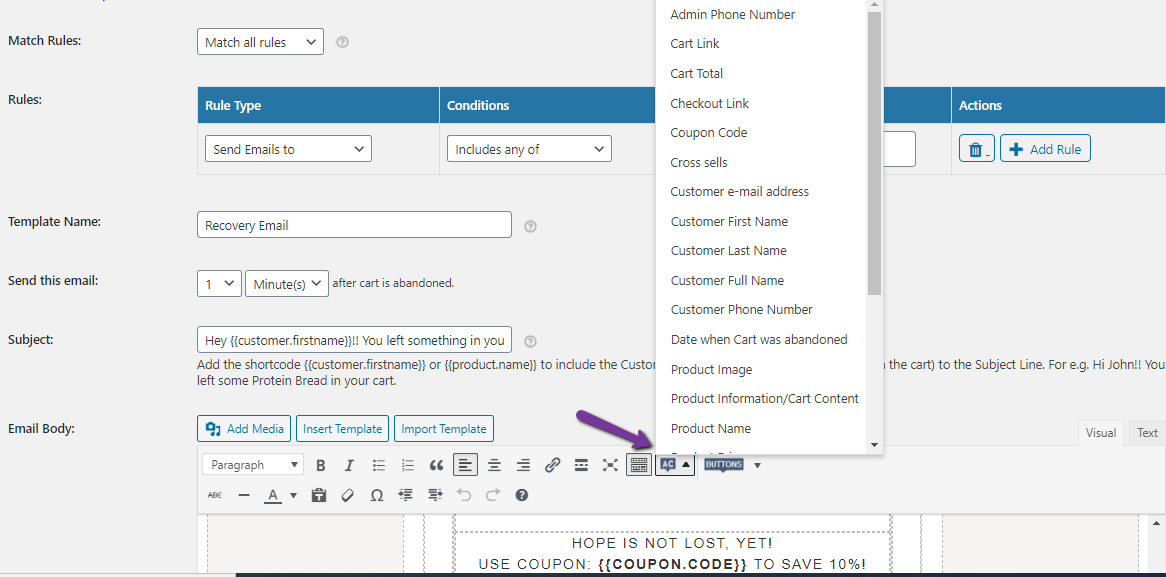
Merge codes: The above is a list of merge codes that can be used for specific items. For example, if you want to have the Product Name to be displayed then you simply click on Product Name from the list. So when this gets added in the email body, the actual product name in the abandoned cart will be picked and displayed in place of this merge code.
So if the product in the abandoned cart was a Red bag, then you do not mention the Red bag, you simply click on the Product Name merge code from the dropdown. So when the email will be sent to the customer it will display Red bag in place of Product Name.
Newly added merge codes {{customer.phone}}, {{admin.phone}} and {{store.address}} when used are replaced with customer’s phone number, admin’s phone number and the store address that is set on the WooCommerce -> Settings page, respectively. Note that the admin’s phone number needs to be added manually and shall be replaced with real-time data in the abandoned cart reminder emails.

Buttons: The Button’s dropdown has 2 items – Cart and Checkout Button. These are used at the end of the email content as per the requirements. Customers will just have to click on the button to either go to the cart or checkout, whatever is provided in the email. The cart button will take him to the cart page and the checkout button will take him to the checkout page.
You can refer to this link to know what should be included in your abandoned cart emails to show better results.
The third part of the template is as follows:
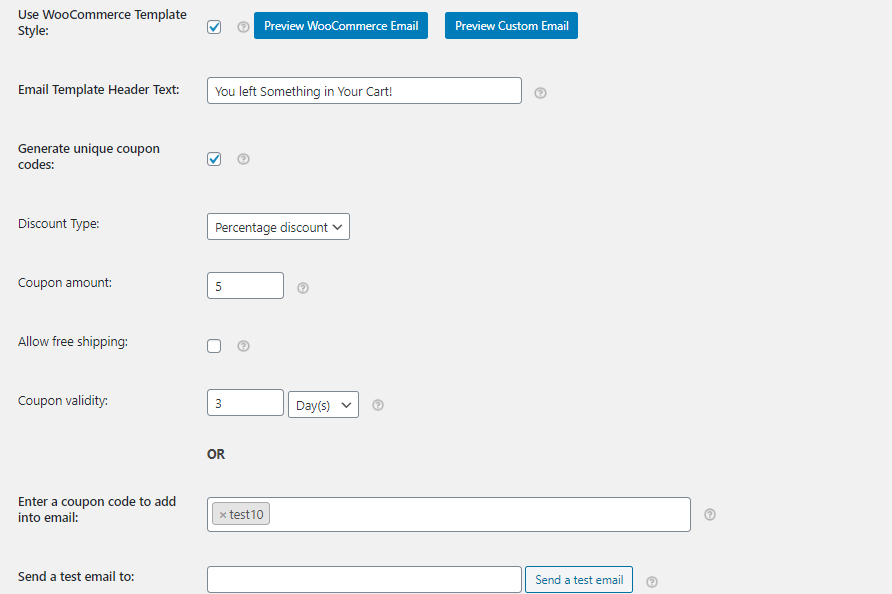
Use WooCommerce Template Style – Here you have 2 options to preview the email to be sent, one is the WooCommerce Style template and the other is the Custom Email template. To choose any of these templates, click on the buttons shown above namely Preview WooCommerce Email and Preview Custom Email.
If you click on the Preview WooCommerce Email, then the abandoned cart reminder email will appear in the popup modal as shown below:

If you click on Preview Custom Email, then the reminder email will appear in the popup modal as shown below:
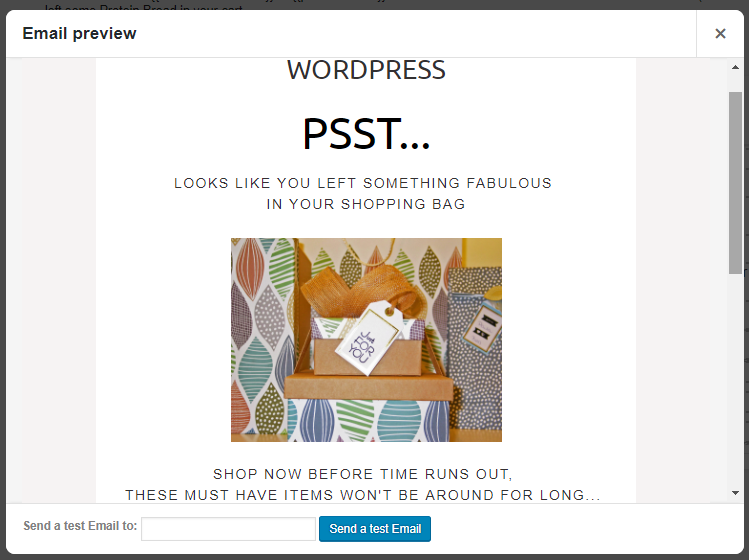
Here, the data shown is in popup modal and taken real-time unlike before, when the data was hardcoded and displayed in the new tab. This preview gives you an essence of how the email will appear to the potential customer as it takes the details of the last order placed.
Email Template Header text – Anything you type here appears on the header of the template which is the blue band as shown in the above image. By default, it is ‘Abandoned Cart Email Template’ text written for the template. This is only applicable when the ‘Use WooCommerce Template Style’ is checked.
Enter a coupon code to add into the email – Here the coupon codes have a significant role as these are a tool for converting non-purchasers to purchasers. You can make unique coupon codes by selecting the parent code.
In order to make a coupon code, you need to go to Coupons tab on the left navigation bar and click on ‘Add Coupon’ button as shown below:

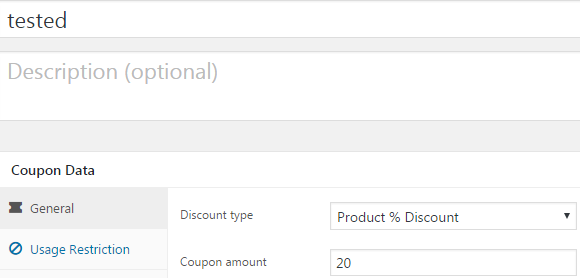
Now enter the name for the coupon code and select publish. Hence a coupon code is created. For this example, we have taken the name as ‘tested’ for the coupon code name and have assigned 20% discount to this code as shown below:
So when you have to assign a coupon code to the email template, all you need to do is type the first 3 characters as shown below for ‘tested’ coupon.

Generate Unique coupon code – To generate a unique coupon code, you need to have a parent code assigned first. The selected coupon code in the setting “Enter a coupon code to add into the email” will be treated as the parent coupon code and all the settings of this coupon code will be inherited and copied to the unique coupon code.
For the above example, if you select ‘tested’ as parent code and you tick on the Generate unique coupon codes checkbox, then the unique coupon which is generated will copy the setting of the coupon code “tested” and a new coupon code will be generated and added to the abandoned cart reminder email and sent to the customers.
So whenever an email is sent to the customer with this template, the coupon code is automatically sent which will provide him 20% discount when he comes back to complete the transaction on the store.
Also, the generated unique coupon code will be the code displayed in the email sent to the customer and will replace the coupon code mergecode ({{coupon.code}}) if mentioned in the email.
Send a test email to – You can have an email address mentioned here where you can receive a test email for this template before sending it to the customer. Hence you can verify the email and confirm the contents before sending it to the customer.

Once all the changes are made on the Edit email template page, you need to click on ‘Update Changes‘ button to save all the changes made to it.
Sending Email Templates
There is a setting that runs in the background where the selected email template will be sent to customers for only those carts which are abandoned after the template is created. The existing abandoned carts will not be associated with the newly created email template.
For instance, if a new template named Recovery Email is created, then the email notification for all abandoned carts after this template was created, will receive this mail.

New Email template created
So now consider a new cart was abandoned on 23rd September 2020, which was after the Recovery Mail template was created.

A new cart was abandoned
Hence this user will receive an abandoned cart reminder email after 30 minutes of her cart abandonment using the Recovery email template. Thus, this setting automatically sends newly created email templates to all the abandoned carts which are captured after the template is created and not to the already existing abandoned orders.
Conclusion
This exhaustive section is the most significant of all as it is imperative to have the email templates as indusive and strong as possible to divert most of the lost customers to complete their transaction. Abandoned Cart Pro for WooCommerce plugin has provided every possible option to the email template by default without having to worry on how will you pull your potential customers to the store.
So get to this plugin and have all your worries set aside!!